
User`s guide


59
Agilent 5500 SPM
User’s Guide
Agilent Technologies
4
Preparing for Imaging
Setting Up the Scanner Assembly 59
One-Piece Nose Assembly 60
Inserting the One-Piece Nose Assembly 60
Removing the One-Piece Nose Assembly 62
Inserting a Probe in the One-Piece Nose Assembly 64
Two-Piece Nose Assembly 67
Inserting the Body of the Two-Piece Nose Assembly 67
Removing the Body of the Two-Piece Nose Assembly 68
Inserting a Probe in the Two-Piece Nose Assembly 69
Inserting the Scanner and Connecting Cables 70
Aligning the Laser 72
Inserting and Aligning the Detector 79
Mounting the Sample 83
Using the Video System 86
Care and Handling of the Probes and Scanner 90
Probes 90
Nose Assembly 90
Two-Piece Nose Cone Cleaning 90
Scanner 90
The Agilent 5500 SPM is capable of imaging in many different modes.
Several steps of the imaging process are similar or identical, however,
for all modes. This chapter will cover the steps that are common to most
imaging procedures.
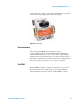
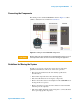
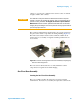
Setting Up the Scanner Assembly
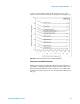
As mentioned earlier, the Agilent 5500 SPM is a tip-scanning system, in
which the probe is raster-scanned across the stationary sample. When an
electric field is applied to the scanner’s piezo elements, they elongate or
contract, depending on the direction of the field.The Z-motion of the tip
is achieved by elongation or contraction of the piezo element in the
scanner. X/Y raster scanning is achieved by applying alternating