
Technical data

Chapter 10 287
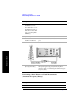
Distance to Fault
Measuring Distance to Fault
Distance to Fault
2 [Antenna/Cable]
3 [Distance to Fault] The distance to fault measurement takes a few
seconds to load.
4 On [Freq Range] select
Auto.
Each time you press this softkey, the selected
option changes.
5 On [Units] select
Meters or Feet.
Each time you press this softkey, the selected
option changes.
6 [Start Distance] For greater ease of use, you do not need to display
the measurement results for the entire cable length
that you are measuring. If you want to zoom in on a
small section of the cable, enter here the distance
from the start of the cable. If you want to look at
the whole cable, leave this at the default setting of
0 m (0 ft).
If your Start Distance is 0 m (0 ft), you will see a
peak corresponding to 0 m (0 ft). This is caused by
reflection from the junction between your analyzer
and the cable under test. This does not necessarily
indicate a problem, but be sure that this connection
is tight and clean.
7 Using the numeric
keypad, enter the start
distance for the part of
the cable that you wish
to zoom in on.
After entering the Start Distance value, press [m]
for meters, or [ft] for feet, to use the new value.
8 [Stop Distance] After entering the Stop Distance value, press [m]
for meters, or [ft] for feet, to use the new value.
Step Notes