
Technical data


340 Chapter 12
GSM and EDGE Analyzer
Optional GSM and EDGE Tx Analyzer Measurement Settings
GSM and EDGE Analyzer
• “Adding a Marker” on page 365
• “Compensating for the Loss of an External Cable and Attenuator” on page 367
• “Setting Average, Sweep, and Restart” on page 368
Setting your Scan Mode
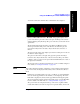
The selected Scan Mode provides three different methods of specifying the channels
you wish to look at. These are Range Mode, Auto Mode, and List Mode:
• Range Mode: All channels between the Start and Stop Freq/Channel are
displayed. The channels are separated by the Freq/Channel Step value. Metrics
are only computed for the single channel indicated by the vertical yellow line,
which can be adjusted by using the [Display], [Position] menu keys. For further
details, see “Setting the Display Position” on page 349.
If the channel you specified using the [Position] menu key can not be
demodulated, you will see the message “No valid Slot Sync found” displayed on
the graphic portion of the screen for all three views, and the numeric metrics at
the bottom of the screen will be dashed out. In the Power versus Time view, the
PvT Mask will not be shown even if you have switched it on.
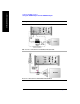
To Set the Scan Mode to Range:
Step Notes
1 [Freq/Chan]
2 [Scan Mode] Each time you press this key, the selected
option changes. Set Scan Mode to Range.
3 [Start Freq] Enter the start frequency or the start channel
for your desired scan, and terminate it with
the appropriate Units key.
4 [Stop Freq] Enter the stop frequency or the stop channel
for your desired scan, and terminate it with
the appropriate Units key.
3 [Step Size] Enter the step size for your desired scan, and
terminate it with the appropriate Units key.
For further details on Step Size, see “Setting
the Start Frequency/Channel” on page 343.