
Technical data

38 Chapter 1
Getting Started
Your First 15 Minutes with the E7495A/B
Getting Started
working like a standard on-off button, the E7495A/B power button also lets you put
the test set into standby mode, which conserves battery usage and provides a quick
startup when you are ready to resume measurements.
Make Your First Measurement (Two Port Insertion Loss)
The two port insertion loss measurement is perhaps the most fundamental test set
measurement. It quantifies exactly how much loss is incurred as a signal travels
through a cable or other device. You must account for the signal loss of a connecting
cable in order to produce accurate results for a variety of other measurements.
You can perform this measurement using any of the following devices:
Needed for normalization:
• 60-centimeter (2-foot) normalization jumper cable
• Two 10 dB pads
Devices whose insertion loss you measure:
• 60-centimeter (2-foot) test cable
• 3-meter (10-foot) test cable
• High power attenuator
• N-N barrel
Step Notes
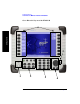
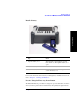
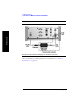
To power on the test set, press
the button.
As soon as you press the power button, the
right LED goes on. The full power-up
sequence can take up to 2 minutes.
To put the test set into standby
mode while the power is on,
press the button briefly for about
a second.
When in standby mode, the left LED is lit.
When you power on the test set again, the
startup takes only about 30 seconds.
To power off the test set, press
the button and hold until both
LEDs above the button go off.
This usually takes about 5
seconds.
When you hold down the button, at first
both LEDs are lit. After about 5 seconds,
both go out.