
Technical data

Chapter 14 391
Return Loss
Measuring Return Loss
Return Loss
range that you will set manually, you can perform one calibration for all three
measurements as long as you calibrate over a frequency range that incorporates all
three of your measurements, and as long as your cables do not change. For this
reason, if you are doing Distance to Fault measurements (using a frequency range
that you have set manually) as well as any type of Insertion Loss measurement,
Agilent recommends that you select your cable type before performing calibrations.
Press [Mode], [Antenna/Cable], [Distance to Fault], [Cable Type] to set the cable
type.
The calibration remains valid until you do any one of the following:
• set the Distance to Fault frequency range to
Auto. Note that the calibration will
become valid again as soon as you switch from
Auto back to Manual Frequency
Range.
• power off the test set
• change the start frequency to a new value that lies below the start frequency of
your previous calibration
• change the stop frequency to a new value that lies above the stop frequency of
your previous calibration
• change any of the jumper leads that you used for the calibration
• change any of the attenuators that you used for the calibration
• change the type of cable specified under the [Cable Type] menu key.
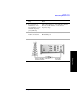
Performing (and Calibrating) a Basic Return Loss Measurement
Select the desired frequency range and calibrate the test set (using calibrated Open,
Short, and Load connectors) for a return loss measurement.
Step Notes
1
Mode
2 [Antenna/Cable]
3 [Return Loss] The return loss measurement takes a few seconds
to load.
4 [Start Freq]