
Technical data

392 Chapter 14
Return Loss
Measuring Return Loss
Return Loss
5 Enter the start
frequency using the
numeric keypad.
6 [Hz], [kHz], [MHz], or
[GHz]
7 [Stop Freq]
8 Enter the stop
frequency using the
keypad.
The stop frequency should be larger than the start
frequency.
9 [Hz], [kHz], [MHz], or
[GHz]
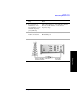
10 Check whether your
analyzer has already
been calibrated over the
frequency range that
you wish to measure. If
it is already calibrated
over the correct
frequency range, you
can omit the next step
(Step 11) and go
straight to Step 12.
The analyzer displays its calibration status on the
top left of the measurement screen. You only need
to re calibrate if you:
• power off the test set
• change the start frequency to a new value that
lies below the start frequency of your previous
calibration
• change the stop frequency to a new value that
lies above the stop frequency of your previous
calibration
• change any of the jumper leads that you used
for the calibration
• change any of the attenuators that you used for
the calibration
• change the type of cable specified under the
[Cable Type] menu key in the Distance to Fault
measurement.
For more information, see “Calibration -
Minimizing your Workload” on page 390.
Step Notes