
Technical data

394 Chapter 14
Return Loss
Measuring Return Loss
Return Loss
NOTE If the Return Loss measurement looks suspect (less than 5 dB), you may want to
perform a Distance to Fault measurement to determine if a noticeable fault exists
and where it may be located. For more information see “Distance to Fault” on
page 277.
Clearing Calibration
Clear Calibration deletes the current calibration data, enabling you to re-calibrate
the instrument for the same frequency range, or for a new frequency range.
To Clear the Measurement Calibration Data:
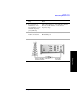
13 [Level] Below the Return Loss display is a table displaying
the Frequency, the Return Loss, and the Standing
Wave Ratio (SWR) of the best and worst return
losses. These values may be changing rapidly. To
isolate a signal, use a single sweep, or apply
averaging to the trace data.
If the Return Loss trace is not visible, you can
change the reference level, or use Autoscale to
have the test set select a reference level for you.
• To choose Autoscale, press [Autoscale].
• To set the reference level manually, press [Ref
Level], enter a value using the numeric keypad,
then press [dB].
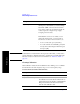
Step Notes
Step Notes
1 [Setup]
2 [Clear Calibration] When you clear the calibration, you will also clear
the calibration for both the One-Port Insertion Loss
measurement and for the Distance to Fault Manual
Range measurement as all three measurements
share the same calibration data.