
Instruction manual


170 Chapter 6
Replacement Procedure
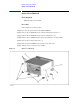
A27 HDD (Hard Disk Drive) Replacement
Replacement Procedure
Step 1. Reverse the order of the removal procedure.
Step 2. Restore backup files onto the new mass storage disk drive as described in “Restore Backup
Files onto the New HDD” on page 170
Step 3. Calibrate the touch screen as described in “Calibration of the Touch Screen” on page 170
Restore Backup Files onto the New HDD
The Backup files is stored in the flash ROM on the A21 PCI DSP card. The file must be
restored in the new mass storage disk drive with the adjustment program. For detail of the
adjustment program, refer to Chapter 3, “Adjustment,” on page 81.
Step 1. Run the adjustment program.
Step 2. Input the GPIB address of the E5061A/E5062A.
Step 3. Input the serial number of the E5061A/E5062A.
Step 4. Choose Spot Adjustment.
Step 5. Choose HDD.
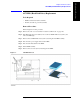
Calibration of the Touch Screen
When you have replaced the HDD on a E5061A/E5062A equipped with an Option 016
touch screen, you have to calibrate the touch screen. Follow the procedure described below
to calibrate the touch screen.
Step 1. Press .
Step 2. Press
Service Menu.
Step 3. Press
Test Menu.
Step 4. Press
Adjust Touch Screen.
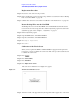
The touch screen calibration screen (Figure 6-4) appears.
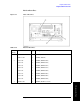
Figure 6-4 Touch Panel Calibration Screen
Step 5. Touch the x mark on the upper left with your finger. The mark x appears also on the lower