
Instruction manual


178 Chapter 6
Replacement Procedure
A1 Source Board Replacement
A1 Source Board Replacement
Tools Required
• TORX screwdriver, T10, T15, and T20
• Flat edge screwdriver
• Open-end torque wrench, 5/16 inch (set to 10 in-lb); or 8mm with 9.5in-lbs can be
alternatively used (for reconnecting SMA connector)
Removal Procedure
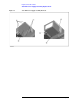
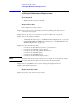
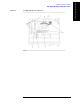
Refer to Figure 6-9 for this procedure.
Step 1. Remove the outer cover as described in “Outer Cover Removal” on page 166
Step 2. Remove the front panel as described in “Front Panel Removal” on page 167.
Step 3. Remove the two TORX T10 screws (item 1) fastening the A1 source board on the rear
panel.
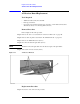
Step 4. Disconnect the all semi-rigid cables (item 2).
NOTE The label on the semi-rigid cable shows the last two digits of the part number.
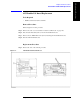
Step 5. Remove the two TORX T10 screws fastening the source board angle (item 3).
Step 6. Slide out the A1 source board (item 4).
Step 7. Remove the two TORX T10 screws fastening the source board angle (item 5)
Replacement Procedure
Step 1. Reverse the order of the removal procedure.
NOTE Fasten the semi rigid cable using a torque wrench for replacement.