
Instruction manual


Chapter 2 29
Performance Tests
Instruction for Using the Performance Test Software
2. Performance Test
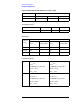
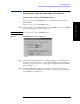
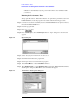
Figure 2-3 IO Config dialog box
Step 6. The USB to GPIB Configuration dialog box (Figure 2-2) appears. Check/change the
setting of the USB/GPIB interface and then click the
OK button (2 in Figure 2-2).
Step 7. In the USB to GPIB Configuration dialog box, click the
OK button (3 in Figure 2-3).
Setting the GPIB address of the equipment
The test program needs the following GPIB address for the equipment.
• 53131A Frequency Counter --- 03
• E4419B Power Meter --- 13
• Z5623A Dynamic Accuracy Test Set --- 12
Setting up the E4419B Power Meter
You must set up the power meter before running the performance test program.
1. Connect the power sensor you use to the power meter’s channel.
• 8482A Power Sensor --- Connect to the channel A for testing the E5061A/E5062A
option 150/250
• 8483A Power Sensor --- Connect to the channel B for testing the E5061A/E5062A
option 175/275
2. Edit a Sensor Calibrattion Table for your power sensor. If you have already edited the
table for your power sensor, you can skip this step. Refer to the E4419B User’s Guide
for further information.
3. Select the Sensor Calibration Table for your power sensor. Refer to the E4419B User’s
Guide for further information.
4. Zero and calibrate the power meter. The reference calibration factor used during the