
User`s guide


Chapter 3 97
Basic Digital Operation
Using Waveform Markers
2. Press Insert Waveform.
3. Highlight the desired waveform segment.
4. Press
Insert Selected Waveform > Insert Selected Waveform > Insert Selected Waveform >
Done Inserting.
You have inserted the same waveform segment three times. If desired, you can highlight a
different waveform segment after each press of the
Insert Selected Waveform softkey.
5. Highlight the first waveform segment.
6. Press
Toggle Markers > Toggle Marker 1, Toggle Marker 2, Toggle Marker 3, and/or
Toggle Marker 4.
7. Highlight the next waveform segment.
8. Press
Toggle Marker 1, Toggle Marker 2, Toggle Marker 3, and/or
Toggle Marker 4.
9. Press
Return.
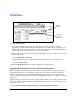
An entry (1, 2,3,4 or 1234) in the Mkr column indicates that a marker is active. No entry
in that column means that all markers are off.
10.Press
Name and Store.
If you exit the softkey menu shown above without saving the changes, you will be
prompted to confirm exiting without saving. When you see this message at the top of the
softkey menu, you can either press the confirmation softkey or press the
Return hardkey to
return to the softkey menu where you can save your changes.
11.Press Editing Keys > Clear Text.
12.Using the alpha/symbol softkeys and the numeric keypad, enter a new file name.
Marker
Column
This entry
shows all
markers on.