
User`s guide


132 Chapter 4
Optimizing Performance
Creating and Applying User Flatness Correction
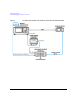
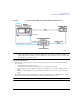
2. Configure the signal generator to interface with the power meter.
a. Press
Amplitude > More (1 of 2) > User Flatness > More (1 of 2) > Power Meter > E4416A, E4417A, E4418B, or
E4419B.
b. Press
Meter Address > enter the power meter’s GPIB address > Enter.
c. For E4417A and E4419B models, press
Meter Channel A B to select the power meter’s active
channel.
d. Press
Meter Timeout to adjust the length of time before the instrument generates a timeout error
if unsuccessfully attempting to communicate with the power meter.
3. Press
More (2 of 2) > Configure Cal Array > More (1 of 2) > Preset List > Confirm Preset.
This opens the User Flatness table editor and resets the cal array frequency/correction list.
4. Press
Configure Step Array.
This opens a menu for entering the user flatness step array data.
5. Press
Freq Start > 26.5 > GHz.
6. Press
Freq Stop > 40 > GHz.
7. Press
# of Points > 28 > Enter.
This enters the desired flatness- corrected frequencies (26.5 GHz to 40 GHz in 500 MHz intervals)
into the step array.
8. Press
Return > Load Cal Array From Step Array > Confirm Load From Step Data.
This populates the user flatness correction array with the frequency settings defined in the step
array.
9. Press
Amplitude > 0 > dBm.
10. Press
RF On/Off.
This activates the RF output and the RF ON annunciator is displayed on the signal generator.
Perform the User Flatness Correction
NOTE If you are not using an Agilent E4416A/17A/18B/19B power meter, or if your power meter
does not have a GPIB interface, you can perform the user flatness correction manually. For
instructions, see Performing the User Flatness Correction Manually below.
1. Press More (1 of 2) > User Flatness > Do Cal.
This creates the user flatness amplitude correction value table entries. The signal generator begins
the user flatness correction routine and a progress bar is shown on the display.
2. When prompted, press
Done.
This loads the amplitude correction values into the user flatness correction array.
If desired, press
Configure Cal Array.
This opens the user flatness correction array, where you can view the list of defined frequencies
and their calculated amplitude correction values. The user flatness correction array title displays