
User`s guide


To set up the Test Automation Module
In the next two exercises, the front panel calibration signal is used as the
source signal. A probe is needed to connect the calibration signal to channel
1 of the oscilloscope. A mask template is created based on the calibration
signal. Then a sequence step is created to test the signal. Failure of the test
is also simulated.
1 Connect the front panel calibration signal to channel 1 of oscilloscope
through a probe.
2 Set the correct probe attenuation factor by pressing 1 . Then
toggle the
Probe softkey to change the attenuation factor to
match the probe you are using.
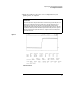
3 Press Autoscale .
4 Press Display , then toggle the Grid softkey to the off position.
5 Press Print/Utility .
6 Press the Sequence Admin softkey.
If you cannot find the Sequence Admin softkey,
press Print/Utility again to display it at the rightmost side of the
softkey menu, then press the Sequence Admin softkey.
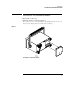
If a warning message "Sequence Admin Protected" is displayed when you
press the Sequence Admin softkey, the sequence is protected. To access the
softkey, flip the recessed protection switch on the module to the unprotected
position using the tip of a ball-point pen. Then press the Sequence Admin
softkey.
Quick Start
To set up the Test Automation Module
12