
Specifications
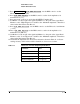


11-30
Performance Tests
Error Detector Performance Tests
2. Press and set the Clock Output Sig Gen Freq to 10 GHz, the Data
output amplitude to 2 Vpp with a Data Hi-level of 0V. A 2^23−1 PRBS pattern will
now be output from the pattern generator to the error detector.
3. Press the key and set the to 1x10^−7
followed by .
4. Press , a value of approximately −120 mV will be
present on the HP 70004A display.
5. Ensure that the system is in Sync and showing 0 errors before continuing. Press the
align key if this is not so.
6. Press followed by and reduce the Data amplitude
slowly until errors start to occur.
7. Press followed by . Adjust the 0/1
threshold towards 0V slowly. The display should now read 0 errors. Continue to adjust
0/1 Threshold until errors start to occur again.
8. Press followed by and reduce the Data amplitude
slowly until the display shows 0 errors. Continue to reduce the Data amplitude until
errors begin to occur once more.
9. Steps 7 and 8 should be repeated until it is no longer possible to find an error-free zone
or until the Data amplitude reads 500 mV.
10.If an error free zone can no longer be found then the value of Data Amplitude/10 is
entered on the Calibration Data sheet for the input sensitivity. If the Data amplitude
reaches 500 mV then the figure 50 mV is entered for the Input sensitivity.
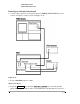
INST PRESET
input & eye
Eye Edge Threshold
ENTER
0/1 Threshold Center
CLK DAT
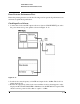
data output
Data Amplitude
input & eye
0/1 Manual Threshold
data output
Data Amplitude