
Oscilloscopes User's Guide


Front-Panel Controls 2
6000 Series Oscilloscope User’s Guide 79
2 If you are triggering on analog channel events, turn the
Trigger Level knob to the trigger threshold to a level that your
waveform will cross.
3 To begin a single acquisition, press the Single key.
When you press Single, the display is cleared, the trigger
circuitry is armed, the Single key is illuminated yellow, and
the oscilloscope will wait until a trigger condition occurs
before it displays a waveform.
When the oscilloscope triggers, the single acquisition is
displayed and the oscilloscope is stopped (the Run/Stop key is
illuminated in red).
4 To acquire another waveform, press Single again.
Auto Single
Auto-trigger will generate a trigger for you if one is not found in
the predetermined time (about 40 ms) after you press Single. If
you want to make a single acquisition and you are not
particularly interested in triggering the acquisition (for
example, if you are probing a DC level), set the trigger mode to
Auto (see page 131) and press the Single key. If a trigger
condition occurs, it will be used; if a trigger doesn’t happen, an
untriggered acquisition will be taken.
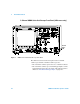
To pan and zoom
You can pan across and zoom-in on a waveform even when the
acquisition system is stopped.
1 Press the Run/Stop key to stop acquisitions (or press the
Single key and allow the oscilloscope to acquire the waveform
and stop). The Run/Stop key is illuminated red when the
oscilloscope is stopped.
2 Turn the sweep speed knob to zoom horizontally and turn
the volts/division knob to zoom vertically.
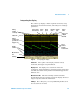
The ∇ symbol at the top of the display indicates the time
reference point where the zoom-in/zoom-out is referenced.