
Technical data
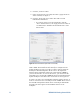
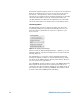


Demo Mode
When you close the connection dialog without connecting
instruments, you enter the Demo Mode.
The Demo Mode is intended for demostration purposes, where no
actual hardware is available. Most functions will be available, but no
instruments are affected.
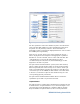
Applying
When changing any parameter in the user interface, you'll have to
apply those changes to the instruments by clicking the “Apply”
button in the bottom left corner of the main window. This applies all
parameters at once. Pressing F6 on your keyboard has the same
effect, as well as using the menu command “Apply” in the
“Instruments” menu.
Many group boxes and windows have a dedicated “Apply” button,
which only apply the parameters in that group or window.
There is also the menu command “Apply Pattern Only” to apply the
pattern only while remaining all other parameters untouched. You
can find this command in the “Instruments” menu. You can also
press Shift+F6 on your keyboard, or click the main “Apply” button
while holding the shift-key.
One special case are track bars. For example, there is a track bar in
the “Voltage Levels” group box. When you move a track bar, the
affected parameter is immediately applied to the hardware.
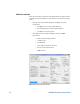
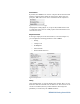
PCI Express Physical Parameters
The corresponding controls are shown in Figure 6.
To test a PCI Express DUT, you must define the PCIe specification
revision and a DUT type. These parameter affect the available
settings and the way calibration data is handled. For PCIe Gen3 ASIC
tests, you'll also have to select the calibration channel.
When you change one of these settings, your instruments will
automatically be re-configured.
14 N5990A-301 Getting Started Guide
Figure 6: PCI Express Physical Parameter Settingss