
Technical data


Low and Full Speed Tests 7
Notes on USB Electrical Compliance Testing 185
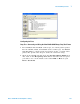
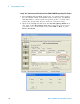
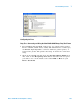
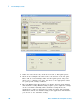
3 Under the Select Tests tab, check the box next to Droop/Drop Test.
4 Click on the Configure tab and scroll to the bottom of the left pane.
There will be several listings under the Droop/Drop Test entry that
allow you to configure your tests. Set these to the appropriate values
for your specific testing conditions.
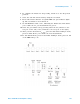
5 The new E2649- 66405 Droop/Drop test fixture supports both manual
and automatic testing. Manual testing requires you to adjust the settings
on the test fixture manually while automatic testing allows the
application to walk you through the testing procedure. The following
instructions will be for manual testing as the application will instruct
you on how to use automatic testing.
6 To configure the fixture for droop testing, switch S5 to the droop mode
position.
7 Select the 500 mA current load by using the S4 switch.
8 Press and hold S1 until the 7- segment LED test port indicator lights
up. This turns the test fixture on.
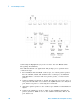
9 All of the port LEDs will be lit up, but the Port 1 LED will be blinking.
This indicates that Port 1 is the Droop port. Port 0 will be the test port
(indicated by the number 0 illuminated on the 7- segment LED test port
indicator).
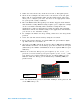
10 Press S2 to increase Droop test port sequence (0 & 1, 1 & 2, ...) or
press S1 to reverse the Droop test port sequence (2 & 1, 1 & 0, ...). The
port under test is always indicated by the 7- segment LED test port
indicator while the Droop port is indicated by a blinking LED (see
picture below)
11 To exit manual mode, press S2 and while holding it down, press S1. All
of the LEDs will go off.
Test port indicator
Blinking LED indicate
droop port
Test port