
user manual


20 Chapter 1
Installation and Setup
Printer Setup and Operation
Installation and Setup
Interconnection and Setup
1. Turn off the printer and the analyzer.
2. Using an IEEE 1284 compliant parallel printer cable, connect the
printer to the analyzer parallel I/O interface connector on the rear
panel (see “Rear-Panel Features” on page 29).
3. Turn on the analyzer and printer.
4. On the front panel, press Print Setup, then press the Printer Setup
menu key.
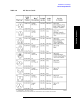
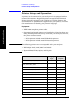
5. Select the printer language and color capability appropriate for your
printer. See table above this section for a list of some compatible
printers.
Testing Printer Operation
When you have completed the printer setup for the analyzer, press the
front panel
Print key. If the printer is ready and the printer setup was
successful, a printout of the analyzer display will be printed. If the
printer is not ready, the message “Printer not responding” appears
at the bottom of the screen.
NOTE There may be some small discrepancies in the color mapping of the
analyzer display to your color printer. Due to differences in display and
printer technologies, the default display colors do not map exactly to the
printer colors. For example trace 1 is yellow on your analyzer display
while it maps to green on your printer.