
Manual


10
MAINTENANCE
1. Do not store sprayer with any solution left in tank.
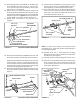
2. Periodically clean the strainer in the end of the intake
hose at the bottom of the tank. Remove the nylon swivel
nut from the hose, pull out the screen and fl ush it with
clear water.
AFTER EACH USE
3. After use, fi ll the sprayer part way with water, start the
sprayer and allow clear water to be pumped through the
plumbing system and out through the boom assembly
and the handgun. Use the handgun to thoroughly wash
all internal parts of the tank, the outside of the tank and
the boom.
4. Refi ll the tank about half full with plain water and a
chemical neutralizer and repeat the cleaning instructions
above. Flush the entire sprayer with the neutralizing
agent. Follow the chemical manufacturers instructions
for disposal of all wash or rinsing water.
ATTENTION!
Do not
allow chemicals to sit in pump for extended
times of idleness. Some chemicals will damage the
pump valve if allowed to soak untreated for a length
of time. Always fl ush the pump with water after each
use. Follow the procedures in the AFTER EACH USE
instructions for fl ushing and disposal.
WINTER STORAGE
5. Drain all water out of the sprayer, paying special
attention to the pump and handgun. These items are
especially prone to damage from chemicals and freezing
weather.
6. The sprayer should be winterized before storage by
pumping a 50-50 solution of water and R. V. antifreeze
through the entire plumbing. Proper care and
maintenance will prolong the life of the sprayer.
4. Set the desired boom pressure, spraying with plain water
while making pressure adjustments. For best results stay
in the 20 to 30 PSI range. (At 10 PSI the spray pattern
begins to break up, and at 40 PSI some drift develops.)
Refer to the tip chart on page 11.
5. Determine the appropriate speed at which to travel, based
on the chosen pressure setting and the recommended
application rate. Use the tip chart on page 11.
6. To determine the throttle setting for attaining the
appropriate speed, mark off 100, 200 and 300 feet
intervals. The speed chart at the bottom of page 11
indicates the number of seconds it takes to travel these
distances. Set the throttle and, with a running start, travel
the distances in the number of seconds indicated by
the speed chart. Once you have determined the throttle
and gear settings needed, mark the throttle location
so that you can easily resume the same speed after
stopping.
7. Add the chemical solution to the tank and drive to the
starting place for spraying.
8. Set the throttle at the position determined in step 6 to
attain the proper ground speed. Reach back and fl ip
the pump/motor switch to the "ON" position to start the
solution spraying from the nozzles.
9. When not being used, the outer boom arm assemblies
may be folded in and attached to the boom transport
bracket at the center of the boom.
10. Stay clear of fl owers, shrubs and evergreen trees when
spraying weed control solutions to prevent contact of
the solution with these sensitive plants.