
Product Manual


7
ASSEMBLY
This unit is shipped WITHOUT GASOLINE or OIL. After
assembly, see separate engine manual for proper fuel
and engine oil recommendations.
TOOLS REQUIRED FOR ASSEMBLY
1) 1/2" Wrench
(2) 9/16" Wrenches
(1) Pliers
REMOVAL OF PARTS FROM CARTONS
1. Remove the hardware packs and all loose parts from
the cartons.
2. Lay out and identify parts shown in carton contents.
3. Lay out and identify parts in the hardware packs. Keep
contents of each hardware package separate.
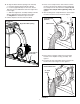
FIGURE 1
FIGURE 2
ASSEMBLING THE MOW-N-VAC
1. Tip the cart back to rest upright on the rear of the cart.
See gure 1.
2. Install the rear tongue and the axle onto the cart body,
sliding the axle through the wheel support and the
tongue. Lock the tongue to the latch stand bracket
with the latch lock lever. See gure 1.
IMPORTANT: Make sure the tongue is securely locked
to the latch stand bracket by the latch lock lever.
3. Assemble a spacer tube, a 1" at washer, a wheel
(valve stem facing out), and another 1" at washer
onto the axle as shown in gure 2. Secure the wheel
with a cotter pin, spreading the ends so that a hub cap
can t over the pin. Assemble the hub cap by pressing
it onto the at washer. Repeat on other end of axle.
4. Pump grease into grease ttings on wheels until
grease is forced out through ends of hubs.
FIGURE 3
5. Tip the cart forward so that it rests on its wheels.
6. Assemble the front tongue on top of the rear tongue
using four 3/8" x 1-1/4" hex bolts, 3/8" lock washers
and 5/16" at washers. See gure 3.
HINT: For easier assembly, support the rear tongue
with a block of wood.
AXLE
REAR TONGUE
LATCH LOCK LEVER
BLOCK
3/8" x 1-1/4"
HEX BOLT
3/8" LOCK
WASHER
5/16" FLAT
WASHER
COTTER
PIN
WHEEL
1" FLAT
WASHER
1" FLAT
WASHER
SPACER
TUBE