™ owners manual MANUAL DEL USUARIO NOTICE D’UTILISATION Model No. Modelo No. Modèle No. 45-01773 CAUTION: Read Rules for Safe Operation and Instructions Carefully 14 CU. FT. FARM/YARD CART CARRETILLA DE POLY PARA JARDÍN/GRANJA DE 14 PIES CUB. (0,39 METROS CÚB.) PRECAUCION: Lea cuidadosamente los Procedimientos e Instrucciones para la Operación Segura de la Máquina. ATTENTION: Lire et suivre attentivement les instructions et consignes de sécurité de cette notice.
ENGLISH RULES FOR SAFE OPERATION ASSEMBLY INSTRUCTIONS Preventing accidents is the responsibility of every equipment operator. The following general safety precautions must be fully understood and followed by every operator. 1. Do not at any time carry passengers in this cart. It is designed for carrying materials only and not intended to carry passengers. 2. Be careful on any grade (hill) and stay off of steep grades. 3. Use caution when loading cart to avoid tipping. 4.
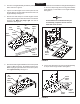
ENGLISH 3. Turn the front angle assembly and bottom panel upside down as shown in figure 3. 7. Stand the cart on end with the front angle assembly down on the floor. Temporarily place four large flat washers (axle washers) on the inside of front angle assembly. See figure 5. 4. Lay the two side angles on the bottom panel so that the two holes for the axle clamps are closer to the front angle assembly. See figure 3. 5.
ENGLISH 9. Position a side panel againist a side angle, resting it down on top of the front panel. Place a support strap on the outside of the side angle and start a M6X30 screw through the second hole in the side panel, the side angle and the support strap. Secure with a flat washer and hex nut. Make only finger tight at this time. See figure 7. 10. Start a M6X30 screw through the top hole in the side panel, the front angle assembly and the support strap. Secure with a flat washer and hex nut.
ENGLISH 16. Turn the cart upside down. Place the handle tube on the bottom of the cart as shown in figure 10. Place the four tube clamps over the handle tube, with the longer leg of each tube clamp to the outside. Secure the four tube clamps over the handle tube using eight M6X25 screws, eight flat washers and eight hex nuts. Make only finger tight until all eight screws are in place and then tighten securely. See figure 10. 17.
ENGLISH 23. Slide the axle through the axle clamps. See figure 12. MAINTENANCE 24. Assemble a cotter pin to the inner hole at one end of the axle. Place a large flat washer, a wheel and then another large flat washer onto the axle. Secure the wheel with a cotter pin assembled to the outer hole at the end of the axle. Repeat step for other wheel. See figure 12. 1. Grease or oil wheel bearings occasionally. Use automotive wheel bearing type grease or 20 weight oil. 2.
ESPAÑOL REGLAS PARA UNA OPERACIÓN SEGURA 6. Asegure ambas estructuras angulares laterales al panel inferior usando cuatro tornillos M6x25, arandelas planas y tuercas hexagonales. Sólo ajuste a mano hasta que los cuatro tornillos estén en su lugar, luego apriete. Ver Figura 4. 1. No transporte pasajeros en la carretilla en ningún momento. Está diseñada para transportar materiales solamente y no pasajeros. 2. Tenga cuidado con las pendientes y manténgase alejado de las que son escarpadas. 3.
ESPAÑOL 16. Suba y baje la carretilla. Coloque la manija en la parte inferior de la carretilla, según se muestra en la Figura 10. Coloque las cuatro abrazaderas sobre la manija, la pata más larga de cada abrazadera mirando hacia afuera. Asegure las cuatro abrazaderas sobre la manija utilizando ocho tornillos M6X25, ocho arandelas planas y ocho tuercas hexagonales. En este momento, sólo ajuste a mano hasta que los ocho tornillos estén ubicados y luego, ajuste con firmeza. Ver Figura 10. 25.
FRANÇAIS CONSIGNES DE SÉCURITÉ 5. Fixez les deux brides de fixation de l’essieu aux longerons latéraux et au panneau du fond en utilisant quatre vis M6X30, quatre rondelles de blocage et quatre écrous hexagonaux. Serrez uniquement à la main jusqu’à ce qu’essieu ait été installé. Voir l’illustration 3. Il incombe à l’utilisateur d’éviter tout risque d’accident. Les consignes de sécurité suivantes doivent être comprises et respectées par chaque utilisateur. 6.
FRANÇAIS 15. Placez la remorque par-terre de façon à ce que les panneaux latéraux se trouvent vers le haut, en position normale. Retirez le panneau avant en le glissant vers le haut puis retirez les quatre grandes rondelles que vous avez utilisées en tant que cales. Voir l’illustration 9. 24. Fixez une goupille fendue dans le trou intérieur à une extrémité de l’essieu. Placez une grande rondelle plate, une roue et une autre grande rondelle plate sur l’essieu.
MODEL 45-017773 14 CU. FT. FARM/YARD CART REF. NO. PART NO. QTY. 1 2 3 4 5 6 7 9 10 11 12 13 14 49123 25244 49322 44481 49124 24887 24888 49125 49126 44033 23882 64886 49323 1 1 2 2 1 1 1 1 1 4 2 1 2 DESCRIPTION REF. NO. Bottom Panel Axle Side Panel Tube Caps Front Panel Side Angle, L.H. Side Angle, R.H. Handle Tube Leg Tube Clamp, Tube Support Strap Front Angle Assembly Wheel 19 20 21 22 25 26 27 28 29 30 31 PART QTY. NO.
the fastest way to purchase parts www.speedepart.com REPAIR PARTS Agri-Fab, Inc. 303 West Raymond Sullivan, IL 61951 217-728-8388 www.agri-fab.com This document (or manual) is protected under the U.S. Copyright Laws and the copyright laws of foreign countries, pursuant to the Universal Copyright Convention and the Berne convention.