B16008-R0-160RC SERIES-U&C 17/1/07 11:13 AM 1.
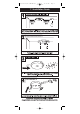
B16008-R0-160RC SERIES-U&C 17/1/07 11:13 AM Page 2 2. ALARM REMOVAL LOCATE REMOVAL SLOT TO REMOVE PU SH S CREWDRIVER INTO SLO & PUSH COVER T AWAY LOCATE THE ARROW ON THE FRONT FACE OF THE ALARM. THE SLOT IS LOCATED DIRECTLY ABOVE THE ARROW. INSERT SCREWDRIVER INSERT A FLAT-BLADED SCREWDRIVER HORIZONTALLY APPROX.
B16008-R0-160RC SERIES-U&C 17/1/07 11:13 AM Page 3 2. HOW MANY ALARMS TO INSTALL - CATEGORIES & GRADES The advice here follows the guidance in British Standard BS 5839-Part 6: 2004 in general (for further information see the BS standard itself). The main reason for fitting Smoke & Heat Alarms in dwellings is to ensure that when there is a fire, sufficient early warning is given so that everybody can escape safely.
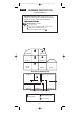
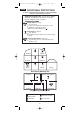
B16008-R0-160RC SERIES-U&C LD3 17/1/07 11:13 AM Page 4 MINIMUM PROTECTION for existing dwellings Minimum Protection LD3: Smoke Alarms in all hallways, stairways and circulation areas that form part of the escape routes from the dwelling. Smoke Alarms located: on each storey every 7.
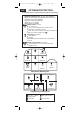
B16008-R0-160RC SERIES-U&C 17/1/07 11:13 AM Page 5 LD2 ADDITIONAL PROTECTION for new or materially altered dwellings or existing dwellings with poor structural fire precautions Additional Protection LD2: As LD3, but in addition Smoke or Heat Alarms in all rooms or areas that present a high fire risk to occupants. Smoke Alarms located: on each storey every 7.
B16008-R0-160RC SERIES-U&C LD1 17/1/07 11:13 AM Page 6 OPTIMUM PROTECTION for dwellings where occupants may be at high risk (e.g. elderly) Optimum Protection LD1: As LD2, but in addition Smoke or Heat Alarms should be located in all rooms and other areas of the dwelling. (apart from toilets or bathroom) Smoke Alarms located: on each storey every 7.
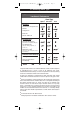
B16008-R0-160RC SERIES-U&C 17/1/07 11:13 AM Page 7 2.2 Selecting Alarm Type Optical/Ionisation/Heat Alarm Selection Locations & Performance Optical 1 Alarm Type Ionisation 2 Heat Locations Hall, Corridors, Escape Routes Kitchens 3 Living Rooms Bedrooms Shower / Bathroom Fire Response Slow Smouldering Fires (polyurethane foam, ignited bedding etc.) Fast Flaming Fires (chip pans, flaming wood/plastic, oil, solvents etc.
B16008-R0-160RC SERIES-U&C 17/1/07 11:13 AM Page 8 Improved Audibility The effectiveness of Category LD2 and LD3 systems can be significantly enhanced if an additional Smoke Alarm (interconnected) is installed in the master bedroom. This will help ensure that a responsible person will quickly be alerted to a fire and can arrange for an orderly evacuation of children and other vulnerable occupants. 2.
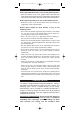
B16008-R0-160RC SERIES-U&C 17/1/07 11:13 AM Page 9 3.1 Locations To Avoid DON’T place Smoke Alarms in any of the following areas: • Bathrooms, kitchens, shower rooms, garages or other rooms where the smoke alarm may be triggered by steam, condensation, normal smoke or fumes. Keep at least 6 metres away from sources of normal smoke/fumes. DON’T place Heat Alarms in any of the following areas: • Bathrooms, shower rooms or other rooms where the unit may be triggered by steam or condensation.
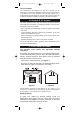
B16008-R0-160RC SERIES-U&C 17/1/07 11:13 AM Page 10 appropriate. (Excessive dust and debris from building work can contaminate the smoke chamber or heat sensor and cause problems, it will also invalidate the guarantee). If it must be installed, first cover it completely, particularly around the edges, with a dust cover (eg. with the elasticated cover supplied or a plastic bag), until all cleaning is finished.
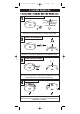
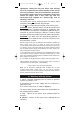
B16008-R0-160RC SERIES-U&C 17/1/07 11:13 AM Page 11 See page 14 for information on interconnection. Note: Wiring must be installed in compliance with local regulations. FOAM CEILING GASKET INSERT SCREWDRIVER TO LIFT AND REMOVE WIRING COVER Figure 3 Warning: Mixing the Live and Neutral connections when interconnecting alarms will damage all the alarms - ensure that the same colours are used throughout the premises for Live, Neutral and Interconnect wires.
B16008-R0-160RC SERIES-U&C 17/1/07 11:13 AM Page 12 If the mains wires are being brought along the surface: (a) position the mounting plate so the cable trunking is as shown in Figure 4. (b) the mounting plate has a removable section, take it out to interface directly with 25 mm conduit as shown in Figure 5. If interfacing to 16 mm conduit carefully cut around the marked section, leaving the top intact and replace the section.
B16008-R0-160RC SERIES-U&C 17/1/07 11:13 AM Page 13 4.2 Interconnecting Alarms Note: A maximum of twelve Ei141/144/146/161RC /164RC/166RC Smoke or Heat Alarms may be interconnected along with an Ei128R pattress with relay (see “ACCESSORIES” section on page 15). If you wish to connect more than twelve alarms contact your local distributor (see page 16 for details). Systems using more than 3 or 4 alarms must be very carefully planned to ensure nuisance alarms are not excessive. e.g.
B16008-R0-160RC SERIES-U&C 17/1/07 11:13 AM Page 14 These Smoke/Heat Alarms should be interconnected only within the confines of a single family living unit. If they are connected between different units there may be excessive nuisance alarms. Everybody may not be aware that they are being tested or that it is a nuisance alarm caused by cooking etc. Ensure the alarms operate correctly - see “TESTING & MAINTAINING YOUR ALARM” section on page 4 of the USER INSTRUCTIONS. 5.
B16008-R0-160RC SERIES-U&C 17/1/07 11:13 AM Page 15 INDEX 1 1. QUICK GUIDE 1.1 INSTALLATION GUIDE 2 1.2 ALARM REMOVAL 3 4 2. HOW MANY ALARMS TO INSTALL 2.1 CATEGORIES OF SYSTEM 4 2.2 SELECTING ALARM TYPE 8 2.3 GRADE D, E & F SYSTEMS 9 9 3. POSITIONING ALARMS 3.1 LOCATIONS TO AVOID 10 10 4. INSTALLATION 4.1 MOUNTING & WIRING ALARMS 11 4.2 INTERCONNECTING ALARMS 14 15 5. ACCESSORIES Aico Ltd. Mile End Business Park, Maesbury Rd, Oswestry, Shropshire SY10 8NN, U.K.
B16008-R0-160RC SERIES-U&C 17/1/07 11:13 AM Page 16 230V~ SMOKE & HEAT ALARMS ALKALINE PRIMARY BATTERY BACK-UP Ei141 - Ionisation Ei146 - Optical Ei144 - Heat RECHARGEABLE LITHIUM CELL BACK-UP Ei161RC - Ionisation Ei164RC - Heat Ei166RC - Optical INSTALLER INSTRUCTIONS IDEALLY INSTALL IN THE CENTRE OF CEILING AT LEAST 300mm FROM LIGHT FITTINGS LOCATE IONISATION ALARMS AWAY FROM KITCHENS TO PREVENT NUISANCE ALARMS INTERCONNECT ALL ALARMS ENSURE LIVE MAINS IS CORRECTLY CONNECTED TO L TERMINALS ON