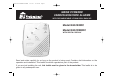
B16132-R0-261ENRC-UC-ENG 7/11/07 11:52 AM Page 1 MAINS POWERED CARBON MONOXIDE ALARMS WITH RECHARGEABLE LITHIUM CELL BACK-UP Model Ei261ENRC Model Ei261DENRC WITH DIGITAL DISPLAY Read and retain carefully for as long as the product is being used. Contains vital information on the operation and installation. This leaflet should be regarded as part of the product. If you are just installing the unit, this leaflet must be given to the householder. This leaflet is to be given to any subsequent user.
B16132-R0-261ENRC-UC-ENG 7/11/07 11:52 AM Page 2 2
B16132-R0-261ENRC-UC-ENG 7/11/07 11:52 AM Page 3 CONTENTS Page 1 IMPORTANT INFORMATION 4 2 CARBON MONOXIDE - THE SILENT KILLER 6 3 ALARM POSITIONING 10 4 INSTALLATION 15 5 TESTING 20 6 HOW TO DISTINGUISH BETWEEN CO ALARM & SMOKE ALARM WARNINGS 22 7 MAINTENANCE 22 8 LIMITATIONS OF CO ALARMS 24 9 HOW TO PROTECT YOUR FAMILY 25 10 GETTING YOUR CO ALARM SERVICED 27 11 FIVE YEAR GUARANTEE 27 12 TECHNICAL SPECIFICATIONS 28 13 TROUBLESHOOTING 30 14 ACCESSORIES 32 3
B16132-R0-261ENRC-UC-ENG 7/11/07 11:52 AM Page 4 1. IMPORTANT INFORMATION WARNING: The Alarm should be permanently wired to the mains by a qualified electrician in accordance with IEE wiring regulations (BS7671). Install a Carbon Monoxide (CO) Alarm in every room that contains a fuel burning appliance, particularly rooms where people spend a lot of time e.g. bedrooms, kitchens and sitting rooms.
B16132-R0-261ENRC-UC-ENG ? 7/11/07 11:52 AM Page 5 WHAT TO DO WHEN THE ALARM SOUNDS: (1) Open the doors and windows to ventilate the area. (2) Turn off all fuel appliances where possible. (The alarm can be silenced immediately by pushing the Test/Hush button). (3) Evacuate the property leaving the doors and windows open. (4) Get medical help immediately for anyone suffering the effects of Carbon Monoxide poisoning (headache, nausea), and advise that Carbon Monoxide poisoning is suspected.
B16132-R0-261ENRC-UC-ENG ? 7/11/07 11:52 AM Page 6 The CO Alarm is no substitute for keeping chimneys and flues clear and in good condition, and all of your appliances serviced regularly according to the manufacturer’s instructions. Do not fit alarm until all building work is completed to avoid contamination. 2. CARBON MONOXIDE - THE SILENT KILLER 2.1 WHAT IS CARBON MONOXIDE ? Congratulations on becoming the owner of an Ei Carbon Monoxide Alarm.
B16132-R0-261ENRC-UC-ENG 7/11/07 11:52 AM Page 7 A low level for a long period (e.g. 150 ppm for 90 minutes) can cause the same symptoms (a slight headache) as a high level of CO for a short period (e.g. 350 ppm CO for 30 minutes). Table A shows how exposure to different concentrations of CO generally affects people.
B16132-R0-261ENRC-UC-ENG 7/11/07 11:52 AM Page 8 2.3 WHAT HAPPENS WHEN YOUR CO ALARM DETECTS CARBON MONOXIDE ? When the Alarm detects potentally dangerous levels of CO, it flashes the red alarm light and then sounds a loud alarm if the CO persists. The digital display (Model Ei261DENRC only) indicates the CO level in parts per million (ppm) CO. Table B below shows how the CO Alarm reacts to different levels of CO gas and exposure time. At higher levels of CO the alarm turns on sooner.
B16132-R0-261ENRC-UC-ENG 7/11/07 11:52 AM Page 9 NEVER IGNORE THE ALARM Pre-Alarm: When the alarm detects over 50ppm CO the red light flashes every 2 seconds. This helps locate CO leaks as the unit gives an indication straight away (without this feature the CO level would need to be at 50ppm CO for 90 minutes for the horn to sound). Note the Pre-Alarm signal may be triggered by CO coming for example, from cooking with gas, from car engines or from nearby barbecues.
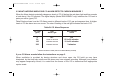
B16132-R0-261ENRC-UC-ENG 7/11/07 11:52 AM Page 10 3. ALARM POSITIONING 3.
B16132-R0-261ENRC-UC-ENG 7/11/07 11:52 AM Page 11 - In an enclosed space (e.g. in or below a cupboard) - In a damp or humid area - Directly above a sink or cooker - Next to a door, window, air vent or anywhere that it would be affected by draughts - Next to an extractor fan - Where it would be obstructed, e.g.
B16132-R0-261ENRC-UC-ENG 7/11/07 11:52 AM Page 12 - If there is a partition in the room, the CO Alarm should be located on the same side of the partition as the potential source - In rooms with sloped ceilings, the CO Alarm should be located at the high side of the room (see Figure 3) 3.
B16132-R0-261ENRC-UC-ENG 7/11/07 11:52 AM Page 13 300mm CO Alarm 150mm 1 to 3 m DEAD AIR DON'T LOCATE HERE 1 to 3 m Figure 1.
B16132-R0-261ENRC-UC-ENG 7/11/07 11:52 AM Page 14 300 mm CO Alarm CO Alarm approx 1 to 2m Figure 2. Location in rooms with sloped ceilings Figure 3. Location in bedroom & rooms remote from the appliance - 300mm from apex of ceiling - High side of the room - Wall mounted - Breathing level (approx.
B16132-R0-261ENRC-UC-ENG 7/11/07 11:52 AM Page 15 4. INSTALLATION The Alarm is designed to be permanently mounted, using its own built-in terminal block to connect it to the mains wiring. The mounting plate can be screwed directly to the ceiling/wall. Alternatively it can be screwed to a standard junction box (BS 4662 single gang accessory box). The alarm requires a current of 60mA. The Alarm must not be exposed to dripping or splashing. There are important markings on the underside of the alarm.
B16132-R0-261ENRC-UC-ENG 7/11/07 11:52 AM Page 16 The Alarm must not be connected when the house wiring insulation is being checked with high Voltages i.e. do not use an insulation tester on the alarm. Do not use the CO Alarm on an intermittent basis, or as a portable detector for the spillage of combustion products from fuel burning appliances or chimneys.
B16132-R0-261ENRC-UC-ENG 7/11/07 11:52 AM Page 17 We strongly recommend that you check for the following before connecting the alarm: • check for Live and Neutral using a two probe tester. • check for Live using a neon tester. • check that the Interconnect wire is NOT connected to Live, Neutral or Earth. Do not use an Earth wire for the Interconnect line. Note: The Alarm does not need to be earthed.
B16132-R0-261ENRC-UC-ENG WIRING CONDUIT 7/11/07 11:52 AM Page 18 TERMINAL SCREWS INSERT SCREWDRIVER TO LIFT AND REMOVE WIRE COVER L - LIVE KNOCK OUT FOR SURFACE WIRING CONDUIT N - NEUTRAL IC - INTERCONNECT L N IC SEALING GASKET (MUST BE IN PLACE) L N IC KNOCK OUT FOR SURFACE WIRING CONDUIT WIRING CONDUIT MAINS WIRING RECESSED WIRING AREA Figure 5 - Surface Wiring EARTH (IF PRESENT) Figure 6 - Recessed Wiring 11. Connect the mains power to the alarm circuit. Check the green light is on.
B16132-R0-261ENRC-UC-ENG 7/11/07 11:52 AM Page 19 4.1 INTERCONNECTING With interconnected alarms, when one unit detects CO all units alarm. All horns will sound but only units detecting CO will flash their red lights. A maximum of twelve Ei261ENRC/261DENRC CO Alarms may be interconnected along with an Ei128RBU & Ei128COV relay module (see “ACCESSORIES” on page 32).
B16132-R0-261ENRC-UC-ENG 7/11/07 11:52 AM Page 20 A maximum of 250 metres (820 ft) of wire can be used (maximum resistance between detectors 50 Ohms). Connect as shown in Figure 7. Alarms should be interconnected only within the confines of a single family living unit. If they are connected between different units there may be excessive nuisance alarms. Everybody may not be aware that they are being tested etc.
B16132-R0-261ENRC-UC-ENG 7/11/07 11:52 AM Page 21 checking circuit has detected a fault. Press and hold the Test/Hush button. If the amber light flashes without the horn sounding, the sensor is faulty. On the Ei261DENRC the display will show SF indicating Sensor Faulty. 4. If the Alarm fails to operate when the Test/Hush button is pressed, switch off the mains supply at the distribution fuse board and remove unit from mounting plate for 3 minutes. Put unit back on mounting plate.
B16132-R0-261ENRC-UC-ENG 7/11/07 11:52 AM Page 22 The Fast CO Test Mode normally does not activate the memory function unless a high level of CO remains in the sensor for a few minutes. (This can be checked by pressing the Test/Hush button. If the red light flashes continuously (indicating CO was detected), hold the Test/Hush button for 20 seconds until the red light stops flashing as the memory resets). 6.
B16132-R0-261ENRC-UC-ENG 7/11/07 11:52 AM Page 23 HOW TO DISCONNECT AND REMOVE THE ALARM: (1) Disconnect the mains supply to the CO Alarm circuit at the distribution/fuse board. (2) Remove tamperproofing screw if fitted (see Figure 1). (3) Release catch (as shown in Figure 1) and slide unit off mounting plate. SENSOR MODULE REPLACEMENT Replace the sensor module after 5 years operation (or by the date on the ‘REPLACE SENSOR BY’ label on the side of the unit).
B16132-R0-261ENRC-UC-ENG 7/11/07 11:52 AM Page 24 Note: When the second sensor has completed its 5 years of operation the amber light will flash every 40 seconds. The sensor module can only be replaced once. The entire unit must be replaced after 10 years. The date for replacing the entire unit is given on the ‘REPLACE UNIT BY’ label on the alarm. 8. LIMITATIONS OF CO ALARMS - The Ei261EN/261DEN CO Alarm will not work without mains power if the rechargeable cells are depleted.
B16132-R0-261ENRC-UC-ENG 7/11/07 11:52 AM Page 25 - CO Alarms are not suitable as early warning Smoke Alarms. Some fires produce Carbon Monoxide, but the response characteristics of these CO Alarms are such that they would not give sufficient warning of fire. Smoke Alarms must be fitted to give early warning of fire. - This CO Alarm does not detect the presence of natural gas (methane), bottled gas (propane, butane) or other combustible gases. Fit combustion gas alarms to detect these.
B16132-R0-261ENRC-UC-ENG 7/11/07 11:52 AM Page 26 - These appliances must “breathe in” air to burn the fuel properly. Know where the air comes from and ensure vents/air bricks etc. remain unobstructed (particularly after building work). - The appliances must also “breathe out” the waste gases (including the CO) – usually through a flue or chimney. Ensure chimneys and flues are not blocked or leaking, and get them checked every year. Check for excessive rust or cracks on appliances and pipe work.
B16132-R0-261ENRC-UC-ENG 7/11/07 11:52 AM Page 27 10. GETTING YOUR CO ALARM SERVICED If your CO Alarm fails to work after you have carefully read all the instructions, checked the unit has been installed correctly, and is receiving AC power, return it for repair or replacement. (Do not attach to mounting plate as unit can give beeps or alarm if the Test/Hush button is pressed during shipping).
B16132-R0-261ENRC-UC-ENG 7/11/07 11:52 AM Page 28 12. TECHNICAL SPECIFICATIONS Operating Voltage : 230±10% VAC, 50Hz Power : 1 Watt (60 mA) Power on Indicator : Green Light Sensor : Electrochemical Sensor CO Sensitivity : Meets BS EN 50291: 2001. Unit operates as per Table B (on page 8). Electrical Safety : Complies with relevant sections of EN 60335-1: 1994 Electromagnetic Compatibility : Complies with BS EN 50270 Test/Hush Button : Checks electronics and horn.
B16132-R0-261ENRC-UC-ENG 7/11/07 11:52 AM Page 29 Initialisation Time : 70 seconds. On power up red and amber lights flash momentarily to show they are operational. Operating Temperature : -10°C to 40°C Humidity Range : 15% to 95% R.H. (non-condensing) Audible Alarm : 85dB(A) minimum @ 3m Self Diagnostics : Horn beep and amber fault light flashes every 40 seconds if a sensor fault is found. Tamperproof : Screwdriver needed to release from mounting plate.
B16132-R0-261ENRC-UC-ENG 7/11/07 11:52 AM Page 30 CO Alarm Memory: : A unit will indicate if it has been in alarm previously by flashing the red light for 2 seconds every 40 seconds (2 flashes for 50 ppm CO, 4 flashes for 100 ppm CO and 8 flashes, for 300 ppm CO). When the Test/Hush button is pressed, the red light flashes (as per Table B on page 8) to indicate the previous CO alarm level detected. The memory is cleared by holding down the Test/Hush button until the red light stops flashing.
B16132-R0-261ENRC-UC-ENG 7/11/07 11:52 AM Page 31 - Press the Test/Hush button for approximately 20 seconds to reset the unit. If the beeping and the amber light flashing re-occurs replace the sensor module. 3. ALARM BEEPS EVERY 40 SECONDS (without amber light flashing): - Rechargeable cells depleted. Reconnect mains power if green light is off. 4. ALARM SOUNDS FOR NO APPARENT REASON: Follow the detailed instructions in Section 1 on page 5 entitled “WHAT TO DO WHEN THE ALARM SOUNDS”.
B16132-R0-261ENRC-UC-ENG 7/11/07 11:52 AM Page 32 Alternatively, if an optional Ei1529RC Remote Control is fitted, pressing the LOCATE switch when all alarms are sounding will silence all alarms apart from the alarm that is sensing CO/Smoke/Heat. This area can then be safely investigated and if determined that it is a false alarm, press the HUSH switch to silence the alarm. 14. ACCESSORIES Ei1529RC Remote Control The Ei1529RC is strongly advised for systems with interconnected CO and Smoke/Heat Alarms.
B16132-R0-261ENRC-UC-ENG 7/11/07 11:52 AM Page 33 The crossed out wheelie bin symbol that is on your product indicates that this product should not be disposed of via the normal household waste stream. Proper disposal will prevent possible harm to the environment or to human health. When disposing of this product please separate it from other waste streams to ensure that it can be recycled in an environmentally sound manner.
B16132-R0-261ENRC-UC-ENG 7/11/07 11:52 AM Page 34 Aico Ltd Mile End Business Park, Maesbury Rd, Oswestry, Shropshire SY10 8NN, U.K. Tel: 0870 758 4000 www.aico.co.uk Ei Electronics Shannon, Co Clare, Ireland. Tel: +353 (0)61 471277 www.eielectronics.