
Installation Guide


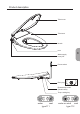

Installation tools
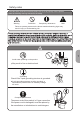
Attention before installation
1.Water pressure range: 0.1-0.75MPa, please follow the instructions.
2.Corner valves shall be located close to the location where this product is installed
and disassembled.
3.Please use the braided hose that comes with the product to prevent water leakage.
4.When installing braided hose,be careful to prevent the black gasket falling out.
Installation steps
6
Cross screwdriver
Monkey wrench
Barrel and rag
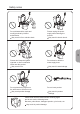
Installation Procedure
1.Loosen the nut connecting and remove
the old cover.
2.Place the mounting template on the
ceramic as shown. Align it with the
rim of toilet.
3.①Insert the expansion bolt into ceramic hole;
②Place fixing plate in notch part of template;
③Place adjusting sheet and plate in fixing plate;
④Align expansion bolt hole , and tighten up;
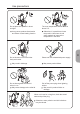
5.Slightly push the cover into fixing plate
until you heard "click" , indicating that
the cover has been installed in place.
CLICK
Screw
Fixing plate
Adjustment sheet
Adjustment plate
Expansion bolt
4.To ensure the normal use of the product,
please press reset key before installation;
Press to maximum stroke
and hold for 2 seconds
Note