
Instructions


14
Simple Pass / Fail Sorting
To set up simple pass/fail sorting, first select the measurement type to be made, i.e. R+Q, L+Q,
C+D or C+R. Set the measurement frequency and select series or parallel measurement as
required.
Note: Binning cannot be set with the bridge in Auto mode.
Bin Selection
Press the Bin No. key to enter set–up mode. Successive presses of the Bin No. key will step
the display through the options of
binX (where X is the bin number), CLEAr? (clear the
selected bin),
CLEAR ALL? (clear all bins) and End? (exit bin set–up mode). The first
press of Bin No. will enter the option sequence where it was last exited; it may be necessary to
press the key several times to get to the desired option.
If any previous binning information needs to be cleared select
CLEAr? with the Bin No. key
and press Enter; the display should show the message
CLEAr donE and then binX in
the right–hand display, ready for the next step. If all bins are to be cleared select
CLEAr ALL?
and follow a similar procedure.
For simple pass/fail sorting, bin 0 must be used. The other bins (1 to 7 inclusive) should be
‘closed’ by setting their limits to zero; alternatively, and easier, all the bins can be cleared by
using
CLEAr ALL? before bin 0 is set. Bin 8 can be used to set limits for the minor
parameter (Q, D, or R); parts that fail these limits fall into bin 8. Parts that fall into neither bin 0
nor bin 8 fall into bin 9, the general fail bin.
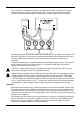
Press Bin No. until
binX shows in the display. Press 0 to select bin 0; bin0 should show in
the right–hand display.
Setting Nominal Value
With bin0 displayed, press the Nominal key; the left–hand display now shows six dashes and
NOM above them.
Enter the nominal value required, followed by the appropriate units key (kΩ, µF, etc.). Press
Enter to save the value; the left–hand display now shows the value entered.
To edit an entered value simply enter a new value and press Enter again.
Setting Limits
With bin0 displayed, press the Limit key; the left–hand display now shows six dashes and
+LIM above them. The units indicator changes to %.
Enter the upper limit of deviation from the nominal allowed for a pass component, as a
percentage, and press Enter. Note that the minimum value that can be entered is 0.1% and the
resolution is 0.1%. The left–hand display again shows the value entered. To change an entered
value simply enter a new value and press Enter again.
Press the Limit key again; the left–hand display shows six dashes but now with
–LIM above
them. Enter the lower limit of deviation from the nominal allowed for a pass component, as a
percentage, and press Enter. Note that for a limit below the nominal value it is necessary to
enter a minus value using the
± key. Note also that the limits need not be symmetrical and can
even both be above the nominal or both below the nominal. If no –LIM limit is entered the limits
are assumed to be symmetrical about the nominal value, i.e. if the upper limit has been set to
+0.5%, the lower limit automatically defaults to –0.5%.
The lower limit (
–LIM) can be set above the upper limit (+LIM) but exiting set–up mode and
selecting Sort will give
Err bin0.