
User Manual

Page 44
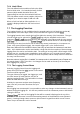
7.6.4 Limit Offset
The Limit Offset function enables a limit to be offset
from its initial value. It is intended primarily for limit
patterns (which would otherwise have to be
regenerated) but can also be used with limit lines.
The Limit Offset control screen enables a limit to be
“nudged” up or down in steps of 1dB or 0.1dB.
Where a limit has had an offset applied to it, a **
symbol is displayed within the Set Limits control
screen.
7.7 The Logging Function
The Logging function is only available when the upgrade option U01 is fitted (see section 6).
A description of the menu keys used to control the function is given in section 4.8.1.
The logging function saves results into log files within the memory of the instrument. The type
of result saved can be selected as (logs only the amplitude at the centre
frequency), (logs the frequency and amplitude of the highest peak in every sweep),
(logs the whole trace) or (logs the whole screen as a bit-map image).
The saving of an entry into the file can be after every sweep (continuous) or in response to a
Timer, a key press (manual trigger), the external trigger input, or the Limits function.
Each entry within the file includes the time of the entry as read from the instrument’s real time
clock. Up to 9,999 entries can be saved within a single file with the exception of Screen Image
logging where the entries are limited to 999. The saving of an entry takes a finite length of time
varying from 0.1 seconds (centre amplitude or peak value) up to 1.5 seconds (screen image).
Entries are only saved after the sweep has been completed, and the sweep cannot re-start until
the entry has been saved.
Note that, when a logging file is “enabled”, the sweep mode is automatically set to Repeat and
the sweep trigger is set to Free Run. No changes can be made to the set-up of the analyser
while logging is in progress.
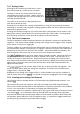
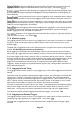
7.7.1 The Logging Control Menu
Selecting Logging Control from the Logging sub-
group menu (see section 4.8.1) opens a new control
screen as shown opposite.
The type of data to be logged, the trigger type, and
the timer interval (if used) must be set prior to
entering Logging Control. This information is shown
within the area above the keys.
Similarly the spectrum analyzer state (frequency
span, level etc). must also have been set-up in
advance.
Once logging has commenced it is not possible to make any changes to the instrument’s set-up
without closing the logging file. It is also not possible to turn the instrument power to Off without
closing the file first.
: the name of the logging file that will be created is displayed at the top of the
menu area. The file name is an auto-incrementing numeric of the default file name (shown in
green). Pressing Change Name opens an alpha-numeric keypad from which a user-chosen
name of up to 8 characters can be entered.