
Instructions

Page 47
Wider Span
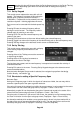
Having set a frequency span in which the signals of interest are visible, the user may wish to
examine a wider span in order to see further signals not currently visible.
One method of doing this is to zoom out from the Span sub-group menu (Freq/Span > Span >
Zoom) which shows frequencies both above and below the current span.
Alternatively, the user may wish to look only at frequencies above (or below) the current span.
This can be done from the Start/Stop sub-group menu (Freq/Span > Start/Stop > Fix Start or
Stop). Once the start or stop frequency is fixed, the word Fix is displayed next to its frequency
at the top of the screen. The Step Up and Step down keys can then be used to increase or
decrease the opposite frequency only. Pressing the key again will cancel the condition. See
section 4.1.3.
7.3.4 Repetitive Operations
A common requirement for a spectrum analyzer user is to change repetitively between two or
more frequency ranges. The PSAxx05 provides several methods for doing this.
1. When setting the centre frequency using the keyboard, the Previous key can be used to
toggle between two centre frequencies - see section 7.3.1. The same facility is provided for Set
Span, Set Start and Set Stop.
2. Frequency Presets, selected via the Frequency/Span menu group, enable up to six
frequency spans to be stored and rapidly recalled - see section 4.1.5. Only Centre/Span or the
equivalent Start/Stop frequencies are stored. Other parameters such as RBW are not affected
(unless set to Auto).
3. Trace States are files which contain not only the frequency span, but the RBW, the Level
setting and the graticule scale and units. Up to 999 trace files can be stored and are recalled
from the Traces/Stores control screen - see section 4.5.1.
4. The hard key marked “Presets” brings up a menu of set-up states - see section 4.10. Note,
however, that these change many parameters of the instrument simultaneously.
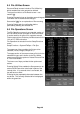
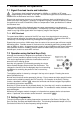
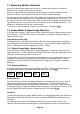
7.3.5 Using Custom Presets (when fitted)
Custom Presets is only available when Option U02 is
fitted. It is accessed using the Presets hard key - see
section 4.10.
Pressing the Custom Presets key brings up a menu
as shown.
Custom Presets is an extended version of the User Preset from which multiple presets can be
saved or recalled by entering just a number. To save a new preset, set up the instrument as
required and press the Save Preset key followed by a number.
Each Preset is a special type of Setup file stored in the SETUPS directory with a file name of
the form $PST0001 where the $ is fixed and the next three characters (default PST) can be
changed to create multiple groups of presets. The last four characters represent the number by
which the preset is saved or recalled. Any number in the range 1 to 9999 can be used, although
the number of presets simultaneously available is set by the directory limit of 999 files.
Applications for which Custom Presets might be used include frequency selection via channel
numbers, or repetitive steps within a test environment.
7.3.6 Creating Channel Markers (when fitted)
Channel markers are only available when Option U02 is fitted and provide a convenient method
of showing multiple fixed frequency points on the display via vertical lines that overlay or
replace the graticule.
They are created via a special type of limit pattern file. See section 7.10.6 for details.