FK1629 B P0811JZ IS SERIES Commercial & Security IP Video Intercom system Network Direct System GETTING STARTED OPERATION MANUAL SETTING AND ADJUSTMENT USING THE SYSTEM APPENDIX Thank you for selecting Aiphone for your communication and security needs. Please read this manual and the separate “SETTING MANUAL” carefully before setting and using this system. * Please make sure to read this manual for safe and correct use of the system, and keep it in a safe place for future reference.
CONTENTS INTRODUCTION .......................... 4 USING THE SYSTEM .................... 20 PRECAUTIONS ........................... 4 CAUTION ....................................... 4 RECEIVING AND ANSWERING A CALL ON THE MASTER STATION .................................... 20 GENERAL PRECAUTIONS ........... 5 Receiving a call ........................... 20 Notes on using this system ......... 5 Answering a call ......................... 21 Notices ...........................................
Calling another station (direct voice call) ........................ 33 Monitoring ................................... 34 ■ Monitoring...........................................34 ■ Scan-monitoring .................................34 Viewing video images at the target station ............................... 35 Paging ......................................... 35 OTHER FUNCTIONS .................. 36 Sending e-mails .......................... 36 APPENDIX .....................................
INTRODUCTION The IS system is a commercial and security video intercom system especially designed for applications in facilities such as office buildings, factories, schools, hospitals, and prisons. Installed separately from conventional general-purpose internal communications systems, the IS system can be used as a video door entry system, emergency announcement system, rescue assistance system, urgent call system, public announcement system, and access control system.
GENERAL PRECAUTIONS 1. Keep the unit more than 1m (3.3') away from radio or TV set. 2. Keep the intercom wires more than 30cm (12'') away from AC 100-240V wiring. AC induced noise and/or unit malfunction could result. 3. Install the unit in an area that will be accessible for future inspections, repairs, and maintenance. 4. As to other manufacturer’s devices (such as door releases) used with this system, comply with the Specifications and Warranty conditions that the manufacturers or venders present. 29.
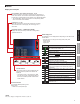
GETTING STARTED PART NAMES Color monitor IP master station (IS-IPMV) ■ Control panel Handset (→P. 22) Hook switch Speaker Call tones and communication sounds are heard from this. Color LCD monitor See the next page for details. Status LED (red) Indicates the current status of the master station by lighting up or blinking in red (while initializing the system, being called, communicating, etc.). * This may blink when you do not answer a call, though it is not a failure.
■ Monitor Display item examples List of stations, zones and/or remote sites (→P. 29) The list of the stations, zones and/or remote sites you searched for is shown here. Stations, zones and/or remote sites are displayed either by number and/or name depending on the setting on the "INITIAL SETTING". * “NOT AVAILABLE” appears in the list when a corresponding station, zone or remote site is not detected. List page no. (→P.
Display examples [Standby mode] * The monitor with no display (black) may also be in the standby mode. [When called from another master station] Station no. and name (or remote site no. and name) of the calling station Date, time, station no. and name of this master station The calling station type image (or remote site symbol image) Key map for selecting the search items If the target station or calling station is a master station, no video image is displayed.
Vandal-resistant IP door station IP vandal-resistant video door station (IS-IPDV) (surface-mount) Camera (→P. 23) Captures images to display on the monitor of the master station. Microphone Sends sounds from the door station to the master station. White light LED Lights up automatically when a call operation is made on this unit at night. Name plate (with backlight) Write down a name on the plate. The backlight is always lit while the power is on to make a visitor confirm the name even at night.
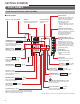
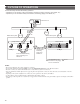
OUTLINE OF OPERATIONS This manual mainly describes the following operations. • Operations you can do within a site (communication, transferring, paging, monitoring, door release, etc.) • Operations you can do between sites (communication, transferring, paging, door release, etc.) Site 1 IP : Control office, etc. Internet / WAN Network direct system Site 2 Communication, transferring, paging, door release, etc.
Communication • On a door station, you can call up to 20 preset master stations in your site at the same time. Or you can call up to19 master stations in your site and a remote site (up to 20 master stations at the remote site). • On a master station, the communication method can be selected from the hands-free mode, the press-to-talk mode, or using the handset. (→P. 21) • You can also communicate with a remote site (the pilot station registered in the site).
Paging On a master station, you can initiate paging to the selected zone(s). All the stations previously registered to the zone(s) receive the paging. (→P. 35) * You can also call another master station or a door station in your site individually by direct voice call. The receiver can reply in the hands-free mode. * You can also make paging to the pilot zone in a remote site.
Door release On a master station, you can unlock the door associated with a door station call in which a door release device is connected. (→P. 26) * You can also unlock the door (door release device) connected to a door station in a remote site depending on the setting.
SETTING AND ADJUSTMENT MASTER STATION SETTINGS AND ADJUSTMENTS Make the basic and initial settings and adjustments on a master station after the system settings are completed. Make the settings and adjustments to all of the master stations individually. NOTE: First change the display language for the monitor screen to the language you need. (→ P. 15) Setting items You can make the settings and adjustments for the following items.
The setting screen appears. Setting the display language When the master station is started up for the first time, the [DISPLAY LANGUAGE] setting screen appears on the monitor. The display language for the monitor screen is set to English as default. First change it to the language you need as follows. IS-IPMV (Pan & Tilt control button) repeatedly to Press select [BRIGHTNESS] (so that it is highlighted). 3 Press repeatedly to change the level.
* When [BACK] is displayed, pressing Initial settings [INITIAL SETTING] SETTING will return to the setting screen. Make the initial settings before beginning to use the master station. You can set the following items under [INITIAL SETTING]. ■ [DOOR CALL TONE] A ■ [ROOM SUB CALL TONE] 001 (Not available in a network direct system) ■ [COMMUNICATION METHOD] B ■ [DISPLAY] C D ■ [SPEED DIAL] ■ [TRANSFER] E F 002 ■ [PRIVACY] ■ [INITIALIZATION] in the standby mode. The setting screen appears.
B Setting the communication method for using the microphone and speaker [COMMUNICATION METHOD] You can select the communication method for using the microphone and speaker between HF (hands-free) and PTT (press-to-talk). 1 2 Press repeatedly to select [COMMUNICATION METHOD] (so that it is highlighted), and then press ZOOM/WIDE to select. Press ZOOM/WIDE , then press repeatedly to select [HF] or [PTT] (so that it is highlighted), and then press ZOOM/WIDE to decide on the selected one.
E Setting the call transferring [TRANSFER] [CALL TRANSFER]: You can make the following settings for transferring calls. Sub item [CALL TRANSFER] [TRANSFER DESTINA] (Transfer destination) [TRANSFER DELAY] [SCHEDULE TRANSFER] [SCHEDULE DESTINA] (Schedule destination) 1 Description Setting range Enables (ON) or disables (OFF) ON the call transferring. OFF (Available when [CALL (Registering a TRANSFER] is set ON.
F Setting the PRIVACY function [PRIVACY] Setting of the PRIVACY function is available when called from another master station. When the PRIVACY MODE is activated, the microphone turns off and you will not be heard by the caller. Sub item Description [PRIVACY MODE] Sets whether or not to activate the PRIVACY function. To activate the PRIVACY function, select the PRIVACY MODE 1 or 2. 1 1 Press repeatedly to select [INITIALIZATION] (so that it is highlighted), and then press ZOOM/WIDE to select.
USING THE SYSTEM RECEIVING AND ANSWERING A CALL ON THE MASTER STATION The following describes the communication method using this system. * When receiving a call from a remote site, the operation methods are the same as described below, however it may take a longer time for some operations and their responses. For example, there may be a time difference between a call starting at a remote site and the call tone ringing on the target master station in your site.
■ Communication in the press-to-talk mode Answering a call The maximum duration of communication is preset in the System setting. (It can be set to a maximum of 10 minutes.) 1 Answer the call in one of the following ways. (Available when "COMMUNICATION METHOD" is set to "PTT" in the "INITIAL SETTING") 1) Press TALK momentarily.
■ Communication by using the handset 1) Lift the handset and you can communicate with the handset. * You can also communicate in the press-to-talk mode by pressing and holding TALK . About the priority The order of priority for two or more actions (communication, calling, paging, monitoring, etc.) performed at the same time is as follows depending on the priority setting.
Viewing video images at a video door station You can view video images at the target station when receiving a call from or communicating with a video door station, or monitoring a video door station in your site. The video images can be adjusted as necessary by using the following functions on the master station. ■ Switching Zoom/Wide The display mode on the monitor can be switched between zoom and wide by each press of ZOOM/WIDE .
■ Adjusting images To restore the image before adjustment If the image on the monitor is difficult to see, you can adjust the image. Press ADJUST again. 1 Press ADJUST when the image is difficult to see. The icon is cleared and the image before adjustment is restored. NOTE: Pressing ADJUST at night may make visitors' faces easier to see, but may also make moving objects more difficult to see. The backlight or night sensitivity is automatically adjusted.
Transferring to another master station You can transfer a call received from a door station to another master station while communicating with it (communication transferring), as well as setting calls to be automatically transferred in the "INITIAL SETTING". * For a call from another master station, you can transfer it when you are communicating with it. However, you cannot transfer the communication to a remote site.
Door release You can release the door lock while being called from, communicating with, or monitoring a door station if a door release device is connected to the station. Press while being called from, communicating with, or monitoring the door station. Using the PRIVACY function The PRIVACY function of a master station prevents you from being heard by other master stations (in your site) or remote sites that call you.
PERFORMING CALLING, MONITORING AND PAGING ON THE MASTER STATION The following describes how to operate the master station to perform calling, monitoring and paging. * If your network direct system includes a PC master station (IS-SOFT), refer to the “OPERATION MANUAL” for the PC master station (IS-SOFT) for details about operating it. * The term “a remote site” used in this manual means “a network direct system in a remote site”. * To make a communication (or calling, paging, etc.
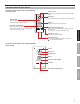
[In the SEARCH LIST] 1 Press LIST or ZOOM/WIDE in the standby mode. The search items are shown in the SEARCH LIST. 2 Press repeatedly to select the target search item A to E (so that it is highlighted). ZOOM/WIDE or LIST (001/002) Search items A NAME SEARCH (→P. 29) B STATIONS BY AREA (→P. 30) C STATIONS BY TYPE (→P. 30) D PAGING ZONE (→P. 31) (002/002) (Not available both in a network direct system in your site and to a network direct system in a remote site) E REMOTE SITE (→P.
Searching for a station, zone or remote site from the list To delete the just entered character: Press . A Searching for a station or zone in your site by entering the name [NAME SEARCH] 1 Select [NAME SEARCH] either in the standby mode (→P. 27) or the SEARCH LIST (→P. 28). To enter the same characters or characters on the same dial key sequentially: (e.g.: To enter “AB”) 2 Enter a name by using the dial keys. (→P. 37) 1. Enter “A”. (Press the dial 2. Press (4 times) A S 3. Enter “B”.
B Searching for a station in your site by designating an area [STATIONS BY AREA] 1 Select [STATIONS BY AREA] either in the standby mode (→P. 27) or the SEARCH LIST. (→P. 28) C Searching for a station in your site by designating a station type [STATIONS BY TYPE] 1 Select [STATIONS BY TYPE] from the SEARCH LIST. (→P. 28) All the station types are displayed in the list. 2 to select the target area from the list (so Press that it is highlighted), and then press ZOOM/WIDE to select.
D Searching for a paging zone in your site from the list [PAGING ZONE] 1 Select [PAGING ZONE] from the SEARCH LIST. (→P. 28) Searching for a station or zone by number using the dial keys 1 All the registered paging zones are displayed in the list. 2 Enter the number of the station or zone in your site you want to search for by using the dial keys in the standby mode. Press to select the target zone (so that it is highlighted). * You can select up to 5 zones. (→P. 29) 3 (→P.
Searching for a station, zone or remote site from the placed call or received call list You can search for a station, zone or remote site from the most recent 20 items of the call and/or paging record or reception record. * The items are displayed in the list in chronological order. Selecting a station, zone or remote site by using the speed dial buttons Select a station, zone or remote site registered to one of the speed dials (1 to 6) simply by pressing the corresponding speed dial button.
Calling another station (direct voice call) 3 Press TALK or ZOOM/WIDE or lift the handset to start calling (talking). Follow the steps below to call a desired door station or master station in your site, or a remote site. 1 or Search for and select the station or remote site you want to call (so that it is highlighted) in one of the search methods. (→P.
■ Scan-monitoring Monitoring You can monitor a door station or multiple door stations in your site sequentially (scan-monitoring) with a master station. You can monitor the preset stations in your site (up to 20 door stations) sequentially, each for the set duration. * The stations should be preset in the System setting on a PC. When monitoring, you can view the image at the station and hear the sound. 1 ■ Monitoring 1 the master station monitor will be turned off.
Viewing video images at the target station When you are receiving a call from, communicating with a door station, or monitoring a door station in your site, you can view video images at the target station. Use the following functions on the master station to control video images as you prefer. (→P. 23-24) • Switching Zoom/Wide • Pan & Tilt • Adjusting images Paging The system allows you to page (transmit an announcement) the selected zone(s) and/or station(s) simultaneously.
OTHER FUNCTIONS Sending e-mails You can send e-mails to the designated mail addresses in the following events. • When calling • When a error occurs among units • When the system starts up Each of these events that has occurred in the previous 60 seconds is summarized and sent in an e-mail. * To use this function, you need to register mail addresses in the System settings on a PC in advance.
APPENDIX TECHNICAL PRECAUTIONS • Cleaning: Clean all the units with a soft cloth dampened with a neutral household cleanser. Do not use an abrasive cleaner or cloth. Door stations are water resistant, however clean all the units with a soft cloth dampened with a neutral household cleanser. Do not use an abrasive cleaner or cloth. • If you are experiencing difficulties in the use of the system, please check our web site at http://www.aiphone.net/.
SPECIFICATIONS Color monitor IP master station (IS-IPMV) Power source Current consumption Communication Ambient temperature Monitor Call history Paging capacity Mounting Electrical box Material Color Weight 48V DC (PoE) 24V DC (supplied from the power supply unit) Max. 65mA (PoE) Max. 130mA (when power supply unit is used) Handset: Simultaneous communication (When press-to-talk (PTT) is not set) Hands-free: Auto-voice actuation or Press-to-talk (PTT) 0 - 40°C (+32°F - +104°F) 3.
WARRANTY Aiphone warrants its products to be free from defects of material and workmanship under normal use and service for a period of two years after delivery to the ultimate user and will repair free of charge or replace at no charge, should it become defective upon which examination shall disclose to be defective and under warranty.
http://www.aiphone.net/ AIPHONE CO., LTD., NAGOYA, JAPAN AIPHONE CORPORATION, BELLEVUE, WA, USA AIPHONE S.A.S.