012 GT-TLI Telephone Line Interface for the GT Series Installation / Operation Instructions ATTENTION: This is the installation and operation manual for the GT-TLI only. Refer to the GT Series Installation and Operation Manual for complete information on all other GT components.
Precautions ! WARNING (Negligence could result in death or serious injury to people.) • • • • • • • • • • • High voltage is present internally. Do not open the case. Electric shock may occur. Do not dismantle or alter the unit. Fire or electric shock may occur. Do not connect any non-specified power source to the +, - terminals and do not install two power supplies in parallel to a single input. Fire, damage to the unit, or system malfunction may occur. Keep the unit away from water or any other liquid.
Package Contents • • • Installation / Operation Instructions GT-TLI RJ11 cable Installation A working GT system with at least one entry panel is required when using the GT-TLI telephone line interface adaptor. The GT-TLI can be desk mounted or wall mounted using the mounting slots on the back of the unit. Ensure that the mounting location is accessible.
Wiring (continued) Below are a few examples of connecting the GT-TLI to an existing telephone installation. Basic Connection CO TEL From Phone Line 3 Telephone Connection CO TEL Note: GT-TLI supports a maximum of 3 telephone sets.
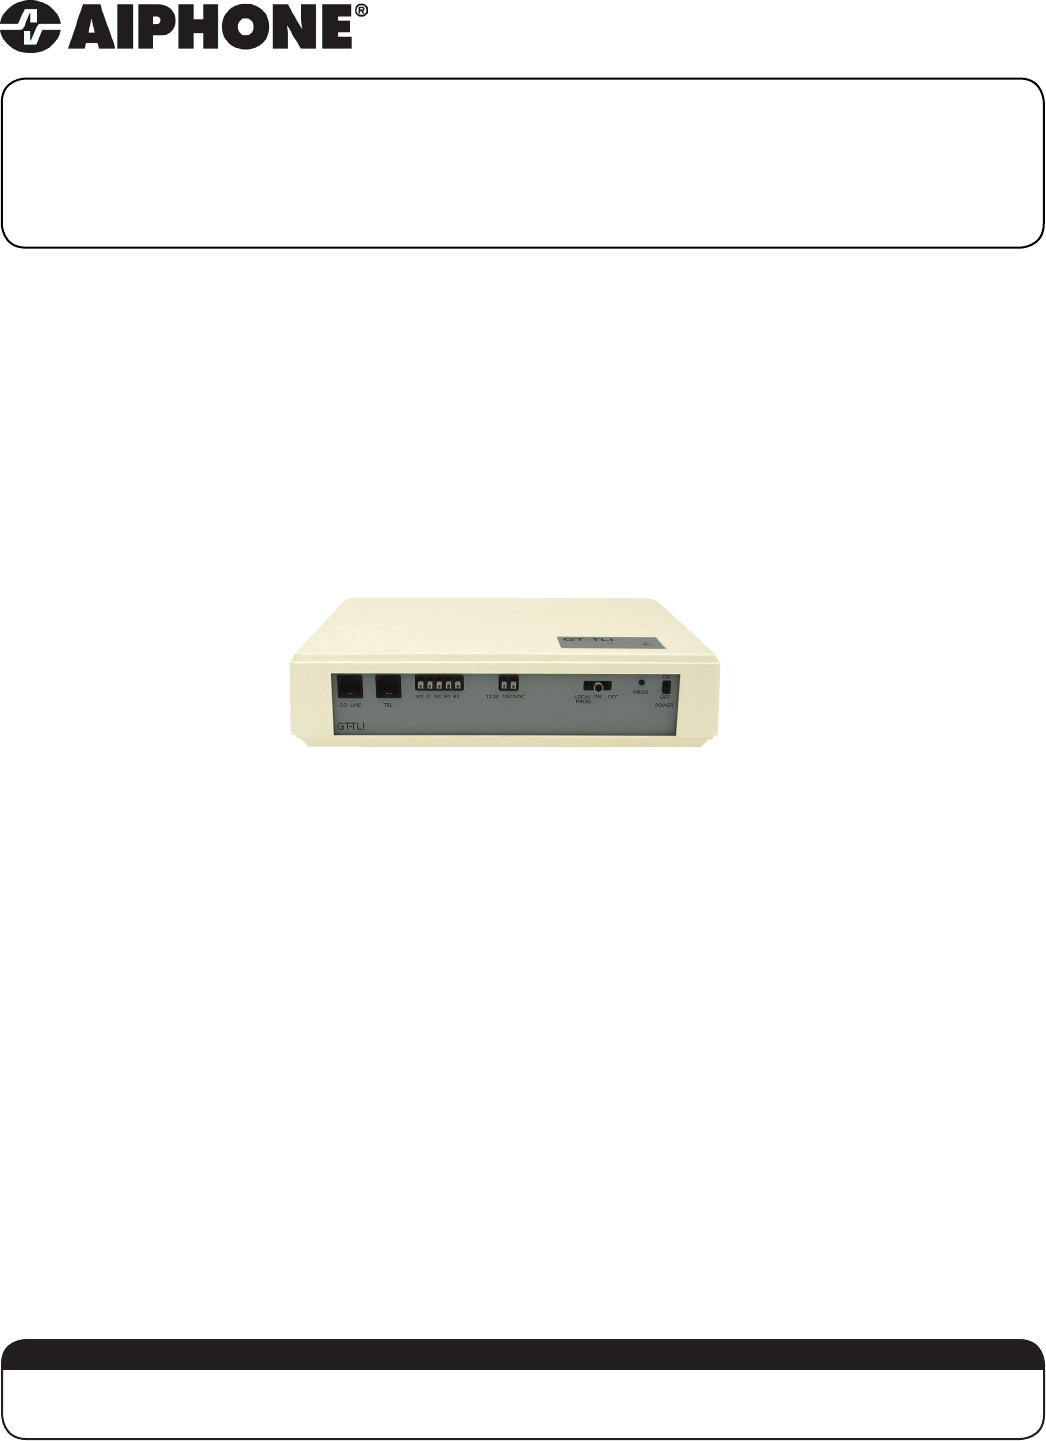
NAMES Power LED Indicator Unit is on when lit. POWER: Master power switch (ON/OFF) 3 Position Switch OFF: ON: LOCAL PROG: PROG: Press to link GT-TLI to system (in program mode) Disables GT-TLI’s dial out function Enables GT-TLI’s dial out function Programming by using direct connected telephone Linking GT-TLI to GT system Direct Select / Push Button Entrance Station Addressing Step 1: Step 2: Step 3: Step 4: Remove front cover from entrance station.
Linking GT-TLI to GT system (continued) GT-DM Entrance Station Addressing Step 1: Step 2: Step 3: Step 4: Step 5: Step 6: While in standby mode, enter # plus ID code (default is 1111). Re-enter ID code. Use the up / down arrows and scroll to PROGRAMMING . Push the Bell button to enter programming mode. The amber LED will begin flashing, then remain lit. Once lit, the entry panel is in programming mode. The LCD will show “CONNECTING” while in programming mode. At GT-TLI, press the PROG button.
SET UP - Accessing Program Mode Remote programming via DTMF telephone • • • • • • • Dial the telephone number of the GT-TLI (tenant’s phone number). An automated message will play “Call from door panel.” Dial one of the two following program access codes; 2000# or 2001#. 2000# = general parameters (volume levels, timing, etc.) 2001# = controlled parameters (calling telephone #, etc.) An automated message will play “The code entered is correct.” Make programming changes (see next page).
SET UP - Basic Programming The following 6 programming steps must be done prior to operating the GT-TLI. Disabling / Enabling Door Calling Telephone The GT-TLI can be disabled from calling the programmed telephone, in cases where the tenant wishes not to be disturbed by the GT entrance panel. The default setting is with Door Call Activation enabled.
SET UP - Advanced Programming Ending Communication After Releasing Door on GT Entrance Panel Choose to end communication immediately after door release (default), after 5 seconds, or not at all. • • • • • Enter program access code 2000# - “The code entered is correct” will be played Enter 35 - 1 long beep will be played Enter 1 (immediate disconnect), 1 long beep will be played, enter 0 - “The code entered is correct” will be played Enter 1 (5 sec.
SET UP - Advanced Programming (continued) Communication Level For Local Telephone Adjust the receive and transmit communication volume for the GT entrance panel to the locally connected telephone. Receive from GT Entrance Panel. The default setting = 04. • • • Enter program access code 2000# - “The code entered is correct” will be played Enter 06 - 1 long beep will be played Enter nn (nn = level, 00 max level - 31 min level) - “The code entered is correct” will be played ⃰ Transmit to GT Entrance Panel.
SET UP - Advanced Programming (continued) Disconnect After Silence or Continuous Signal Set the time that the GT-TLI will wait before disconnecting when either silence or a continuous signal is played. The time can be set in increments of 5 seconds, up to 45 seconds. Enter a value 0 through 9. 0 = function off, 1 = 5 sec, 2 = 10 sec, 3 = 15 sec, 4 = 20 sec, 5 = 25 sec, 6 = 30 sec, 7 = 35 sec, 8 = 40 sec, 9 = 45 sec The defualt setting = 2.
SET UP - Advanced Programming (continued) Audible Level of Voice Messages Adjust the volume level of audible messages played at the GT entrance panel.
SET UP - Quick Reference Programming Chart Password Code Function Parameters 2000# 18 Audio level for voice message 25 DTMF code for GT panel relay 29 Restore default parameters 30 DTMF code for GT-TLI dry contact 32 Duration of GT-TLI dry contact 35 End communication when activating dry contact on GT panel Max 0, Min 7 2 digits Factory default 2 digits 01 - 10 (1-10 seconds) 0 = communication continues 1-0 = communication ends after contact is activated 1-1 = communication ends 5 s
OPERATION Locally Connected Telephone (i.e.
OPERATION - Mode Selection Mode OFF When the 3 position switch (LOCAL PROG/ON/OFF) is in OFF position, GT panel call will not ring the locally connected telephone or the remote telephone. Local Remote Mode ON Without Transfer When the 3 position switch (LOCAL PROG/ON/OFF) is in ON position and the transfer feature is not turned on, the GT panel call will ring the locally connected telephone.
PARAMETERS OF INSTALLATION Programming Default Value Installation Ring duration of the internal telephone set 45 seconds ___________________________ Remote call telephone number 460 ___________________________ DTMF code for operating GT Panel’s dry contact 10 ___________________________ DTMF code for operating GT-TLI’s secondary dry contact 20 ___________________________ Operating time of GT-TLI’s secondary dry contact 5 seconds ___________________________ Ending communication after rele
BASIC PROGRAMMING STEP FROM REMOTE TELEPHONE Dial the phone of the GT-TLI: _____________ , call from door panel will be played Entering Remote Call Number Enter 2001# - “The code entered is correct” will be played Enter 21, 1 long beep will be played Enter telephone number ____________ , “The code entered is correct” will be played Enter 00 to exit - 3 short beeps will be played ⃰ Adjust Ring Duration of Local Telephone Enter 2001# - “The code entered is correct” will be played Enter 20, 1 long beep will
SPECIFICATIONS Dimensions 9-7/16” x 7-1/16” x 2-1/16”, 240mm x 180mm x 53mm Weight 6.35 oz, 0.18 kg Temperature 32°F - 140°F, 0°C - 40°C Connections Standard single line PBX jack master socket within 50 meters or PABX extension of the internal telecommunication network of a company. Power required 12V-24V AC/DC - 0.
WARRANTY Aiphone warrants its products to be free from defects of material and workmanship under normal use and service for a period of two years after delivery to the ultimate user. Aiphone will repair free of charge or replace at no charge should the product become defective upon which examination shall disclose to be defective and under warranty.
Aiphone Corporation 1700 130th Ave. NE Bellevue, WA 98005 Ph: (800) 692-0200 Fax: (425) 455-0071 www.aiphone.com tech@aiphone.