NETWORK INTERCOM SYSTEM AN-8000 SERIES Quickstart Guide Thank you for purchasing AIPHONE's Network Intercom system. Please carefully follow the instructions in this manual to ensure long, trouble-free use of your equipment.
AN Quickstart Guide Overview Network Design Setup a network your system will use to communicate between devices System Name The first (and critical) step in editing an existing system or designing a new one Unit Scan Give your equipment IP addresses Equipment List Tell the software what hardware you have Station Table Give your equipment dialing extension numbers Setting up Door Stations Tell the doors which master to call Setting up Master Stations Set a master to auto answer or to ring until answered Pagi
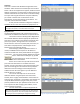
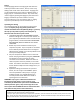
Unit Scan Unit Scan is used to make IP address assignments to the hardware. With the Unit Scan window open click the Scan button. When the equipment list appears, double click each address and change it to match what you were given by the network administrator and press enter to save each setting. Once you have assigned the devices unique IP addresses, put a check in the box next to each device and hit Configuration to save those settings to the devices. You may then close the Unit Scan window.
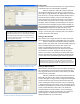
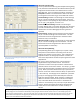
Figure 5: Station Table, see page 155 of the AN-8000 guide. Note: When assigning extensions remember that there are speed dials that involve 0, 7, 8, 9, (and off hook) in addition to the eight Autodials located on some of the handsets, so no extension should start with 0, 7, 8 or 9 unless you plan on not using those speed dials. Station Table The Station Table is the tab that allows us to assign extensions to allow the end user to dial between equipment.
Paging To set up paging switch to the Paging tab and select the stations you’d like to be in Zone 1, Zone 2, and so on by adding check marks next to those stations. A paging zone can be equipment like a Door station or Master station, a Paging amp, or a combination of them. Any master may initiate a page by pressing the Paging key then the zone #. Paging is used when you want to make a one-way announcement to one or more stations and / or paging amps and is preceded by an announcement tone.
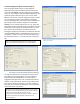
Figure 11: Function Settings1 to enable call forwarding. Figure 12: Function Settings2 to specify which Station Number to send the call to. Figure 13: Group blocking group assignments. Advanced: Incoming Calls To set up automatic transferring and multiple masters getting a call, the feature intended must be enabled and then specific assignments must be made in the called station’s Function Settings(2) tab. There are 5 ways to handle an incoming call.
Advanced: Background Music and Camera Call Up Give the quantity of MI’s is given in the Equipment Registration tab and then the Multi Interface tab may be used. Each AN-8000MI provides 2 paging amp connections which you can configure using the Function Settings tab. The Audio I/O may be used to bring in a music source, select BGM on that channel.
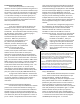
Troubleshooting the Network With as many steps there are and as many options to set in this system somewhere along the line a mistake could be made, or even the best software setup won’t work at a particular site because of some external reason. If you have trouble in Unit Scan, or Uploading, or a call button or dialing on the master gives you an error tone or ignores you there are three procedures you can try to troubleshoot the problem and narrow down the possibilities of the cause.
screenshots it is still “New System” which means an upload has not been attempted and the default system name and password should still work, assuming of course no one else has attempted to upload settings to that device. You can directly log in and undo settings you don’t like specifically or reset it to default settings using the Delete All Settings option in the System Maintenance menu.