FK1629 B 0811YZ IS SERIES Commercial & Security IP Video Intercom system Network Direct System SETTING MANUAL Thank you for selecting Aiphone for your communication and security needs. Please read this manual and the separate “OPERATION MANUAL” carefully before setting and using this system. * Refer to the provided “INSTALLATION MANUAL” for complete information regarding this system. IMPORTANT Please read and understand the system setting procedures before beginning the setup process.
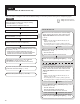
CONTENTS ABOUT THIS MANUAL ............... 3 PURPOSE OF THE SYSTEM SETTINGS ................................... 3 SETTING LIST ............................. 4 SYSTEM SETTING FLOW .......... 8 Flow 1............................................. 9 Flow 2........................................... 10 Flow 3............................................11 Remote site connection settings ........................................ 12 STARTING UP THE SYSTEM AND PREPARING FOR THE SETTINGS .............................
ABOUT THIS MANUAL GETTING STARTED The IS system provides various manuals to meet various system planning and work processes. Use the manuals necessary for your system. Manual configurations The following manuals are provided for a network direct system. Read all the manuals for installing, setting up, and using a network direct system, or provide the manuals to the persons working with the system.
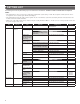
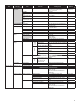
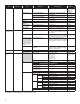
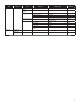
SETTING LIST The following is the list of system settings you can make via the web browser. The titles or items in shaded cells are required. NOTES: • The following list is a brief overview of the setting items available in the system settings on a PC. The descriptions, and the style and order of descriptions do not necessarily equate with the actual displays. • The following list describes the setting contents required only for a network direct system.
IP unit registration Station type Registering stations - 1024 - 65535 - - Up to 16 alphanumeric characters - - ON/OFF ON Other Master station Zone setting Transfer setting Registering daily transfer schedule Zone number Stations Schedule number Schedule name Call transfer time Transfer schedule Weekly schedule setting Individual schedule 50900 - 50902 (Area) 01 - (Unmodifiable) Normal OFF 5 (Center) ON APPENDIX Up to 24 alphanumeric characters (for up to 99 zones) IP video door station,
Title Timer setting Sub title - Call Item Sub item Normal/Priority/Urgent Setting range 10 to 600 (sec.), 0 (Unlimited) Communication In Local (Not available) 30 to 600 (sec.) (Not used for network direct system) 30 to 600 (sec.) 30 to 600 (sec.) (Not used for network direct system) 30 to 600 (sec.) 10 to 600 (sec.) 5 to 60 (sec.
Title E-mail setting Sub title - Default Up to 256 alphanumeric characters 465 English - - - - OFF OFF OFF OFF OFF SETTING THE SYSTEM Downloading setting data Uploading setting data - Up to 256 alphanumeric characters 1 to 65535 Up to 256 alphanumeric characters Up to 64 alphanumeric characters English/French/German/Spanish/Dutch/ Italian/Japanese Call: Normal ON/OFF Call: Priority ON/OFF Call: Urgent ON/OFF System start ON/OFF Data communication error in the ON/OFF system - Mailing event Set
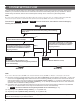
SYSTEM SETTING FLOW First of all, make the network settings. The network setting method differs according to the network environment. Select the flow suitable for your network environment from the chart below, and start the network settings after you fully understand it. After the network settings are finished, make the other individual system settings. See P. 15-28 for the system setting details. NOTE: The system settings should be made mainly on the IP host unit in the system (in a site).
Flow 1 * This is the outline of setting flow. Also make the detailed settings on each setting window referring to the corresponding pages. START : Settings on the IP host unit : Settings on the IP client units Write down the MAC addresses of all the IP units to be used in the system in advance by using the “Setting Information Memo” (→P. 30) etc. * The MAC address is labeled on each unit. SETTING THE SYSTEM Decide the static IP address for the IP unit to be used as the IP host unit.
Flow 2 (All units: Static IP addresses are set) * This is the outline of setting flow. Also make the detailed settings on each setting window referring to the corresponding pages. START : Settings on the IP host unit : Settings on the IP client units Write down the MAC addresses of all the IP units to be used in the system in advance by using the “Setting Information Memo” (→P. 30) etc. * The MAC address is labeled on each unit. Decide the static IP address for each IP unit.
Flow 3 (All units: IP addresses are assigned by the DHCP server automatically) START : Settings on the IP host unit : Settings on the IP client units SETTING THE SYSTEM Write down the MAC addresses of all the IP units to be used in the system in advance by using the “Setting Information Memo” (→P. 30) etc. * The MAC address is labeled on each unit. GETTING STARTED * This is the outline of setting flow. Also make the detailed settings on each setting window referring to the corresponding pages.
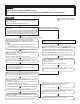
Remote site connection settings You need to make the remote site connection settings to enable communication between your site and remote sites. Make the settings by following the procedure below after the network settings for your site have finished. * This is the outline of setting flow. Also make the detailed settings on each setting window referring to the corresponding pages. Procedure Complete the network settings for your site by following Flow 1 , Flow 2 or Flow 3 . (→P.
STARTING UP THE SYSTEM AND PREPARING FOR THE SETTINGS System requirements for PC Your PC and operating environment must meet the following system requirements to make the settings. 10BASE-T Ethernet, 100BASE-TX Ethernet Web browser Internet Explorer 6.0 or later (with Internet Options SSL 3.0 enabled) SETTING THE SYSTEM Network Starting up the system 1 Connect a PC to the IP unit.
2 Turn on the power to the IP unit. * If the unit is connected to a switch or injector that has a PoE function, the power is being supplied. If a power supply unit is connected to the unit, turn on the power of the power supply unit. * Turn on all the units constituting the system depending on the network setting method. * The status LED of an IP video door station changes from red lighting to orange blinking. (When the settings have correctly made, it changes to orange lighting.
THE SYSTEM SETTING DETAILS GETTING STARTED The basic setting procedure When you have logged in to the system, the setting window appears. You can make the settings on this window. * Make sure to refer to the on-screen instructions and comments displayed on each window when you make the settings. * Depending on the PC and its OS or environment, the display may differ.
The following shows the setting procedure for the items of each title. Refer to “SETTING LIST” (→P. 4-7) for details about the settings. Make the settings by also referring to the on-screen instructions. Making network settings to each IP unit [Network setting: Individual] 4 Make the settings for network to each IP unit connected to the system according to your requirements. 1 When the settings on this window have finished, update the system from [Updating the system]. (→P.
Setting the administrator ID and password [Administrator setting] * This setting can be made to each of the IP units in your site. * “aiphone” is preset as the default for both ID and password. 1 Make the settings on the following items displayed in the setting window. 1 Click IP unit search in the table of contents. 2 Click IP unit search . 3 Confirm the “Station type”, “MAC address” and “Unit name” of the IP units in the list.
Registering areas and remote sites [System setting – Area/Site registration] Required Register areas (for separating stations in your site) and/ or remote sites. The number to which a name is entered is registered as an area or site number. Up to 99 areas and/or sites (up to 31 for sites only) can be registered. 1 2 Click Area/Site registration in the table of contents. Enter an area name in the cell for the area number 01.
Registering IP units [System setting – IP unit registration] GETTING STARTED Register IP units by selecting from the connected ones to the system. * To register a PC master station, first install the application (IS-SOFT) to a PC, then connect the PC to the network and then start IS-SOFT. Click IP unit registration in the table of contents. 2 Click IP unit search . 3 Check the boxes for the IP units you want to register, and then click Add to the imported IP units list .
How to select multiple stations Registering stations [System setting – Registering stations] ○ Click to check the stations you will register. Register all the stations connected in the system, and set the area, station no. and station name to them. 1 Click Registering stations in the table of contents. ○ By clicking the button on the top of the list, you can check or cancel all the stations on the list. 2 Set the area, station no. and station name to the target stations. * Setting the station no.
Making detailed settings to stations [System setting – Advanced station settings] GETTING STARTED Make detailed settings for the registered stations. The settings can be made to a station individually, or multiple stations of the same type at a time. The setting items differ from the station type. First select a station (or stations), and then open the “Advanced settings” window to make the settings.
B Settings on [Other] window • [Transmit volume boost at PTT]: Select whether to increase the press-to-talk sound volume transmitted to the stations (ON) or not (OFF). • [Camera zoom image preset]: Select the default of camera’s Zoom/Wide function at calling from the 9 zoom positions and "0" (wide) from the pull-down menu. • [Call acknowledge tone on/off]: Select whether to sound the call acknowledge tone of door station (ON) or not (OFF).
Registering stations to zones [System setting – Zone setting] Assign stations to the registered zones. 1 Click Zone setting in the table of contents. You can set the schedule for transferring calls to other master stations in your site or remote sites automatically. The schedules registered on this setting are used when making a transfer setting on a master station. Up to 2 daily schedules can be registered. Click Registering daily transfer schedule in the table of contents.
Setting transfer schedule [Transfer setting – Transfer schedule setting] You can set a weekly transfer schedule and individual daily schedule. * The settings can be made 1 year ahead. 1 Click Transfer schedule setting in the table of contents. 2 Make the settings by clicking Weekly schedule and Individual schedule respectively to open the corresponding window. E F * Individual schedule should be clicked after the target date is clicked on the calendar. 3 Make the settings in the displayed window(s).
Setting the timer [Timer setting] Set the time for each operation. Click Timer setting in the table of contents. 2 Set the time for the following operations respectively. GETTING STARTED 1 SETTING THE SYSTEM * The setting range is displayed on the right side of each input box. • [Call]: Set the duration of call from door stations to [Normal], [Priority] or [Urgent].
Setting stations to receive calls and zones to receive paging from remote sites [Remote site pilot call setting] Set the master stations and sub stations to receive calls, and zones to receive paging from remote sites. * The setting can be made for each priority individually. 1 Click Remote site pilot call setting in the table of contents.
Video setting Click Video setting in the table of contents. Set the following settings for video quality. Set the time and date of the system, used for transfer schedule. 1 Click Time and date setting in the table of contents. 2 Set the following settings. • [Frame Rate]: Set the frame rate selecting “1”, “2”, “5”, “7.5”, “10” or “15” fps from the pull-down menu. • [Quality]: 3 SETTING THE SYSTEM Set the video quality selecting “Low”, “Middle”, “High” or “Excellent” from the pull-down menu.
E-mail setting You can send an e-mail when calling or send error messages etc. by e-mail. Up to 3 mail addresses can be set. NOTES: • Prepare an e-mail account for this function beforehand. • Make sure to enter the system name at [Network setting: Individual] – [System name] to display the title with an e-mail. • Make sure to enter primary and/or secondary DNS server information at [Network setting: Individual] to all the IP units. 1 2 Click E-mail setting in the table of contents.
MAINTENANCE This section describes the use of functions for the system maintenance. These functions are available on the web server. Updating the firmware [Firmware update] ■ Downloading updated firmware data 1 Access the web browser and log in. (→P. 14) 2 Click Initialization in the table of contents. Please access our web page at http://www.aiphone.net/ and download the firmware data on the PC to update the system. For the download procedure, see the instructions on our web page.
Setting Information Memo Record your settings information. It will need when resetting or maintenance.
http://www.aiphone.net/ AIPHONE CO., LTD., NAGOYA, JAPAN AIPHONE CORPORATION, BELLEVUE, WA, USA AIPHONE S.A.S.