
Quick Start Guide


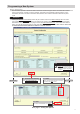
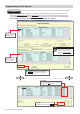
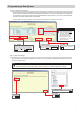

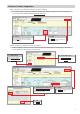

Table Of Contents

7
4.1 - Select
Step 4: Setting File Upload
Once each station has been associated with its individual station information, the setting le containing the rest
of the system’s information will need to be uploaded to each station. To upload the setting le, the programming
PC will need to be in the same subnet as the associated stations (refer to Step 3). The PC’s current IP address
is listed in the bottom left-hand side of this window.
Note that without uploading a setting le, most functions and features will be unavailable to the stations.
Programming a New System
Stations can be selected individually, or by
Type. Choose All from the Select Station
by Type drop down menu to upload to all
stations. Then, click
Select
.
4.3 - Next
After successful upload, click
Next
.
The progress of each station
will be displayed in the Status
column. Unavailable stations
may still be rebooting from
the association process. If a
station has rebooted and is
still unavailable, ensure the
programming PC is in the same
subnet as the station.
Note:
Step 5: Export Settings
The nal step in the Programming Wizard is to create a copy of the system’s setting le and export it to a secure
location or external drive.
5.2 - Select Folder
Select location to save the le then click
OK
.
5.1 - Export
Click
Export
.
5.3 - Finish
Click Finish .
If the original program le is lost, or Support Tool is moved to a different PC, this copy can be used to
access the system programming to add or remove a station, or to make programming changes.
Note:
4.2 - Start Upload
Once station Status shows Available (may
take a few minutes), click Start Upload .