
Quick Start Guide
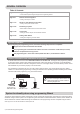


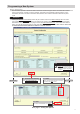
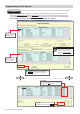
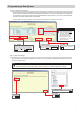

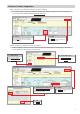

Table Of Contents

8 | IX Quick Start Programming Guide
Getting Started
Step 1: Opening Network Camera Registry
Network Cameras must be registered in Support Tool prior to associating with a station.
Click
Open Network Camera Registry
.
1.3 - Open Network Camera Registry
2
Step 2: Registering a Network Camera
Support Tool will search for available Network Cameras on the network, and any camera found will be listed
in the Network Camera Search List. If a known camera is not found, place the programming PC on the same
network switch as the camera(s), and attempt the search again.
Network Camera Integration
Select
Add Camera
and the Support Tool will
search the network of all compatible network
cameras.
2.1 - Add Camera
Enter the ID and Password
required for each selected
network camera.
2.3 - ID and Password
Click
Get Network Camera Infomation
and the Support Tool will nd the
network camera's video prole
information.
2.4 - Get Network Camera
Check the box of each network
camera video prole you wish to
use with the system.
2.5 - Select a Prole
Click
Register
to apply the
selected settings and register
chosen network cameras.
2.6 - Register
Check the box of each network
camera you wish to register to the
system.
2.2 - Select a Camera
The IX Series allows integration of network cameras that are ONVIF prole S compliant. These cameras can
be called up by either audio or audio and video stations, as well as individually monitored by master stations.
From the menu on the left
expand System Information,
and select Address Book.
1.1 - Address Book
A Network Camera's IP Address
and ID/Password may be entered
to manually add the device.
Optional Settings
Click
Open Network Camera List
.
1.2 - Open Network Camera List