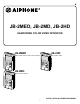
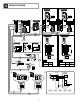
C JB-2MED, JB-2MD, JB-2HD HANDSFREE COLOR VIDEO INTERCOM JB-2MED JB-2HD Master monitor station (w/ built-in picture memory) Sub monitor station SET PL AY RE DOOR C CALL JB-2M ED CALL MONIT OR JB-2HD TALK MONIT OR TALK JB-2MD Master monitor station DOOR CALL JB-2M D MONIT OR TALK INSTALLATION & OPERATION MANUAL -1-
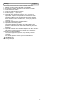
PRECAUTIONS General Prohibitions 1 English Prohibition to Dismantle the Unit Prohibition on Subjecting the Unit to Water PACKAGE CONTENTS General Precautions WARNING 1 (Negligence could result in death or serious injury to people) 1. High voltage is present internally. Do not open the case. Electric shock could result. 2. Do not dismantle or alter the unit. Fire or electric shock could result. 3.
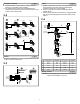
English Installation locations 1. Install the master monitor station in a place where the screen is not exposed to direct sunlight. 2. The master monitor station has manual adjustment switches on both sides. Secure an open space of 5 cm (2") on either side of the monitor. English Cable 1. Parallel or jacketed 2-conductor, non-shielded cables are recommended. PVC jacket with PE (polyethylene) insulated conductors is recommended. 2. Do not use single loose wires, twisted pair cables or coaxial cables. 3.
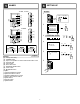
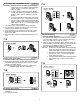
3 3-2 MOUNTING 3-1 #1 JB-2MED (PR) E (BL) SW SET PLA [1] Y REC CAL JB2M L ED MO NIT OR [2] [3] P LK (YE) b1 83,5 mm (3-5/16") V- (OG) V+ (RD) (BR) JB-2MD JB-2HD [2] D JB-2HD L L c1 c2 PR: Purple BL: Blue GR: Green YE: Yellow OR: Orange RD: Red BR: Brown 2 9mm (3/8") PS-1820 PS-1820S PS-1820UL [2] (BR) (RD) (OG) (YE) PR: Violet BL: Bleu GR: Vert YE: Jaune OR: Orange RD: Rouge BR: Brun #1 [5] [6] PR: Lila BL: Blau GR: Grün YE: Gelb OR: Orange RD: Rot BR: Braun PR: Vi
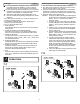
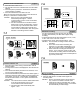
4 WIRING DIAGRAM 2 2 JB-2HD JB-2HD ON - OFF ON - OFF 1 JB-2M(E)D RELEASE A1 A2 A1 A2 B1 B2 S S - 4 + - + 2' 2 - 5 - + 2' JA-2SD JA-2SD + DC 18 V PS-1820 PS-1820DIN PS-1810DIN 230V AC 230 V AC N IN 230V~ 50/60Hz NL 1A - + IN 230V~ 50/60Hz NL 2A - + 100V - 240V 50/60 Hz + 18 V DC2A 6 2 18V DC 2A + 18V DC 1 A B1 B2 SUB IN B1 B2 SUB IN B1 SUB OUT B2 B1 SUB OUT B2 Set to OFF when SUB OUT is wired. Set to OFF when SUB OUT is wired.
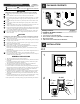
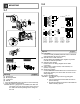
English Wiring Securely insert wires into each terminal as shown. 1. Master monitor station JB-2MD or JB-2MED 2. Sub monitor station JB-2HD or sub station JA-2SD 3. Video entrance station 4. Video or audio entrance station 5. Power supply +, - (DC 18 V) 6. Optional door release EL-9S (AC 12 V, 0.35 A) or equivalent, requires a separate AC transformer. Run separate cables for the audio/video and door release. Door release contact: AC/DC 24 V, 0.5 A (dry closure contact L, L). 7.
5 6 NAMES JB-2MD , JB-2HD SETTING UP JB-2MED 1 BRIGHT [1] [11] SET PLAY REC DOOR CALL MONITOR JB-2MD TONE [7] [8] [9] DOOR CALL [2] [3] RCV. [6] [12] [13] [14] SET PLAY MONITOR TALK 2 [10] TALK REC CALL JB-2MED SET 31/DEC/04 23:45 31/DEC/04 23:45 [4][5] JB-2MED 31/DEC/04 23:45 CALL RCV.
Answering a door call (Voice actuate mode) English 1. The CALL button of the entrance station is pressed. 2. The chime tone sounds, the caller is seen on the video monitor, and the caller's voice is heard. 3. Press the TALK button momentarily, then communicate handsfree. The transmit LED lights when you talk, and goes off as you listen to the caller (or hear outside sounds). 4. Press the TALK button again to end. NOTES: 1. In step 2, the video and audio go off after approx. 45 seconds.
7-5 English Answering a door call (MANUAL mode) NOTES: 1. In step 2, the video and audio go off after approx. 45 seconds. If the TALK button is pressed within approx. 45 sec., it connects to the caller's entrance station. 2. In step 2, the door call-in LED of the JB-2MD and JB-2HD lights in red if called from entrance station 1, and in green if called from entrance station 2. 3. If you press the TALK button in step 4 for a short time (less than 2 sec.), communication will end. 4.
7-8 English Room-to-room communication 1. Press the CALL button once. 2. The "All Call" function is activated to link all of the inside stations. 3. If another person presses the TALK button, handsfree communication is possible. 4. Press and release the TALK button to end. .Do not press the TALK button during communication in step 3. It will end the communication. NOTES: 1. Room-to-room communication ends automatically after approx. 1 minute. To have another room-to-room conversation, repeat from step 1.
7-10 7-12 JB-2MED JB-2MED 1 2 SET 1 16/32/60-picture mode SET PLAY SET PLAY 16-picture, 4-frame mode SET REC REC CALL CALL JB-2M ED JB-2M ED MONITOR MONITOR TALK 2/5 01/APR/04 14:30 3 SET SET PLAY 2/5 TALK 2 01/APR/04 14:30 01/APR/04 14:30 PLAY SET REC CALL JB-2M ED MONITOR TALK English Absence set (Auto absence recording) 1. If the SET button is pressed once (less than 2 sec.), it will light and the unit will be set. 2.
7-13 7-14 JB-2MED 1 REC JB-2MED 1 01/APR/04 15:30 2 SET 01/APR/04 15:30 01/APR/04 14:30 M5 01/APR/04 REC 2 01/APR/04 15:30 M5 SET 01/APR/04 15:30 01/APR/04 01/APR/04 15:30 3 01/APR/04 15:30 FULL 01/APR/04 15:30 PLAY 01/APR/04 14:30 English Save 1. Press the SET button during play (P21) to save the picture. "M" is displayed to show it has been saved, and the number of the saved pictures is also displayed. A maximum of 8 pictures can be saved.
English Erase 1. Use the play operation to display the picture you wish to erase. (P21) Push the SET button and REC button simultaneously for 2 sec. to erase. 2. The picture to be erased is deleted, and the next picture will be displayed. When the next picture is displayed, let go of the button. 1. Erase operations will also erase saved pictures. 2. Once a picture is erased, it cannot be restored. 3.
This equipment has been tested and found to comply with the limits for a Class B digital device, pursuant to Part 15 of the FCC Rules. These limits are designed to provide reasonable protection against harmful interference in a residential installation. This equipment generates, uses, and can radiate radio frequency energy, and if not installed and used in accordance with the instructions, may cause harmful interference to radio communications.