FK1462 Ⓑ P0109YI JK-1MED HANDS FREE COLOR VIDEO INTERCOM MASTER MONITOR STATION INTERPHONE VIDEO COULEUR MAINS LIBRES MONITEUR MAÎTRE HANDENVRIJE KLEURENVIDEOFONIE MONITOR-HOOFDPOST JK-1MED Master monitor station Moniteur maître Monitor-hoofdpost INSTALLATION & OPERATION MANUAL MANUEL D’INSTALLATION ET D’UTILISATION INSTALLATIE- EN GEBRUIKSHANDLEIDING
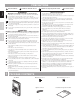
PRECAUTIONS General Prohibitions Prohibition to Dismantle the Unit Prohibition on Subjecting the Unit to Water English WARNING General Precautions (Negligence could result in death or serious injury.) 1. 2. 3. Français 1. High voltage is present internally. Do not open the case. Electric shock could result. 2. Do not dismantle or alter the unit. Fire or electric shock could result. 3. Do not connect any non-specified power source to the +, - terminals.
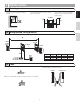
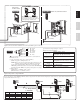
2 INSTALLATION 2-1 Mounting locations 1 2 3 The master monitor station has switches on both sides. Allow at least 5 cm (2") of open space on either side. 2 Allow at least 15 cm (6") of vertical open space from the center of the mounting bracket in order to mount the master monitor station. 3 JK-1MED + 5 cm (2") English Install the master monitor station in a place where the screen is not exposed to direct sunlight.
3 WIRING Insert wires securely into each terminal as shown.
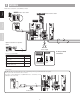
JK-1MED Sub master monitor station JK-1HD 2 JK-1SD NP 2 2 P PS18 Audio only sub master station English JK-1HD P PS18 When the JK-1HD is connected, split power between the master station and the sub master station if radio signals are picked up during communication. Français Nederlands (To optional units) (To optional units) - + - + Option connector: Control external devices connected with the option connector.
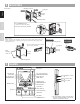
4 MOUNTING Back wiring Mounting screws x 2 1-gang box English JK-1MED 83,5 mm (3-5/16") Mounting bracket Français 1. Press RELEASE button (to insert or remove the wire). 2. Insert the cable into the terminal. 1 2 Nederlands 8mm (3/8") Surface wiring * When a 1-gang box is not mounted, the cable can be routed as surface wiring to the top or bottom of the unit. Cut a cable inlet on the upper part of the unit to allow passage of the wiring into the unit.
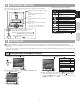
6 OPERATING METHOD To operate this unit, check the symbol and then press the appropriate operation button This is not a touch-panel operation. Symbol The symbols differ according to the symbol screen. 7 ※ Setting can also be done by pressing ZOOM/WIDE button. SETTING UP Upon initial installation, set the time first. If the unit is used without setting the time, the menu LED (red) will light up as notification.
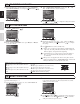
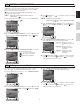
7-2 SELECT THE LANGUAGE After performing steps 1 and 2 in section 7-1, select "LANGUAGE" ). in the "INITIAL SETTING" screen and press MENU button ( 2 In the“SELECT THE LANGUAGE”screen, press“p”,“q”, “t”, and“u”buttons to select the language. 3 Press MENU button ( ) to complete the settings and return to the "INITIAL SETTING" screen. 3 Pressing button sets the "Month" and moves the cursor to "Day". 4 Perform the same steps to set "Day", "Year", "Hour" and "Minute".
7-5 EXTERNAL INPUT SETTING 7-5-1: 1 Press MENU button ( the previous screen. 7-5-2: ) to complete the settings and return to Setting the alert sound time. Initial setting: Notification at door disabled/alert sound is 30 sec. 1 In the "EXTERNAL INPUT SETTING" screen, press button or button to select "NOTICE AT DOOR [1]" and press MENU button ( ). 2 In the "NOTIFICATION AT DOOR SETTING" screen, press button or button to select the "Notification method".
7-7 Automatic night volume adjustment This automatically lowers the communication volume at the door station only at night.Initial setting: "Disabled" 2 In the "NIGHT TIME DOOR VOLUME CONTROL" screen, press button or button to select "ENABLE". 4 Press MENU button ( the previous screen. After performing step 1 in section 7-1, select "COMMUNICATION" and press MENU button ( ). In the "COMMUNICATION SETTING" screen, press button or button to select "NIGHT VOLUME" and press MENU button ( ).
7-9 Press-to-talk setting This disables the press-to-talk setting during communication with a door station (section 8-1). Initial setting: (press-to-talk enabled) 4 Press MENU button ( ) to complete the settings and return to the "COMMUNICATION SETTING" screen. 1 After performing step 1 in section 7-1, select "PICTURE MEMORY" ). and press MENU button ( 2 In the "PICTURE MEMORY SETTING" screen, press button or button to select the recording method.
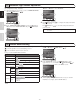
8 OPERATIONS 8-1 Answering a door call (HANDS-FREE mode, PTT mode) Press CALL button. Instant voice call function English 1 Français 2 2 Even without answering, door area can be seen and heard with video and audio (for approximately 45 seconds). Inside sound is not heard outside. 3 Press and hold TALK button for at least 1 second. A beep sounds, and after approximately 1 second another beep sounds, which indicates PTT mode is engaged. If TALK button is pressed briefly (less than 0.
8-3 Entrance monitoring 1 Press 2 The video monitor displays the image from the door station and the incoming audio is heard. If you do not press TALK button, the caller will not hear sounds from the inside station. 3 MONITOR button in the standby mode. Press OFF button to end communication. English 1 2 Press CALL button to talk with the other person. • A call-in is sent to the sub master station. • The reply of the other person is not heard.
8-6 Pan/tilt operation 1 When a zoom picture is displayed, press , , , or button. [Zoom picture] Français English •[]: Up •[]: Down •[]: Left •[]: Right • Moving diagonally is also possible. Nederlands The image range of the zoom picture and wide picture differs. The edges of the wide picture do not display with the zoom picture. 8-7 Zoom Picture Pre-set 1 The picture can be set to display using a set zoom picture position for when a call is received from the door station.
8-9 Backlight adjustment, Night sensitivity adjustment 1 To perform adjustment 1 To cancel adjustment Press ADJUST button during adjustment. • The adjust icon will disappear and the screen returns to the preadjustment screen :Adjust icon (day) :Adjust icon (night) [Before adjustment] Adjust icon display Adjust icon display Nederlands [After adjustment] Français [Before adjustment] NOTES: 1. Distinguishing between day and night is automatically done by the door station.
8-12 Play recorded picture If there are automatically recorded pictures, such as those taken while you were out, the play LED (red) flashes. * In the manual, screen icons and button icons are explained together. English * In addition, the operations shown below are also possible in the play screen. REC button ( ): • To display the previous (more recent date) picture.
Warranty English Aiphone warrants thats its products have no material or workmanship defects under normal use conditions for two years after delivery to the end user. Aiphone will perform repair or replacement free of charge if the product is defective and the warranty applies to the defect. Aiphone reserves unto itself the sole right to make the final decision whether there is a defect in materials and/or workmanship and whether or not the product is under warranty.