TalkMaster™ IP intercom system Software User Guide For all IP-series 10/100 Ethernet Intercoms Models IP-EWST, IP EWST-POE
Table of Contents 1. Welcome To TalkMaster.......................................................................................................... 1 Welcome ................................................................................................................................... 1 Release Notes........................................................................................................................... 1 System Requirements.............................................................
Table of Contents 6. TalkMaster Console Forwarding.......................................................................................... 33 Forward Intercoms .................................................................................................................. 33 Retrieve Intercoms .................................................................................................................. 33 Unattended Console ...........................................................................
Welcome To TalkMaster Welcome Welcome To TalkMaster™ LE! If you are upgrading from an earlier version of TalkMaster™, please review the Release Notes. To setup and configure your IP-series intercoms, please review Configure Intercoms. If you would like help on using TalkMaster, please review TalkMaster Overview. Release Notes TalkMaster™ Version 1.92 Released February, 2007 TalkMaster™ version 1.
Welcome To TalkMaster TalkMaster™ Version 1.8 Released November, 2005 TalkMaster™ version 1.8 contains the following enhancements and corrections: • All Setup functions have been moved to the password protected Admin menu • New tabbed views on main screen allow display of all Intercoms or all Paging Groups and selected Intercoms.
Welcome To TalkMaster • The Calls Waiting Audio Player is automatically closed at the end of a call • Ability to select a multimedia card used for the Speaker and Microphone operation TalkMaster version 1.6 contains the following bug fixes: • Applying Intercom configuration changes fails in non-U.S.
Using TalkMaster TalkMaster Overview TalkMaster™ is a software program designed to work with Aiphone’s IP-series Intercoms. TalkMaster has two main functions. First, TalkMaster must be used to configure the IP address information and related features for your IP intercoms. TalkMaster searches for any Intercoms on your network and allows you to specify the IP address settings for each one.
Using TalkMaster TalkMaster can listen for incoming calls in one of three "modes": Call Announcement with audible and visual alerts In this mode, pressing the Intercom button notifies the TalkMaster operator by an audible and/or visual alert. The TalkMaster operator responds and controls the microphone at that intercom to enable user hands-free operation.
Using TalkMaster The following sections describe the areas of the TalkMaster™ main screen. 1 Tool Bar 2 Intercom View / Custom View tabs 3 Calls Waiting Queue 4 Auto Response setting 5 Talk Mode setting 6 Audio Archive setting 7 Listen Mode setting 8 System Events window Tool Bar Forward Intercoms to an alternate TalkMaster Console. Please see Forward Intercoms for details. Retrieve Intercoms from an alternate TalkMaster Console. Please see Retrieve Intercoms for details.
Using TalkMaster The Answer Later button is displayed when the Activate Call Announcement option in menu Admin - Preferences - Options has been checked and a call is incoming. • Activating the Talk or Listen buttons answers the call and removes the Answer Later button from the screen • Pressing this button sends a message (i.e.
Using TalkMaster Right clicking on an Intercom displays the following Intercom Options context menu • Send announcement to selected unit - Click to send the wave file defined in menu Admin Preferences - Startup Audio to the Intercom • Activity and Connection Details - Click to display the duration of the Intercoms connection, the time it connected, the last time it received audio, the last time audio was sent to it, and the IP address and Port it used to connect to TalkMaster • Reset Connection - Click
Using TalkMaster Right clicking on a Paging Group displays the following Paging Group context menu: The connection status of each Intercom in the group is listed. Calls Waiting This list shows calls that are waiting to be answered.
Using TalkMaster Any intercom that tries to contact the console is sent a message indicating that no one is available to take their call. Please see Unattended Console for more information. Clicking the Cancel button returns the console to normal operation. Listen Mode The Listen Mode determines if the Listen button is automatically turned on when the Talk button is turned off. If Call Announcement is enabled in menu Admin Preferences - Options, this option is set to Automatic and cannot be changed.
Using TalkMaster An important benefit of using Automatic mode is that other intercoms are precluded from interrupting your "conversation" because the Talk or Listen button is always active. TalkMaster will not interrupt a call if there is already one in progress. Any other intercom that tries to contact TalkMaster will be placed in the Calls Waiting list.
Using TalkMaster Selected - refers to the intercom currently highlighted in blue in the Intercom View / Custom View list. This option allows 2-way communication with a single Intercom. Group - refers to any Intercom or Paging Group that has an X in the Grp column of the Intercom View / Custom View list. This option allows 1-way communication with any number of Intercoms. All Active - refers to all currently connected Intercoms in the Intercom View / Custom View list.
Using TalkMaster Talk/Page will turn on the PC’s microphone to send the audio to the Intercom(s). Please refer to Talk button for details. Talk / Page button The Talk/Page button turns on the PC’s microphone and allows you to speak to the intercom highlighted in blue in the Intercom View / Custom View list.
Using TalkMaster When a button is pressed, the associated file is played to the Intercom(s) specified by the Talk Mode. When a Paging button is pressed, the Stop Message button becomes active till the file has completed. Pressing the Stop Message button terminates file being played. If the OK button is pressed you are returned to the main TalkMaster screen. If a file is still being played, the Play File button changes to Play Stop allowing you to terminate the recording.
Using Call Announcement Call Announcement Call Announcement causes an audible and/or visual alert to be issued to the TalkMaster™ operator when the Call or PTT button on an intercom is pressed. Selecting menu Admin Preferences and checking Activate Call Announcement in the Options tab turns this option on. If this option is selected, Listen Mode is set to Automatic and is grayed out.
Using Call Announcement An important benefit of using Call Announcement is that any other intercom is prevented from interrupting your "conversation" because the Talk or Listen button is always active. TalkMaster will not interrupt a call if there is already one in progress. Any other intercom that tries to contact TalkMaster will be placed in the Calls Waiting list.
Scheduled Events Scheduled Events TalkMaster provides the ability to schedule events and run them at a particular time. Currently, only the Forward Intercoms command is supported. Setting up a schedule for the Forward Intercoms command allows intercoms to be forwarded to an alternate TalkMaster LE console at specific time during the day (e.g. shift turnover).
Scheduled Events • Description - Enter a description of the event • Command - Select a pre-existing command from the list or select the entry to bring up the Maintain Commands dialog • Intercoms - The All Active is the only option available at this time • Prompted - Check this box to pop up a dialog when the scheduled event occurs • Allow Cancel - Check this box to add a Cancel button to the prompted dialog.
Scheduled Events Maintain Commands The Maintain Commands dialog allows commands that can be run automatically as scheduled events to be maintained. Currently, the only command that is supported is the Forward command.
Preferences and Setup Preferences Preferences are used to specify various settings for TalkMaster™. This is accessed from the menu Admin Preferences. The Options tab is used to customize the way TalkMaster works. The Multimedia tab is used to select the speaker and microphone devices The Volume tab is used to change the Volume on an Intercom The Legacy tab is retained for compatibility with older Intercoms Preferences - Options tab The Options tab sets options that affect the behavior of all intercoms.
Preferences and Setup Hide when minimized - When this option is checked TalkMaster is minimized to the Windows System Tray when either the - or X are pressed. in the upper right hand corner of the screen To close TalkMaster, use menu File Exit or right click on the TalkMaster ICON is the system tray and select Close Program If you check this box, it is recommended that you also check Activate Call Announcement so that the Incoming Call dialog is displayed when TalkMaster is minimized.
Preferences and Setup Listen activated Preferences - Multimedia tab The Multimedia tab is used to select the multimedia device to be used for the speaker and microphone. When the Microphone uLaw box is checked, microphone audio will be sent in uLaw format instead of PCM format. Audio sent in uLaw will be clearer and will have less noise than PCM audio. If your Multimedia card does not support uLaw, this option will be grayed out.
Preferences and Setup Selected Intercom - You can use the up and down arrows to select an Intercom from the list of intercom connected to TalkMaster™. Audio Volume - sets the audio volume on the selected Intercom. This can be overridden at the Intercom by using the Volume Up and Volume Down buttons. Friendly Name (Alias) - Displays the selected Intercom’s Name. Preferences - Legacy tab The Legacy tab is used to change configuration settings on individual Intercoms.
Preferences and Setup Selected Intercom - You can use the up and down arrows to select an Intercom from the list of intercoms connected to TalkMaster™. Please refer to the Advanced Configuration section of the Intercom configuration tool for the definition of these options. Paging Groups The Paging Groups screen is accessed via the menu Admin Maintain Paging Groups. It allows you to create groups of Intercoms that you want to send audio to at the same time.
Preferences and Setup • To create a new Paging Group - press the New button. "New Group" appears in the Group Name field. To specify a custom name, type over "New Group". Select an intercom from the left column and click the >> button to add it to your new group in the right hand column. Click Save when done. • To change an existing Paging Group - use the "Select a group" drop down list to pick a group. Change the name by typing over it or use the >> and << buttons to add or remove Intercoms.
Preferences and Setup Up to 18 buttons can be associated with pre-recorded wav files for use in the Paging Messages dialog. Buttons can have one of four colors. • Select a button "slot" and type in the text to be displayed on the button. • Assign a color to the button, by clicking on one of the four choices. • Click the Folder Icon and select the wav file to be associated with the button. A folder Icon with a green background indicates that a file has been associated with this button.
Preferences and Setup • XXX - IN for speaker audio, OUT for microphone audio • YYYYYYYYYYYY - the twelve digit Ethernet MAC address of the intercom that was communicated with. • HHMMSS - Hours, minutes and seconds of the day in 24 hour format • .wav - standard PCM or uLaw wave file format. Audi from an Intercom will always be PCM. Microphone audio can be either PCM or uLaw depending on the options selected on the Multimedia tab of the Preferences dialog.
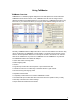
Preferences and Setup Click on a vertical bar and click Play. The audio will be played until you click Stop or the end of the day is reached. As the audio is played, the display changes to indicate which intercom the audio came from or was sent to. If you want to skip backwards or forward between audio clips, use the << or >> keys. Managed Intercoms TalkMaster™ allows you to create a list of managed Intercoms so you can always determine whether they are online or offline.
TalkMaster Console Forwarding Forward Intercoms The Forward Intercoms function allows one or more TalkMaster™ consoles to temporarily assign all of their intercoms to another PC running TalkMaster. This option can be accessed from menu Console Forward Intercoms or from Tool Bar ICON . Once you forward the intercoms, the Forward Intercom window will stay open and the Forward button will change to Return.
TalkMaster Console Forwarding 34
TalkMaster Menu Options File Menu The File menu has one option: Exit - will end the TalkMaster™ server session. View Menu The View menu has three options: Event Log - allows you to display the TalkMaster™ event log and save it as a text file. Screen Position - has two options: • Save current view saves the current window size • Reset to default - sets it back to the size that the product originally shipped with.
TalkMaster Menu Options Adjust Levels • Microphone audio sent to intercoms - with the radio button selected, adjusting the slider affects the Windows Microphone Recording volume • Internet or ‘Line In’ audio set to intercom - no adjustment allowed • Audio from Intercoms (heard on this PC) - with this radio button selected, two options are presented • Master Volume - adjusts the Windows Master volume control • Volume from intercoms - adjusts the Windows .
TalkMaster Menu Options Set Administrator Password - brings up the Change Administrator Password dialog. You must enter your current Administrator password before entering a new one. Preferences - opens up the Preferences dialog. Maintain Paging Groups - brings up the Paging Groups dialog. This is used to group Intercoms together for paging purposes Maintain Paging Messages - brings up the Paging Setup dialog. This is used to setup the Paging Messages dialog with pre-recorded messages.
TalkMaster Menu Options Help Menu Help on using TalkMaster™ - Opens up Help Online Documentation - Directs you to online documents on the Aiphone Web site Aiphone Website - Directs you to the Aiphone homepage About - Displays the current version information about TalkMaster 38
Configuring Intercoms Configure Intercoms When Intercoms are shipped from Aiphone, they do not have IP address information configured. To configure them, you must connect them to your network, install TalkMaster™ and select the menu Admin Configure Intercoms. The Intercom Configuration Tool will immediately search for all Aiphone intercoms connected to your current network segment.
Configuring Intercoms • Factory Default - This setting has no effect. • Door / Relay Control - for use on models that have an integrated relay. The Door/Gate button will become visible in the Intercom View / Custom View. Pressing the Door/Gate button will engaged the relay for the number of seconds specified (defaults to 5 seconds) • Logic Input - used with custom developed applications to monitor other equipment.
Configuring Intercoms be used in environments where hundreds of intercoms could be activated simultaneously causing a potential overload of the network and server. Selecting this option disables a potentially important feature in so its use should be based on the factors considered to be of most importance in the environment that it is installed in.
Configuring Intercoms For each intercom that you want to configure, click on it and then set the options as follows: • Set as Client - Click this option • Assign IP automatically with DHCP - This option determines how the Intercom’s IP address is assigned. The Intercom IP address information can be assigned as a Static IP address or can be dynamically assigned if your network has a DHCP server. To use DHCP, check the box Assign IP automatically with DHCP.
Configuring Intercoms Apply - This option will save your settings to the selected intercom. After applying changes to an intercom, the unit will be reset and will be unavailable for 10-15 seconds Cancel - This option cancels changes that have not been Applied Exit - This option closes the Intercom Configuration Tool screen and returns to the main screen after you have completed configuring all intercoms.
Configuring Intercoms If you have intercoms located in a different network segment, you may not find them since many routers filter out UDP Broadcasts. You can either configure these intercoms on the current network segment prior to installing them on the desired network or you can install a copy of TalkMaster in the other network segment to configure your intercoms.
Configuring Intercoms • Assign IP automatically with DHCP - This option is automatically grayed out • IP Address - Enter the a fixed IP address and the Port number of the Server Intercom. • Subnet Mask - Enter the Server’s Subnet Mask • Gateway - Enter the Server’s Gateway address. If no Gateway is available, enter 0.0.0.0 • Port - Enter the Port number of the Server Intercom. You can change the default Port of 3000 as long as you specify the same port in the Client Intercom’s Server IP setting.
Configuring Intercoms • List when Offline - This option does not apply to Direct Mode Exit - This option closes the Intercom Configuration Tool screen Cancel - cancels any changes made to the selected intercom before the Apply button is pressed. Apply - This option will save your settings to the selected intercom. After applying changes to an intercom, the unit will be reset and will be unavailable for 10-15 seconds Search - You can re-search for Intercoms to verify all of your changes.
Configuring Intercoms If you would like to update firmware in your intercoms, please contact Aiphone Technical Support to verify upgradeability and to obtain the current firmware. Please have the Intercom ID# and OS Version available for each intercom that you would like to upgrade.
Configuring Intercoms In order to update the ICOM firmware, you must configure the Intercom to connect to the copy of TalkMaster™ that you will be doing the update from. Please refer to Intercom Configuration - TalkMaster Clients. It is strongly recommended that the update be done on a local area connection (LAN) instead of on a wide area connection (WAN) due to the critical nature of firmware updating. Use the menu Admin Configure Intercoms to open the Intercom Configuration Tool.
Intercom Configuration Tool Menu Options Configuration File Menu Exit - exits the Intercom Configuration Tool Configuration View Menu Common Port Assignments - is a reference list of the common IP port settings Advanced - makes the Advanced Settings section of the Intercom Configuration Tool available. Please see Advanced Configuration for details. This setting is remembered between TalkMaster™ sessions.
Troubleshooting Troubleshooting Intercom Configuration Tool cannot find Intercoms • Verify that the ACTIVE or LD10 LED is on or flashing. If not, check the power connections. • Verify that the LINK or LD9 LED is on. If not, verify the network cable between the Intercom and the network switch. • Verify that the Intercoms are on the same network segment as TalkMaster™. TalkMaster uses a UDP Broadcast to search for Intercoms.
Troubleshooting When the Call Announcement option is activated in the menu Admin - Preferences - Options and an incoming call is received, a wav file is played at the TalkMaster console to announce the incoming call. Two choices are available, either Doorbell or Custom. It is best to keep the recording to 1 or 2 seconds. Once it starts playing, it will play until it is done and will be repeated in 5 second intervals until a keyboard operation or mouse click occurs.
Troubleshooting TalkMaster unavailable.
Index A G Admin Menu 36 Gateway Advanced Configuration 39 GPIO 39 Advanced Settings 49 Group 6 Grp 6 Answer Later button 7, 18 Answer Now button 18 Assign IP Audio Archive Audio Archives Audio Player Audio Volume Auto Response Automatic Mode 41, 43 6, 15, 29, 30 36 6, 10 23, 35 6, 10, 33, 36 6, 11 B Beep Tone After PTT Released I ICOM Firmware Upload Icom ID Incoming Call Intercom Configuration Intercom OS Recovery Intercom View / Custom View Internet IP Address 39 C LAN 17 Legacy
Paging Messages Paging Setup Password PCM Play Audio Archive 14, 28, 36 14, 28 36 12, 25, 29, 51 10, 30, 35 Space Bar Speaker Levels Startup Audio Static IP Subnet Mask Play File 28 System Events playback 30 System Requirements Point-to-multipoint 41 Point-to-point 43 T Port Preferences 39, 41, 43 23, 36 Preferences - Legacy tab 26 Preferences - Multimedia tab 25 Preferences - Options tab 23 Preferences - Volume tab 25 PTT 40 R Relay Output Release Notes 39 1 Remote Listen Disabl