PC USB Tablet User’s Guide
FCC Statement This equipment generates and uses radio frequency energy and if not installed and used in accordance with the manufacturer’s instructions, it may cause interference to radio and television reception. This equipment has been tested and certified to comply with the limits for a Class B computing device, pursuant to sub-part J of part 15 of FCC Regulation, which are designed to provide reasonable protection against such interference in a residential installation.
Introduction Thank you for purchasing HyperPen, the most natural text and graphics input device for your desktop or notebook PC. We are confident that you will benefit from its advanced features and that it will make your computing more productive and fun. Traditionally, computer graphics tablets have been regarded as professional devices used in specialized fields such as CAD/CAM and graphic arts. Their potential in everyday computing has not, until recently, been fully realized.
computer being able to confirm authenticity of the signature in real time. It's all possible with HyperPen! Use of graphics tablets as the input device of choice is increasing as the mainstream computing world realizes their huge potential. For example, Microsoft Windows 98 will feature a whiteboard utility to allow direct sketching and writing via tablet and pen.
Hardware Installation Before connecting the tablet to your computer, please take a few moments to familiarize yourself with the contents of your HyperPen package. The various components are shown below: • HyperPen stylus • HyperPen pad • USB data/power connector • Please carefully read the following instructions to install HyperPen on your computer.
1. Make sure your computer and all peripherals are turned off. 2. Remove the keyboard cable from the back of your computer. 3. Attach the connector of the USB adaptor cable and then plug the male connector of the USB adaptor into usb socket of your computer. 4. Plug the power jack of the USB adaptor cable into the power socket of the USB connector. 5. Connect the USB data/power connector to the port of your computer. 6.
. Power up your computer and prepare to install software drivers for your HyperPen tablet. 8. If HyperMouse option was included with your HyperPen package, you may now insert the AAA-type battery by opening the panel on the bottom of the mouse. Please note that HyperMouse can only be used with your HyperPen tablet to function.
Software Installation BACKUP Before starting the software installation procedure, please make a backup copy of the original diskette and use this copy to install, storing the original in a safe place.. Driver Installation 1. HyperPen is fully Plug-n-Play compliant and should therefore be detected by Windows 95 as “New Hardware Found” when you start up your machine. If for any reason it is not, please go to the Windows Control Panel and double-click on the “Add New Hardware” icon.
adjustments to suit your particular writing or drawing style. 1. Back up a copy of your HyperPen Manager diskette and insert it into your floppy drive. 2. Select “Run” from the “Start” button and type A:\SETUP (or B:\SETUP). Press “Enter.” 3. Follow the on-screen instructions and make your desired modifications. 4. When the installation process is complete, a HyperPen Manager icon will appear in the Windows Control Panel.
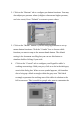
3. Click on the “Buttons” tab to configure pen button functions. You may also adjust pen pressure values (a higher value means higher pressure, and vice-versa). Press “Default” to return to preset values. 3. Click on the “Mouse” button if you are using HyperMouse to set up mouse button functions. Click the “Combo” box to choose which function you want to map to the mouse thumb button. The default setting is for document scrolling but you can use this button to simulate double-clicking if you wish. 4.
working area of the tablet to utilize a relatively smaller area of the screen. To allocate a certain area of your screen to be used as the effective working area of your tablet, select “Screen Ratio.” To automatically match the full working area of your tablet to your full screen, select “Full Area.” Software Package Installation This package includes a variety of software applications that take advantage of the unique capabilities of HyperPen.
3. Click on “Settings”. 4. You can register 2 signatures if required. Click on “Registration No. 1” to register your signature. You are required to sign 3 times for registration. 5. During registration, if you are prompted “Unstable signature”, click on “Del” to delete your signature and repeat step (4). 6. Click on “Registration No. 2”, if you want to register another signaturte e.g. your secretary’s. Repeat as in (4). 7.
icon in the status bar on the right bottom of screen. How to uninstall: 1. Go to “ Control Panel” and double click on “Add/Remove Programs”. 2. Choose “Cadix Signature Screen Saver” and click on “Add/Remove”. 3. Program is removed. Operation Environment The digitizer should operate within the following environment: l 41 to 104 degrees Fahrenheit or 5 to 40 degrees Celsius l 20 to 85 % relative humidity, non-condensing NOTE : Condition higher or lower the range stated above may result in nonoperation.
l Don’t use volatile/chemical liquids such as thinner or benzine to clean the tablet. l Don’t store or operate the tablet in extremely hot or cold environment or where the humidity is beyond the specified range. Don’t place hot items on the surface of tablet. Trouble Shooting Tablet LED light is not ON l Make sure the power jack of the Keyboard/Power adaptor is plugged into the power socket of the USB Data/Power connector.
Specifications (4000 Series) Active area (W x D) 4.0 x 3.5 in (101.6 x 76.2 mm) Physical size (W x D x H) 188 x 200 x 6.9 mm Power consumption 0.35 watts Power supply Keyboard power (DC 5 +/- 5% V regulated) Weight 400 g (0.88 lb) Resolution max. 3048 lpi / 120 lpmm Accuracy (overall with pen) 0.42 mm, Maximum Pressure levels 512 levels Maximum reading height 10 mm (0.
Specifications (6000 Series) Active area (W x D) 60 x 4.5 in (154 x 114.7 mm) Physical size (W x D x H) 234 x 247.5x 7.6 mm Power consumption 0.3 watts Power supply Keyboard power (DC 5 +/- 5% V regulated) Weight 375 g (0.82 lb) Resolution max. 3048 lpi / 120 lpmm Accuracy (overall with pen) 0.42 mm, Maximum Pressure levels 512 levels Maximum reading height 10 mm (0.