+LJK 'HÀQLWLRQ 'LJLWDO 9LGHR &DPHUD 8VHU·V 0DQXDO
Welcome: Dear user, thanks for purchasing this product. Much investment in time and effort has gone into its development, and it is our hope that it will give you many years of trouble-free service. Safety Notice: 1. Do not drop, puncture or disassemble the device; otherwise the warranty will be voided. 2. Avoid all contact with water, and dry hands before using. 3. Do not expose the device to high temperature or leave it in direct sunlight. Doing so may damage the device. 4. Use the device with care.
Getting to Know Your Camera Overview The camera equipped a 5 Mega Pixel sensor that can take H.264 format videos. The 3” LCD touch panel is an ideal platform for you to operate your camera. The menu options are DFFHVVLEOH ZLWK \RXU ¿QJHU The camera also features video recording at an HD resolution of 1920x1080. You can also connect it to DQ +'79 YLD DQ +'0, FDEOH RSWLRQDO DQG HDVLO\ SOD\EDFN WKH UHFRUGHG KLJK GH¿QLWLRQ YLGHRV RQ WKH wide screen HDTV.
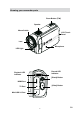
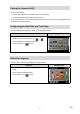
Knowing your camcorder parts Zoom Button (T/W) Speaker Macro Switch LCD Touch Panel Lens Microphone LED Light Record LED Indicator Playback LED Indicator [Photo] Button HDMI Port [Video] Button TV Port Mini USB 2.
Power Button [Playback] Button Pause Button Tripod Socket SD card Cover EN 5
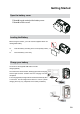
Getting Started Open the battery cover Follow X to push and eject the battery cover. Follow Y to lift the cover. 1 2 Loading the Battery Before using the camera, you must load the supplied Lithium-ion rechargeable battery. 13. -). Insert the battery according to the correct polarity marks ( + or 14. &ORVH WKH EDWWHU\ FRYHU ¿UPO\ Charge your battery You must use the supplied USB cable or the AC charger(optional).
Inserting and Removing an SD Card (Optional) The camera comes with an internal memory which allows you to store photos and videos. You can expand the memory capacity by using an optional SD memory card. 1. ,QVHUW WKH PHPRU\ FDUG LQWR WKH VORW 3OHDVH UHIHU WR WKH ¿JXUH RQ WKH ULJKW VLGH 2. To remove an installed SD card, press the card inwards to release it. 3. When the card pops out, gently remove it from its slot. 4. Recommended memory capacity: 1GB or above.
Turning the Camera On/Off To turn on the camera: 1. Flip out the LCD panel; the camera will turn on automatically. 2. Or press [Power Button] for one second to turn it on. To turn off the camera: You can either press [Power Button] for one second, or you can place the LCD panel back to its original position. &RQ¿JXULQJ WKH ,QLWLDO 'DWH DQG 7LPH 6HWXS The time setting screen appears to allow you to setup date and time: Operation Display Screen 1.
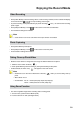
Enjoying the Record Mode Video Recording Press [Video Button] to start recording. When a video is being recorded, a time indicator will display ). To stop recording, press it again. on the LCD monitor ( To pause recording: Press [Pause Button] to pause recording ( 00:00:36 ). To continue the recording, press it again. Press [Playback Button] or touch on the screen to view the recorded video. Four resolution settings are available.
Using Light Function The setting allows you to extend the brightness of the objects that are dark or in the shadow. Using the on-screen button to change the settings. 1. Digital Light On ( ): To extend the dynamic range for backlight and high contrast sense so that the objects will be brighter and clearer. 2. Light On( 3. Light Off ( ): The light will be turned on and keep providing light. ): The light is turned off. Operations for Record Mode Operation Display Screen on the screen in Record Mode.
Video Resolution Four resolution settings are available. FHD (1080p 30) (Full HD (1080p30)):Record videos at 1920x1080p 30 fps resolution. HD+ (720p 60):Record videos at 1280x720p 60 fps resolution. HD (720p 30):Record videos at 1280x720p 30 fps resolution. VGA (640X480): Record videos at 640x480p 30 fps resolution. Operation Display Screen 1. In the Video menu, touch the [Resolution] icon on the screen. 2. Touch to select the desired option. 3. Touch the Exit icon ( ) to exit.
Slow Motion Record videos with slow motion effect. When the video is played, the playback time will be longer than the actual recording time. Operation Display Screen 1. In the Video menu, touch the [Slow Motion] icon on the screen. 2. Touch to select [On] or [Off] ( 3. Touch the Exit icon ( ). ) to exit. Time Lapse RHFRUG VWLOO LPDJHV DW VSHFL¿F LQWHUYDOV \RX FDQ VHW DQG SOD\ WKHP DV RQH YLGHR ¿OH Off: Disable Time Lapse. 1 Second.: Record one frame per second.
Pre-record The Pre-record function ensures that you will not miss any critical recording opportunities. The video is recorded 1 second more before the [Video Button] is pressed. Operation Display Screen 1. In the Video menu, touch the [Pre-record] icon on the screen. 2. Touch to select [On] or [Off] ( ). 3. Touch the Exit icon ( ) to exit. Note Aim the camera at the subject and position it securely before the [Video Button] is pressed. Photo Operation Display Screen on the screen in Record Mode.
ISO The camera adjusts the ISO sensitivity of its images automatically. Two manual ISO sensitivity settings are available. (800/1600). The larger the number is, the higher the ISO sensitivity is set to. Select a small number to shoot a smoother image. Select a large number to shoot an image in a dark location or to shoot a subject moving at high speed. Operation Display Screen 1. In the Photo menu, touch the [ISO] icon on the screen. 2. Touch to select the desired option. 3.
Scene You can select the mode according to the scene condition. Auto: Shoot without any special effect on the image. Skin: Shoot with an effect that makes skin tones more natural. Night: Use Night Mode for night scenes or low light conditions. Backlight: You can take shots when the bright light is behind the subject. Black/White: The image is converted to black-and-white. Classic: The image is converted to a sepia look. Negative: The image is converted as the negative of the normal.
Face Tracking (Photo Only) The camera can detect human face(s) and focus on the face(s) automatically. This function can works with photo capturing. It is wonderful for capturing beautiful portraits in backlight situation. Operation Display Screen 1. In the Effect menu, touch the [Face Tracking] icon on the screen. 2. Touch to select [On] or [Off] ( 3. Touch the Exit icon ( ). ) to exit.
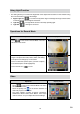
Operations for Playback Mode The Playback Mode is for viewing and managing videos and photos on the built-in memory or on an SD Card. Operation 1. Press [Playback Button] or touch switch to the Playback mode. Display Screen on the screen to 2. 7RXFK WR VHOHFW WKH VSHFL¿F RSWLRQ 3. Touch ( ) to back to Record Mode.
Video Playback Operation Display Screen / to play 1. In the Video Playback mode, touch or pause the video. 2. Sweep to the right or touch to go to the previous to go to the next video; sweep to the left or touch video. 3. While playing video, touch / to fast rewind/ forward. 4. Touch to increase the volume; touch to reduce the volume. 5. Touch ( ) to exit. Note :KHQ WKH /&' LV LGOH IRU D IHZ VHFRQGV WKH SOD\EDFN IXQFWLRQ LFRQV ZLOO GLVDSSHDU automatically.
Viewing Photos and Videos on TV &RQQHFWLQJ WR D +LJK 'H¿QLWLRQ :LGH 79 1. Connect the HDMI cable (optional) to your camera’s HDMI Out port. 2. Connect the other end of the cable to a television. 3. Set the video input source of your TV to “ HDMI.” 4. The steps for viewing stored videos and photos on HDTV are exactly the same as for viewing them on the LCD screen.
Uploading Files to Internet The built-in Internet Direct DSSOLFDWLRQ RIIHUV \RX DQ HDV\ ZD\ WR XSORDG \RXU ¿OHV WR ,QWHUQHW LQVWDQWO\ It helps you share them with your family and friends on the web site. 7R XSORDG ¿OHV WR ,QWHUQHW 1. Connect the camera to your computer by using the supplied USB cable. 2. After making a USB connection, the AutoPlay window will appear. (It may be different based on OS recognition. If the AutoPlay window does not appear. Please click [My Computer]-->[DVAP]-->[DVAP.
4. 2Q WKH WKXPEQDLO VFUHHQ FOLFN RQ WKH XS GRZQ LFRQ WR FKDQJH WKH SDJHV &OLFN RQ WKH ¿OH V \RX want to upload. 5. Click on “ UPLOAD” to start uploading. 6. Click on “ CANCEL” to stop uploading. 7R SOD\EDFN WKH YLGHR ¿OH 1. Double click on the video clip on the thumbnail screen. 2. Click on the Play/Pause icon to play/pause. Click on the Return icon to return to the thumbnail preview screen.
6SHFL¿FDWLRQV DQG 6\VWHP 5HTXLUHPHQWV 6SHFL¿FDWLRQ Image sensor 5 Mega pixel CMOS sensor Operation modes Video record, Photo record Lens F 2.5 Focus range Macro Mode:20cm 1RUPDO 0RGH FP a LQ¿QLWH +' S HD(720p 30) ) FP a LQ¿QLWH 3KRWR )XOO +' S Zoom 1X~16X (16X Digital zoom) Shutter Electronic LCD monitor 7.
6\VWHP UHTXLUHPHQWV Microsoft Windows XP/Vista/7 Intel Pentium 4, 2.
Digitale Videokamera Benutzerhandbuch
Herzlich willkommen! Lieber Benutzer, vielen Dank für den Kauf dieses Produkts. In die Entwicklung dieses Geräts wurde viel Zeit und Mühe investiert, und wir hoffen, es wird Ihnen viele Jahre störungsfreien Betrieb und Freude bescheren. Sicherheitshinweise: 1. Lassen Sie die Kamera nicht fallen und beschädigen und zerlegen Sie die Kamera nicht, andernfalls erlischt die Gewährleistung. 2. Vermeiden Sie jeglichen Kontakt des Geräts mit Wasser und trocknen Sie sich die Hände ab, bevor Sie es verwenden. 3.
Das ist Ihre Kamera Übersicht Die Kamera kann mit dem 5 Megapixel-Sensor H.264 Filme aufnehmen. 'LH .DPHUD LVW PLW HLQHP %HUKUXQJVHPSÀLQGOLFKHQ ´ /&' 0RQLWRU DXVJHVWDWWHW GHU HLQH LGHDOH Plattform zum Bedienen der Kamera ist. 'LH .
Die Komponenten des Camcorders Zoomtaste (ein-/auszoomen) Lautsprecher Makro-Schalter LCD Touchscreen Objektiv Mikrofon Videolicht Aufnahme - LED Anzeigelampe Rückspul- LED Anzeigelampe [Foto] Taste HDMI-Ausgang [Video] Taste TV-Ausgang Mini-USB-Anschluss DE 4
Ein/Aus-Taste [Wiedergabe] Taste [Pause]Taste Fassung für Dreibeinstativ SD-Kartenfach DE 5
Erste Schritte Öffnen der Akku-Abdeckung Wie in X gezeigt, schieben und ziehen Sie die Akku-Abdeckung heraus. Heben Sie dann die Abdeckung heraus, wie in Y gezeigt. 1 2 Einsetzen des Akkus Bevor Sie die Kamera, müssen Sie laden den mitgelieferten Lithium-Ionen- Akku. 13. Setzen Sie die Batterie richtig gepolt entsprechend der Kennzeichnung (+ und -) in das Fach ein. 14. Schließen Sie die Akkuabdeckung richtig! $XÀDGHQ GHV $NNXV 'DIU N|QQHQ 6LH GDV PLWJHOLHIHUWH 86% .
Einsetzen und Entnehmen einer SD-Speicherkarte (Optional) Die Kamera verfügt über einen internen Speicher von 128 MB, auf dem Fotos, Filme gespeichert werden können. Sie können die Speicherkapazität durch die Nutzung einer optionalen SD - Memory Card erweitern. 1. Legen Sie die Speicherkarte richtig herum ein. Siehe Abbildung. 2. Sie können die Speicherkarte wieder entnehmen, indem Sie die Karte leicht hineindrücken. 3. Sie wird dann ausgeworfen, und Sie können sie aus dem Kartenfach entnehmen. 4.
Ein-/Ausschalten des Camcorders 8P GLH .DPHUD HLQ]XVFKDOWHQ 1. Klappen Sie den LCD-Monitor hoch. Dabei wird die Kamera automatisch eingeschaltet. 2. Oder drücken Sie eine Sekunde lang auf die [Ein/Aus-Taste]. So schalten Sie den Kamera aus: Klappen Sie den LCD-Bildschirm wieder in seine ursprüngliche Position zurück, oder drücken Sie eine Sekunde lang auf die [Ein/Aus-Taste]. .
Verwenden des Aufnahmemodus Videoaufzeichnung Drücken Sie, zum Aufnehmen die [Video-Taste]. Wird ein Video aufgezeichnet, wird eine Zeitanzeige ). Zum Beenden der Aufnahme, Taste erneut auf dem LCD-Display eingeblendet ( drücken. =XP 8QWHUEUHFKHQ HLQHU $XI]HLFKQXQJ 'UFNHQ 6LH ]XP 8QWHUEUHFKHQ GHU $XI]HLFKQXQJ GLH [Pause-Taste] ( 00:00:36 ). Zum Fortfahren die Taste erneut drücken.
Anwenden der Leuchtfunktion Die Einstellung können Sie die Helligkeit der Objekte, die dunkel oder im Schatten zu erweitern. Mit dem On-Screen-Taste, um die Einstellungen zu ändern. 1. Digitales Licht EIN ( ): Der dynamische Bereich für Hintergrundbeleuchtung und hohe Kontraste wird erweitert, sodass die Objekte heller und deutlicher aussehen. 2. Licht Ein( Beleuchtung. ): Das Licht wird eingeschaltet und sorgt bei Aufnahmen für zusätzliche 3. Licht Aus ( ): Das Licht wird ausgeschaltet.
9LGHRDXÀ|VXQJ )U GLH )LOPDXIQDKPH JLEW HV YHUVFKLHGHQH $XÀ|VXQJHQ FHD (1080 p30)(Full HD(1080p 30):$XIQDPH YRQ 9LGHRV EHL HLQHU $XÀ|VXQJ YRQ [ S ISV HD+ (720 p60):$XIQDPH YRQ 9LGHRV EHL HLQHU $XÀ|VXQJ YRQ [ S ISV HD (720 p30):$XIQDPH YRQ 9LGHRV EHL HLQHU $XÀ|VXQJ YRQ [ S ISV VGA(640X480): $XIQDPH YRQ 9LGHRV EHL HLQHU $XÀ|VXQJ YRQ [ S ISV Bedienung Bildschirmanzeige 1. %HUKUHQ 6LH LP 9LGHRPHQ GDV 6\PERO >$XÀ|VXQJ@ 2.
Zeitlupe Videoaufnahme mit Slow Motion Effekt. Beim Abspielen des Videos wird die Abspielzeit länger als die normale Aufnahmezeit. Bedienung Bildschirmanzeige 1. Berühren Sie im Videomenü, das Symbol [Zeitlupe]. 2. Zur Auswahl [Ein] oder [Aus] bitte berühren( ). 3. Berühren Sie zum Beenden das Exit-Symbol ( ). Zeitraffer Aufnahme von Einzelbildern in bestimmten, einstellbaren Abständen. Wiedergabe als Filmdatei. Aus: Kein Zeitraffer. 1 Sekunde: Aufnahmen von 1 Bild / sec.
Pre-record Die Pre-Record Funktion gewährleistet, dass Sie keine kritische Aufnahmemöglichkeit verpassen. Das Video wird zusätzlich 1 Sekunde vor dem Drücken der [Video-Taste] aufgezeichnet. Bedienung Bildschirmanzeige 1. Berühren Sie im Videomenü, das Symbol [Pre-record]. 2. Zur Auswahl [Ein] oder [Aus] bitte berühren( ). 3. Berühren Sie zum Beenden das Exit-Symbol ( ).
ISO 'LH .DPHUD VWHOOW GLH ,62 (PS¿QGOLFKNHLW GHU %LOGHU DXWRPDWLVFK HLQ (V VLQG PDQXHOOH Einstellungsmöglichkeiten verfügbar(800/1600). -H JU|HU GLH 1XPPHU LVW GHVWR K|KHU LVW GLH ,62 (PS¿QGOLFKNHLW HLQJHVWHOOW :lKOHQ 6LH HLQH NOHLQH =DKO IU IHLQHUH $XIQDKPHQ :lKOHQ 6LH HLQH JURH =LIIHU IU $XIQDKPHQ LQ GXQNOHU 8PJHEXQJ RGHU wenn sich das Objekt sehr schnell bewegt. (Beachten Sie, dass die Aufnahme verrauschen kann, wenn die Ziffer zu hoch ist.) Bedienung Bildschirmanzeige 1.
Szene Wählen Sie den Modus entsprechend des Motivs. Auto: Aufnahme ohne Spezialeffekt auf dem Bild. Haut: Aufnahme mit einem Effekt, mit dem Hauttöne natürlicher aussehen. Nacht: Der Nacht-Modus wird für Nachtaufnahmen und bei schlechten Lichtbedingungen verwendet.
Gesichtsverfolgung (NUR bei Foto ) Die Kamera erkennt Gesichter und Konzentration auf die Gesichter automatisch. Diese Funktion kann arbeitet mit Foto Erfassung. Es ist wunderbar für die Erfassung schöne Porträts im Gegenlicht Situation. Bedienung Bildschirmanzeige 1. Berühren Sie im Effektemenü, das Symbol [Gesichtsverfolgung]. 2. Zur Auswahl [Ein] oder [Aus] bitte berühren( ). 3. Berühren Sie zum Beenden das Exit-Symbol ( ).
Bedienmöglichkeiten für den Wiedergabemodus Im Wiedergabe-Modus können Sie sich Filme und Bilder ansehen, die sich im internen Speicher oder DXI GHU RSWLRQDOHQ 6SHLFKHUNDUWH EH¿QGHQ Bedienung Bildschirmanzeige 1. Drücken Sie die [Wiedergabetaste] oder berühren Sie auf dem Display, um zum Wiedergabemodus zu wechseln. 2. =XP $XVZlKOHQ GHU VSH]L¿VFKHQ 2SWLRQ EHUKUHQ 3. Berühren Sie ( ) , um zum Aufnahmemodus zurückzukehren.
Videowiedergabe Bedienung Bildschirmanzeige 1. Berühren Sie, im Video-Wiedergabe- modus, / zur Wiedergabe oder zum Anhalten der Videos. 2. Nach rechts streichen oder berühren, um zum vorherigen Video zu gelangen; streichen Sie nach links , um zum nächsten Video zu oder berühren Sie gelangen. 3. Berühren Sie, zum schnellen Vor- und Rücklauf / , wenn Sie gerade ein Video abspielen. 4. Berühren Sie , um die Lautstärke zu erhöhen, berühren Sie zum Verringern der Lautstärke. 5. Berühren Sie zum Beenden ( ).
Wiedergabe von Fotos und Videos auf einem TV $QVFKOXVV DQ HLQHQ +LJK 'H¿QLWLRQ %UHLWELOG 79 1. 2. 3. 4. Ein Ende des HDMI-Kabel (optional) wird in die HDMI Out-Buchse an Ihrer Kamera eingesteckt. Das andere Ende wird am Fernsehgerät angesteckt. 6WHOOHQ 6LH GLH 9LGHRHLQJDQJVTXHOOH GHV )HUQVHKHUV DXI GLH 2SWLRQ ³+'0,´ HLQ Die Schritte gespeicherte Videos und Fotos auf dem HDTV Gerät zu betrachten, sind genau die gleichen, wie für das Betrachten auf dem Computer-Monitor.
Wiedergabe von Foto und Video auf dem PC Installieren der mitgelieferten Software Die mit der Kamera gelieferte CD enthält 2 Anwendungsprogramme. ArcSoft MediaImpression ist eine anwenderfreundliche Anwendung, die Ihnen bei der Verwaltung Ihrer Medien, beim Brennen Ihrer Videos auf DVD und beim Hochladen von Dateien ins Web hilft. Adobe Reader ist ein weit verbreitetes Programm, das Sie benötigen, um das Benutzerhandbuch lesen zu können.
Hochladen von Dateien in das Internet Die eingebaute Anwendung Internet-Direct bietet Ihnen eine einfach Möglichkeit Ihre Dateien sofort ins Internet zu stellen.Es unterstützt Sie beim Freigeben an Familie und Freunde in verschieden Webseiten. So laden Sie Dateien auf Internet : 1. 'LH .DPHUD PLW GHP PLWJHOLHIHUWHQ 86% .DEHO DQ ,KUHQ &RPSXWHU DQVFKOLHVVHQ 2.
4. Klicken Sie auf der Vorschauanzeige auf das Symbol nach unten/oben, um zu blättern. Klicken Sie auf die Dateien, die Sie hochladen möchten. 5. .OLFNHQ 6LH ³83/2$'´ XP PLW GHU hEHUWUDJXQJ ]X EHJLQQHQ 6. Klicken Sie “CANCEL um den Übertragungsvorgang abzubrechen. Abspielen der Videodatei: 1. Klicken Sie die gewünschte Datei zweimal an. 2. Im Wiedergabefenster das Play/Pause Zeichen oder fortzusetzen.
6SH]L¿NDWLRQHQ XQG 6\VWHPDQIRUGHUXQJHQ 6SH]L¿NDWLRQHQ Sensor 5 Megapixel Betriebsmodi Videoaufnahme, Fotoaufnahme Objektiv F 2.
6\VWHPYRUDXVVHW]XQJHQ Microsoft Windows XP/Vista/7 Intel Pentium 4, 2.4 GHz oder höher 512 MB RAM 1 GB freier Festplattenspeicher )UHLHU 86% $QVFKOXVV CD-ROM 16-Bit Farbmonitor Hinweis Der LCD-Bildschirm wurde mittels einer hochpräzisen Technologie gefertigt. Es kann unter Umständen vorkommen, dass einige sehr kleine schwarze und/oder helle Punkte (weiß, rot,blau oder grün) auf dem LCD-Bildschirm erkennbar sind.
Caméra et vidéo numérique Manuel d’utilisation
Bienvenue : Cher utilisateur, nous vous remercions pour l’achat de ce produit. Beaucoup d’investissements en temps et d’efforts ont été consentis pour son développement, et c’est notre souhait qu’il vous procurera de nombreuses années de bons et loyaux services. Instructions de sécurité : 1. Ne faites pas tomber, ne perforez pas ou ne démontez pas le caméscope ; autrement la garantie sera annulée. 2. Évitez tout contact avec l’eau, et séchez-vous les mains utilisation. 3.
Présentation le Caméra Vue d’ensemble /D FDPpUD pTXLSpH G¶XQ FDSWHXU GH PpJDSL[HOV SHXW UpDOLVHU GHV ¿OPV + La cam ra est dot e d un cran tactile LCD 3 , plateforme id ale pour l utilisation de votre appareil. Les options du menu sont accessibles avec le doigt.
Connaitre les fonctions de votre caméscope Bouton Zoom avant/arrière Haut-parleur Bouton Macro Écran tactile LCD Objectif Microphone Lumière vidéo Voyant LED Enregistrement Voyant LED Lecture Bouton [Photo] Port HDMI Bouton [Vidéo] Port TV Port Mini USB 2.
Bouton marche/arrêt Bouton [Lecture] Bouton [Pause] Support du Trépied Couvercle carte SD FR 5
Mise en route Ouverture du compartiment de batterie : Faites comme en X pour repousser et batterie. jecter le couvercle de Faites comme en Y pour soulever le couvercle. 1 2 Insertion de la batterie Avant d utiliser le cam ra, vous devez charger la batterie Lithium-ion fournie batterie rechargeable. Avant d utiliser le cam ra, il faut charger la batterie /LWKLXP ,RQ /D EDWWHULH UHFKDUJHDEOH VH WURXYH GDQV l emballage. 13. ,QVpUH] OD EDWWHULH HQ UHVSHFWDQW OD SRODULWp indiqu e (+ou -). 14.
Insertion et retrait d une carte SD (en option) Le cam ra est livr avec une m moire interne vous permettant de VWRFNHU GHV SKRWRV HW GHV ¿OPV Vous pouvez tendre la capacit de la m moire en utilisant une carte m moire SD en option. 1. ,QVpUH] FRUUHFWHPHQW OD FDUWH PpPRLUH GDQV O¶HPSODFHPHQW SUpYX j FHW HIIHW 5HSRUWH] YRXV j OD ¿JXUH 2. Pour retirer une carte SD, appuyez sur la carte pour la lib rer. 3. Lorsque la carte d passe l g rement, retirez-la doucement de son emplacement. 4.
Allumer/ teindre votre cam scope Pour allumer cam ra: 1. Relever l cran LCD ;cam ra s allumera automatiquement. 2. Vous pouvez galement appuyer sur le [bouton marche/arr t] pour l allumer.
3UR¿WHU GX 0RGH (QUHJLVWUHU Enregistrement vid o Appuyez sur le [Bouton Vid o] pour d marrer l enregistrement. Pendant l enregistrement vid o, un ). Pour arr ter l enregistrement, appuyez de LQGLFDWHXU GH WHPSV G¶DI¿FKH VXU O¶pFUDQ /&' nouveau sur le m me bouton. Pour mettre en pause l enregistrement : Appuyez sur le [Bouton Pause] pour mettre en pause l enregistrement ( 00:00:36 ). Pour reprendre l enregistrement, appuyez Appuyez sur le [Bouton Lecture] ou touchez nouveau.
Utilisation de la fonction Lampe Le r glage vous permet d tendre la luminosit des objets qui sont sombres ou dans l ombre. En XWLOLVDQW OH ERXWRQ j O¶pFUDQ SRXU PRGL¿HU OHV SDUDPqWUHV 1. clairage num ri ue activ e ( d tection de contraste, de fa on 2. Lumi re Activ e( ): Etend la plage dynamique de r tro- clairage et de rendre les objets plus lumineux et clairs. ): La lampe sera allum e pendant l enregistrement. 3. Lumi re D sactiv ( ): La lampe est teinte.
R solution vid o 4 r glages de r solution sont disponibles. FHD (1080p 30) )XOO +' S :Enregistrement vid o avec la r solution 1920x1080p 30 fps. HD+ (720p 60):Enregistrement vid o avec la r solution 1280x720p 60 fps. HD (720p 30):Enregistrement vid o avec la r solution 1280x720p 30 fps. VGA (640X480): Enregistrement vid o avec la r solution 640x480p 30 fps n. eFUDQ G¶DI¿FKDJH Proc dure 1. 'DQV OH PHQX 9LGpR WRXFKH] VXU O¶pFUDQ O¶LF{QH [R solution]. 2.
Ralenti Enregistrement vid o au ralenti. l enregistrement. la lecture, le temps de reproduction sera plus long que celui de eFUDQ G¶DI¿FKDJH Proc dure 1. 'DQV OH PHQX 9LGpR WRXFKH] VXU O¶pFUDQ O¶LF{QH [Ralenti]. 2. 7RXFKH] SRXU [Act.](Activer) ou [D sact.] (D sactiver) ( ). 3. 7RXFKH] O¶LF{QH 4XLWWHU ( ) pour quitter. Intervallom tre (QUHJLVWUHU GHV LPDJHV ¿[HV j GHV LQWHUYDOOHV VSpFL¿TXHV TXH YRXV SRXYH] UpJOHU HW OHV UHSURGXLre FRPPH XQ ¿FKLHU YLGpR XQLTXH D sact.
Pr enregistrement La fonction pr enregistrement vous garantit de ne rater aucune occasion d enregistrer. Les images vid o sont enregistr es 1 seconde avant que l on appuie sur le [Bouton Vid o]. eFUDQ G¶DI¿FKDJH Proc dure 1. 'DQV OH PHQX 9LGpR WRXFKH] VXU O¶pFUDQ O¶LF{QH [Pr enregistrement]. 2. 7RXFKH] SRXU [Act.](Activer) ou [D sact.] (D sactiver) ( ). 3. 7RXFKH] O¶LF{QH 4XLWWHU ( e ) pour quitter.
ISO /H FDPpUD UqJOH DXWRPDWLTXHPHQW O¶VHQVLELOLWp ,62 GH O¶LPDJH SDUDPqWUHV G¶ VHQVLELOLWp ,62 PDQXHOV VRQW GLVSRQLEOHV 3OXV OH FKLIIUH HVW pOHYp SOXV JUDQGH HVW OD VHQVLELOLWp ,62 VXU ODTXHOOH YRXV tes r gl . S lectionnez un chiffre bas pour obtenir une image plus diaphane. S lectionnez un chiffre lev si vous tes dans un lieu sombre ou si le sujet se d place rapidement. (Notez qu un chiffre lev peut faire appara tre du bruit dans l image.). eFUDQ G¶DI¿FKDJH Proc dure 1.
Sc ne Vous pouvez s lectionner le mode en fonction des conditions de prise de vue. Auto: Prenez la photo sans effets sp ciaux sur l image. Habillage: Prenez la photo avec un effet sp cial rendant les tons de la peau plus naturels. Nuit: tilisez le mode Nocturne pour les sc nes de nuit ou lorsque les conditions d clairage sont LQVXI¿VDQWHV Contre-jour: Vous pouvez prendre des photos m me lorsque l arri re-plan du sujet est clair. Noir/Blanc: La photo est convertie en noir et blanc.
Suivi du visage (en Photo seulement) La cam ra peut d tecter les visages humains et de se concentrer sur les visages automatiquement. &HWWH IRQFWLRQ SHXW IRQFWLRQQH DYHF OD SKRWR ,O HVW PHUYHLOOHX[ SRXU OD FDSWXUH GH EHDX[ SRUWUDLWV ORUVTXH l arri re-plan du sujet est clair. Operation Displa Screen 1. 'DQV OH PHQX (IIHW WRXFKH] VXU O¶pFUDQ O¶LF{QH >Suivi du visage]. 2. 7RXFKH] SRXU [Act.](Activer) ou [D sact.] (D sactiver) ( ). 3. 7RXFKH] O¶LF{QH 4XLWWHU ( e ) pour quitter.
Utilisation pour le mode Lecture /H PRGH GH OHFWXUH SHUPHW G¶DI¿FKHU HW GH JpUHU YRV SKRWRV HW YLGpRV HQUHJLVWUpV GDQV OD PpPRLUH interne de l appareil ou sur une carte m moire en option. eFUDQ G¶DI¿FKDJH Proc dure 1. Appuyez sur le [Bouton Lecture] ou touchez sur l cran pour passer en mode lecture. 2. 7RXFKH] O¶RSWLRQ YRXOXH SRXU OD VpOHFWLRQQHU 3. 7RXFKH] ) pour retourner au mode Enregistrement.
Lecture vid o eFUDQ G¶DI¿FKDJH Proc dure / pour mettre 1. En mode Lecture vid o, touchez en pause ou lire les vid os. 2. Faites glisser du doigt vers la droite ou touchez pour aller la vid o pr c dente ; faites glisser du doigt pour aller la vid o vers la gauche ou touchez suivante. 3. En lecture vid o, touchez / pour le retour ou l avance rapide. 4. 7RXFKH] pour augmenter le volume ; touchez pour baisser le volume. 5. 7RXFKH] ) pour quitter.
$I¿FKDJH GH SKRWRV HW GH YLGpRV VXU XQ WpOpYLVHXU &RQQHFWHU j XQH 79 KDXWH Gp¿QLWLRQ *UDQG 1. &RQQHFWH] XQH H[WUpPLWp GX FkEOH +'0, (opcional) DX SRUW GH 6RUWLH +'0, GH YRWUH FDPpUD 2. &RQQHFWH] O¶DXWUH H[WUpPLWp GX FkEOH j XQH 79 3. 3RVLWLRQQH] OD VRXUFH G¶HQWUpH YLGpR GX WpOpYLVHXU VXU O¶RSWLRQ ³+'0,´ 4. /D PDUFKH j VXLYUH SRXU YLVLRQQHU OHV YLGpRV RX OHV SKRWRV VWRFNpHV HQ +'79 HVW H[DFWHPHQW OD m me que pour les voir sur l cran LCD.
7pOpFKDUJHPHQW GH ¿FKLHUV YHUV ,QWHUQHW /¶DSSOLFDWLRQ LQWpJUpH ,QWHUQHW 'LUHFW YRXV SHUPHW GH WpOpFKDUJHU YRV ¿FKLHUV YHUV ,QWHUQHW IDFLOHPHQW HW l instant. Elle vous aide les partager avec votre famille et vos amis sur les sites Web. 3RXU WpOpFKDUJHU GHV ¿FKLHUV VXU ,QWHUQHW 1. Reliez le cam ra l ordinateur l aide du c ble SB fourni. 2.
4. 6XU O¶pFUDQ GHV PLQLDWXUHV FOLTXH] VXU O¶LF{QH GHV ÀqFKHV KDXW EDV SRXU SDVVHU OHV SDJHV &OLTXH] VXU OHV ¿FKLHUV TXH YRXV YRXOH] WpOpFKDUJHU 5. &OLTXH] VXU >83/2$'@ 75$16)e5(5 SRXU GpPDUUHU OH WpOpFKDUJHPHQW 6. Cliquez sur [CANCEL] (ANN LER) pour arr ter le t l chargement. 3RXU YLVLRQQHU OD YLGpR GX ¿FKLHU 1. Double cliquez sur le vid o clip sur l cran des miniatures. 2.
6SpFL¿FDWLRQV WHFKQLTXHV HW FRQ¿JXUDWLRQ UHTXLVH 6SpFL¿FDWLRQV WHFKQLTXHV Capteur d image &DSWHXU GH &026 PpJDSL[HOVU 0RGHV GH IRQFWLRQQHPHQW Enregistrement vid o, Enregistrement photo. 2EMHFWLI F 2.5 Port e de mise au point 0RGH PDFUR 20 cm 0RGH QRUPDO FP a LQ¿QL +' S +' S ) FP a LQ¿QL 3KRWR )XOO +' S Zoom 2EWXUDWHXU cran LCD Support de stockage X1~X16 (zoom num rique X16) lectronique cran tactile LCD 7.
&RQ¿JXUDWLRQ UHTXLVH 0LFURVRIW :LQGRZV ;3 9LVWD 3URFHVVHXU 3HQWLXP *+] RX VXSpULHXUH 0R GH 5$0 1 GB espace libre sur le disque dur Port SB disponible &' 520 $I¿FKDJH FRXOHXU ELWV e e /¶pFUDQ /&' HVW IDEULTXp j O¶DLGH G¶XQH WHFKQRORJLH G¶XQH H[WUrPH SUpFLVLRQ DXVVL SOXV GH GHV SL[HOV VRQW RSpUDWLRQQHOV &HSHQGDQW GH PLQXVFXOHV SRLQWV QRLUV HW RX OXPLQHX[ EODQFV URXJHV EOHXV RX YHUWV SHXYHQW DSSDUDvWUH VXU O¶pFUDQ /&' &HV SRLQWV VRQW XQ UpV