SERVICE-ADDRESS AIPTEK International GmbH Halskestr. 6 47877 Willich (Germany) Tel.: +49 (0) 2154 / 9235-50 Fax: +49 (0) 2154 / 9235-68 Email: info@aiptek.de TECHNICAL HOTLINE Our technical hotline can assist you with your questions, problems and comments and can be reached Monday – Friday from 09:00 to 17:30. Tel.: +49 (0) 2154 / 9235-55 Fax: +49 (0) 2154 / 9235-68 EMail: support@aiptek.
Table of Contents General Information General Safety Information Maintenance and Repair 1 1 2 Introduction Contents System Requirements Technical Specifications 3 3 3 4 Getting Started Installing the Batteries Operation With Rechargeable Batteries Installing the Stand 5 5 6 6 Operating the camera Introduction Operating Controls Turning the Camera On / Off Description of the LCD Display Battery Status PC-Connection Counter Resolution Settings Distance Settings Taking Pictures Capturing Videos Erasing
General Information General Safety Information Maintenance and Repair ¾ To prevent operating malfunctions, keep the camera dry and free of dust. Do not place the camera in direct sunlight or near excessive heat. ¾ Keep the lens free of water, dirt and dust. Use a soft, dry cloth to clean the lens. ¾ Place and operate the camera from a stable, even and vibration free area. Use the camera stand to prevent the camera from accidentally falling. ¾ Use a damp cloth to clean the camera.
Introduction Contents Technical Specifications Please check that the contents of this package are complete.
Getting Started Installing the Batteries To install the batteries, open the battery compartment at the bottom of the camera and insert the batteries in the slots provided, according to the polizeration marked on the metal clip located beneath the compartment cap. Please note the following: ¾ Please use only ALCALINE batteries with the camera. Normal ZincCarbon Batteries could become hot while in use and damage the camera. ¾ The camera requires power even when the camera is switched off (Stand By mode).
Operating the Camera Introduction Operating Controls With the PenCam Plus, short video sequences can be taken and via. the USB Cable transferred and saved to the computer. You can use the included software to edit or change the data as desired. Distance Setting Lens There are two memory types for saving captured data: Sharpness Setting Close-up Setting • 128Mbit Flash-Memory, used to save pictures even when the batteries are removed or if the camera has been switched to the ”off” position.
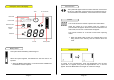
Description of the LCD Display PC-Connection Timer PC-Connection This symbol will appear when the camera has been connected to the PC via. USB Cable. Power will then be provided from the PC. To extend the life of the batteries, remove them from the camera. Video-Mode Counter Picture-Mode The counter shows the number of pictures and videos taken. Delete last frame When the camera is in the camera mode, the number of pictures taken will appear.
The counter shows the number of captures saved. When no more memory space is available, the counter will blink and the capture button will not function. To switch to the High-Resolution, press the Mode-Button until the Star symbol with ”L” appears, then press the Capture-Button. An “H” will now appear. Press the Mode-Button once again to confirm the change For the saving of pictures, the camera is equipped with an internal 128Mbit Flash Memory. You can save approx.
Erasing Pictures and Recordings Timer The camera offers to methods of erasing pictures or recordings: either one at a time (the last picture taken) or all at once. Press the mode button until the timer symbol appears in the display. Then press the capture button and approx. 10 seconds later the picture will be captured. An acoustic signal will be heard while waiting. Erasing one picture at a time: Press the mode button until the picture, as shown at the left, appears in the display.
Installing the software Click on the “eye” symbol to start the installation Installing the AVI-Decoder The AVI-Decoder is required if you desire to save Video-Data using the Proprietary-Format To install the AVI-Decoder, do the following: Place the “Mega Camera” CD into the CDROM drive and click on START / RUN and enter “D:\avidecode.exe in the space provided. Exchange the “D” to correspond with your CDROM – Drive letter. Press RETURN. Follow the installation wizard’s instructions.
Installing the Camera under Windows 98SE / ME To start the camera installation, connect the PenCam Plus to the computer. ¾ Additional Installation Information using Windows 98SE / ME After proper installation of the drivers, the three components can be found in the device manager Use the USB cable provided. Note: Insure that the camera is turned off before connecting it to the USB Cable. Connect the smaller end of the USB -Cable to the USB-connection port of the camera.
Installing the Camera under Windows 2000 / XP To start the camera installation, connect the Mini PenCam to the computer. ¾ Use the USB cable provided. Note: Insure that the camera is turned off before connecting it to the USB Cable. Connect the smaller end of the USB -Cable to the USB-connection port of the camera.
Additional Installation Information under Windows 2000 / XP After proper installation of the drivers, the three components can be found in the device manager Click on the entry, in which the drivers are to be installed, with the right mouse key and choose “refresh drivers” from the options. Device Manager: To find the Device Manager click on: Start → Control Panel → System → Hardware → Device Manager You can install the components either automatically or manually.
Select your component from the list and click on “next”. Additional Software (Short Description) The CD with the Title “Mega Camera” includes a variety of software for processing images, archiving and creating panorama pictures, attaching pictures and videos to Emails and using the camera for videoconferences. Please note the following: ¾ These programs offer numerous possibilities for the processing of images; a complete step-by-step guide is not possible.
Photo Express offers many possibilities to professionally process images. Video Live Mail offers a variety of possibilities to attach pictures and videos to Emails. Included are numerous filters, with which you can use to enhance the quality of your pictures. Effects to change the appearance of your pictures are also available. Printing your pictures is no problem with this program. Short films, with or without tone (an external microphone is necessary) can be created direct from this program.
Operating the Camera Manager Starting the Mega Cam Manager The Mega Camera Manager offers you the opportunity to transfer pictures and videos to your PC. With this program you can also use the camera as a PC-Cam and take pictures or videos while in the live – mode. Start the Mega Camera Manager as follows: Double-click on the Icon “Mega Camera Manager” found on your desktop. DSC-Mode While in the DSC-Mode ("Digital Still Camera") pictures and videos can be transferred from the camera to the pc.
Work area Downloaded pictures and videos will be save in the work area and will be shown as thumbnails. Show changes Number of captured frames EnhancedFunction Load selected frames For a larger view of your pictures, double-click one of them. A window will appear and allow you to view all pictures stored in the work area as a slide show. Delete all frames Picture format settings See page 37 for a complete description of the slide show.
Click on this button to download the selected pictures to your PC. ¾ All pictures are automatically selected when the download dialog is started. To select only one frame, click on the desired frame. To select more than one frame press the CTRL key while clicking on desired frames. Album Pictures and videos will be saved to the album. HINWEIS: Once the selected pictures and videos have been saved to the album, they will be permanently saved to the hard drive.
Album-Manager By using the Album-Manager, you can manage saved pictures and videos. You can create new albums or erase the current album. Click on this symbol to open the Album-Manager. All available albums will be listed with file name and path. IMG = File Format (Only JPEG-Format) AVI = Video file WAV = Audio file Click on the button “new” to create a new album. Name the new album and select a path to where you want to save your albumNote: There can only be one album present in a folder.
By moving the bar you can adjust the frame sequence of your video. 7 frames per second is the default setting. Creating an AVI-File Click on this symbol to create a video from selected frames in the work area. ¾ If other videos have also been selected, they will not be affected. Activate this box if you choose to compress the video data. Compressed video data will use less memory space. Click on this button to cancel. Click on this button to start creating your video.
PC-Camera-Mode Preview and Slide-Show All pictures in the work area can be enlarged and viewed using the preview. You can also use the Slide-Show function to view the pictures automatically. While in the PC-Camera-Mode you can use the camera for live viewing, creating video sequences and taking snapshots.
Taking Snapshots Name of the Video File Click on this symbol to take a snapshot. The picture will automatically be saved to the work area. Frequency setting ¾ A snapshot is only possible when the compression rate is set to “1420”. Otherwise this symbol will be deactivated. Recording time Format settings Click on this symbol to set the frame size and compression rate. Start Recording Close Enter the name and path to where the video is to be saved.
Operating the Twain-Manager With help of the Twain-Manager, pictures and videos can be downloaded using other image processing programs. ¾ The Twain-Manager will automatically be installed when the Camera Manager is installed. Click on this symbol to take a snapshot and to load it to the imaging work area. Click on this symbol to change the picture settings. You can use any Twain compatible software to start the Twain-Manager. Imaging is the Twain software offered by Windows.
Troubleshooting ¾ General Questions and Answers ¾ Where can I obtain a new version of the Camera Manager? The newest version of the Camera Manager can be downloaded from the following Internet link: Problems with the Mega Camera Manager http://www.aiptek.de/downloads/treiber.html ¾ What is the meaning of interpolation? When enlarging the resolution, additional horizontal and vertical pixels must be added to the picture.
Note: You can find and download the complete Installation guide at our web site www.aiptek.de under "Technische Hilfe / Anleitungen" Win98-Users: Please be sure that your operating system is Windows 98 SE (second edition). The camera will not function properly using the Windows 98 (first edition) operating system ¾ The Live Mode functions properly but downloading pictures and videos in not possible. This problem could occur if the drivers were not properly installed.
Problems with the camera ¾ The camera becomes very warm after installing new batteries. You are probably using regular zinc-carbon batteries and not alcaline. Zinc-carbon batteries are not recommended for devices, which require a large amount of energy and tend to overheat. ¾ “Ero” blinks in the display. The internal Flash Memory is defect and must be replaced. Please contact your dealer or send the camera directly to us (Only for customers living in Germany).
Attachments Software Manufacture Contact Addresses The following terms and conditions comprising the prerequisites and scope of our warranties leave our statutory and contractual warranties unaffected. Ulead Internet: EMail: Tel.: www.ulead.de info@ulead.de 0180 / 5085323 Internet: EMail: Tel.: We furnish guaranty for the appliances in accordance with the following terms and conditions: 1. As provided in the following terms and conditions (figures 2. to 5.
3. The warranty claim shall expire, if persons not being authorized by us have carried out repair work or operations, or if our appliances have been equipped with supplementary or accessory parts that are not matched for our appliances. 4. Warranties neither cause an extension of the guaranty period nor do they initiate any new guaranty period. The period of warranty for incorporated spare parts will end with the period of warranty for the complete appliance. 5.