Digital Photo Frame DE GB FR ES Benutzerhandbuch Users Manual Manuel de l’Utilisateur Manual del Usuario Manuale dell’utente IT
� � 1 2 3 4 5 6 7 � � � � � � � �� �� �� �� Abb. 1 Abb.
Abb.
FCC Compliance Statement This device complies with Part 15 of the FCC Rules. Operation is subjected to the following two conditions: (1) this device may not cause harmful interferences and (2) this device must accept any interference received, including interference that may cause undesired operation. This equipment has been tested and found to comply with limits for a Class B digital device, pursuant to Part 15 of the FCC rules.
Vorwort Vielen Dank für den Kauf dieses Produktes. Wir haben viel Zeit und Mühe in seine Entwicklung investiert, damit Sie viele Jahre störungsfrei mit Ihrem digitalen Fotorahmen genießen können. Sicherheitshinweis 1. Den digitalen Fotorahmen nicht fallenlassen, durchbohren oder auseinander bauen, andernfalls erlischt Ihre Garantie. 2. Allen Kontakt mit Wasser vermeiden und die Hände vor dem Benutzen trocknen. 3. Den Fotorahmen keinen hohen Temperaturen aussetzen oder ihn direktem Sonnenlicht aussetzen.
Erste Schritte Picasso ist ein anwendungsfreundlicher, digitaler Foto-Rahmen. Er ermöglicht die Wiedergabe von hochauflösenden Fotos und Filmen, MP3 als Hintergrundmusik und zusammenfassen verschiedener Fotos zu einer Diashow. Er ist kompatibel mit USB Flash Drive, CF-, SD-, MMC- und MS Pro-Karten.
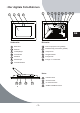
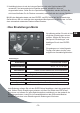
• Der digitale Foto-Rahmen � � � � � � � � � �� �� �� �� DE Vorderseite Rückseite 8 ESC-Knopf (nach Innen gewölbt) Rahmen 9 ENTER-Knopf (nach Außen gewölbt) IR-Empfänger 10 Lautsprecher Frontrahmen 11 Navigationstaste 5 Standfuß 12 Energie-LED 6 Reset-Knopf 13 Energie- u.
Funktionen des digitalen Foto-Rahmens Im Folgenden werden die verschiedene Funktionen und Menüs des Foto-Rahmens vorgestellt. Stellen Sie sicher, dass die nötige Stromversorgung besteht und schalten Sie den Foto-Rahmen auf der Rückseite ein. Es gibt 3 verschiedene Modi die nach dem Starten des Foto-Rahmens und dem erscheinen des “AIPTEK”-Logos aufgerufen werden können. Die Auswahl des Modus hängt von den Einstellungen bzgl. “Auto run” ab und ob sie bereits eine Speicherkarte verwenden. 1.
3. Unabhängig davon ob sie den internen Speicher oder eine Speicherkarte/USB verwenden, wird automatisch eine Diashow gestartet, sobald Sie “Auto run” eingeschaltet haben. Sollte Sie eine Speicherkarte verwenden, werden die Fotos die sich hierauf befinden für die Diashow verwendet, andernfalls die des internen Speichers. Mit Hilfe der Navigationstaste und dem ENTER- und ESC-Knopf auf der Rückseite des Geräts können Sie nun zwischen den angezeigten Menüpunkten navigieren bzw.
• Das Foto-Menü Sobald Sie ein Speichermedium ausgewählt haben stehen Ihnen weitere Funktionen zur Verfügung. Als erstes Symbol in der Reihe des nächsten Fensters finden Sie das FotoMenü. Um sich die auf dem Speichermedium vorhandenen Fotos anzuschauen, wählen Sie das Symbol mit den Navigationsstasten aus und bestätigen Sie mit dem ENTERKnopf. Als nächstes sehen Sie eine Übersicht der zur Verfügung stehenden Fotos.
• Das Musik-Menü Als nächstes Symbol in der Reihe finden Sie das Musik-Menü. Hier können Sie sich die auf dem Speichermedium vorhandenen Musikstücke in einem Mediaplayer wiedergeben lassen. Wählen Sie hierzu das Symbol mit den Navigationsstasten aus und bestätigen Sie Ihre Auswahl mit dem ENTER-Knopf. Sie sehen nun folgendes Fenster.
• Das Film-Menü Auch in dieses Menü gelangen Sie wieder, indem Sie den zugehörige Symbol auswählen und mit dem ENTER-Knopf bestätigen. Ähnlich wie bei der Fotoübersicht werden Ihnen die vorhandenen Filme aufgezeigt (siehe Abbildung). Wählen Sie den gewünschten Film aus und starten Sie ihn mit dem ENTER-Knopf. Auf dem gesamten Bildschirm startet nun die Wiedergabe, die Sie bequem mit dem ENTER-Knopf anhalten und bei erneutem Betätigen weiterlaufen lassen können.
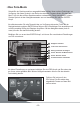
• Der Dateimanager Als vorletztes Symbol in der Reihe finden Sie den Dateimanager. 3 1 4 2 1 Auflistung aller vorhandenen Ordner und Inhalte 2 Die rechts angezeigte Datei wird blau hervorgehoben 3 Verkleinerte Darstellung der ausgewählten Datei 4 Weitere Informationen über die ausgewählte Datei Zuerst wird Ihnen auf der linken Seite eine Übersicht über die vorhandenen Ordner gegeben.
Anhang • Fehlerbehebung Problem Lösung Der Bildschirm bleibt schwarz. Überprüfen Sie die Stromversorgung Es ist keine Speicherkartenauswahl möglich. Kontrollieren Sie, ob die Speicherkarte richtig eingesteck wurde. Es ist keine Funktion mehr möglich oder die Anzeige „friert“ Setzen Sie ihn zurück, indem Sie mit einem spitzen Gegenstand in die Reset-Öffnung drücken. ein.
Foreword Many thanks for buying this product. We have invested much time and effort in its development in order that you may enjoy many years trouble-free with your digital photo frame. Safety Notice 1. Do not drop, puncture or disassemble the digital photo frame, otherwise the warranty will be voided. 2. Avoid all contact with water and dry hands before using. 3. Do not expose the photo frame to high temperature or leave it in direct sunlight. Doing so may damage it. 4. Use the photo frame with care.
Getting Started Picasso is an easy-to-use digital photo frame. It makes it possible to show high resolution photos and films, play MP3 as mood music and combine different photos to a slideshow. It supports USB Flash drive, CF, SD, MMC and MS Pro.
• The digital photo frame � � � � � Front panel � � � � �� �� �� �� Rear panel 1 Screen 8 Esc button 2 Adorning 9 Enter button 3 Remote Control receiving 10 Speaker 4 Front frame 11 Circle button 5 Stand 12 Power LED 6 Reset button 13 Power/LED switch 7 Front-rear frame button Bottom panel �� �� �� �� -3- 14 USB port 15 DC 5V jack 16 CF card port 17 SD/MS Pro/MMC port GB
Functions of the digital photo frame On the following pages the different functions and menus of the photo frame will be presented. Be sure that the necessary power supply is plugged in and then switch the photo frame on. There are 3 different modes after starting the photo frame. The selection of the current mode appears to the setting “auto run” and the existence of a memory card. 1.
3. Independent of the storage device you use, a slideshow will starts automatically, if you have activated the “auto run” mode. If you use a memory card then these photos will be used otherwise those on the internal memory are selected for the slideshow. By using the Circle button and the ENTER and ESC button you can navigate between the shown menu items resp. in case of a automatic slideshow you can stop this. • The Setup Next you should make yourselves familiar with the possible settings.
• The image menu As soon as you selected a storage medium there will be further functions available. As the first symbol of the next window you will see the photo item. In order to watch the images on the storage medium, select the symbol with the circle button and confirm your choice with the ENTER button. Next you have an overview about the available photos. With the circle button and the ENTER button you can select any photo and increase it on the complete size of the display.
• The music menu The next icon you see is the music part. To listen to your favorite music in a mediaplayer. Select the icon with the circle button and confirm your selection with the ENTER button. You will see the following window.
• The movie menu To get to this menu choose the icon movie and and confirm with the ENTER button. Similarly to the photo menuyou get an overview about the existing movies (fig.). Select the preferred movie and start it with the ENTER button. The playback, which you can stop and start comfortably with the ENTER button, will appear on the entire screen. The volume can be adjusted with the circle button (left & right). By doing this a notification appears in the left upper corner.
• The filemanager The item before last is the filemanager item. 3 1 4 2 1 Listing all existing folders and their contents 2 The file that is shown right is blue emphasized 3 Smaller representation of the selected file 4 Further information about the selected file First you get an overview of the existing folders on the right of the screen. If you select one with the circle button (up & down) you can delete/copy it by pushing the ENTER button.
Appendix • Troubleshooting Problem Solution The screen is still black. Please check the power supply. It is not possible to select a memory card. Make sure that the card has been correctly pushed into the slot. The photo frame freezes up itself and there are no more Reset the photo frame by pushing a pointed item in the RESET puncture. function. • Please note: During operation of the digital photo frame you can copy data files from USB port or showing pictures only.
Préface Merci beaucoup pour l’achat de ce produit. Nous avons investi beaucoup de temps et d’efforts dans son développement, afin que vous puissiez jouir sans trouble fonctionnel pendant beaucoup d’années de votre Cadre de Photo Numérique. Indication de sécurité 1. Ne faites pas tomber le cadre de Photo Numérique, ne le perforez pas et ne le démontez pas; ne pas respecter ses consignes annulera la garantie. 2. Évitez tout contact avec l’eau et séchez vos mains avant de l’utiliser. 3.
Premières étapes Le Picasso est un Cadre/ une Armature de Photo Numérique facilement utilisable. Il permet: l’interprétation/la lecture des photos et des vidéos à haute résolution, l’écoute en arrière plan de la musique MP3 et un résumé des différentes photos grâce á une présentation en diaporama. Il est compatible avec l’USB Flash Drive (support usb) et les cartes mémoires CF, SD, MMC et MS Pro.
• Le cadre de photo numérique � � � � � Avant � � � � �� �� �� �� Arrière 8 Bouton ESC Armature 9 Bouton ENTER Receveur IR 10 Haut-parleur Cadre de front 11 Touche de navigation 5 Pied 12 Témoin LED 6 Bouton Reset 13 Commutateur d’alimentation et de LED 7 bouton avant-arrière d’armature 1 Écran 2 3 4 Dessous �� �� �� �� -3- 14 Connexion USB 15 Raccordement d’alimentation en électricité 16 Compartiment de carte CF 17 Compartiment de carte SD/MS Pro/MMC FR
Fonctions du cadre de photo numérique Ci-après, seront présentés les différentes fonctions et les différents menus du Cadre de Photo. Assurez vous que l’alimentation nécessaire en courant existe et allumez le Cadre de Photo grâce au bouton d’alimentation se trouvant sur le dos de l’appareil. Il y a 3 modes différents qui après le démarrage du Cadre de Photo et l’apparition du logo « AIPTEK » peuvent être mis en évidence.
3. Indépendamment du fait que vous utilisez la mémoire interne ou une carte mémoire/ USB, une présentation en diaporama commence automatiquement, aussitôt que vous avez activé la fonction « démarrage automatique ». Si vous êtes entrain d’utiliser une carte mémoire, les photos qui se trouvent là-dessus seront utilisées pour la présentation en diaporama, autrement ce seront celles de la mémoire interne.
• Le menu Photo Aussitôt que vous avez choisi un support de données d’autres fonctions se mettent á votre disposition. Comme premier symbole dans la série de la prochaine fenêtre vous trouvez le menu Photo. Afin de pouvoir regarder les photos existantes se trouvant sur un Support de données, choisissez le symbole avec les touches de navigation et confirmez votre choix avec le bouton ENTER. Vous voyez ensuite un aperçu des photos disponibles.
• Le menu Musique Comme second symbole de la série vous trouvez le menu Musique. Ici, vous pouvez vous faire montrer les morceaux de musique existants sur le support de données et les lire/jouer à l’aide d’un Mediaplayer. Choisissez pour cela le symbole avec la touche de navigation et confirmez votre choix avec le bouton ENTER. .
• Le menu Film Vous parvenez aussi à ce menu en choisissant le symbole correspondant sur l’écran et en confirmant votre choix avec le bouton ENTER. De façon semblable comme avec l’aperçu de photos les films existants vous sont montrés (voir l’illustration). Choisissez la vidéo souhaitée et démarrez la avec le bouton ENTER. Sur la surface totale de l’écran commence la vidéo, dont vous pouvez suspendre le déroulement en appuyant le bouton ENTER et le laisser continuer en appuyant à nouveau ce même bouton.
• Gestionnaire de Fichiers Comme avant dernier symbole de la série vous trouvez le Gestionnaire des Fichiers. 3 1 4 2 1 Énumération de tous les dossiers existants et de leur contenu 2 Le fichier indiqué á droite est mis en évidence avec du bleu 3 Représentation réduite du fichier choisi 4 D’autres informations sur le fichier choisi Sur le côté gauche un aperçu de fichiers existants vous est d’abord montré.
Annexe • Dépannage Problem Solution L’écran reste noir. Vérifier l’alimentation en courant. Impossible de choisir une carte mémoire. Assurez vous que la carte mémoire est bien introduite. Le cadre de Photo s’est „planté“ et aucune fonction n’est Réinitialisez le en appuyant avec un objet légèrement pointu dans l’ouverture Reset du cadre. opérationnelle. • Votre attention s.v.
Bienvenido Muchas gracias por comprar este producto. Hemos invertido muchas horas y esfuerzo en su desarrollo, para que usted pueda gozar por muchos años sin problemas con su marco de la foto digital. Aviso De Seguridad 1. No pinche, no deje caer, ni desmonte el marco de la foto digital, si no la garantía será anulada. 2. Evite todo el contacto con agua y tenga las manos secas antes de usarlo. 3.
Primeros Pasos Picasso es un marco de fotos digital fácil de utilizar. Permite mostrar las fotos y las películas alta resolución , con música MP3 de fondo y permite combinar diversas fotos en una demostración de diapositiva. Apoyada por diversos medios de memoria como el dispositivo USB Flash , y las tarjetas de memoria CF, SD, MMC y MS Pro.
• El marco de la foto digital � � � � � Panel delantero � � � � �� �� �� �� Panel trasero 8 Botón ESC Bordes 9 Botón de Entrada (ENTER) Receptor del mando a distancia 10 Altavoz Marco delantero 11 Circulo o Botón de Navegación 5 Pie de apoyo o soporte 12 Señal de la energía LED 6 Botón Reset 13 Interruptor de energía 7 Botones delantero-trasero de Salida del marco 1 La pantalla 2 3 4 Panel inferior �� �� �� �� -3- 14 Puerto USB 15 DC 5 V (Fuente de energía) 16 Pu
Funciones del marco de la foto digital En las páginas siguientes las diversos funciones y menús del marco de la foto digital serán presentados. Asegurese que existe la fuente de alimentación necesaria y después encienda el marco de la foto. Existen 3 diversos modos de iniciar el marco de la foto digital. La selección del modo actual aparece en la configuración del auto inicio y la existencia de una tarjeta de memoria. 1.
3. Independiente del dispositivo de almacenaje que usted utiliza, comienza automáticamente la demostración de una diapositiva, si usted ha activado el modo función “automatica”. Si usted utiliza una tarjeta de memoria entonces estas fotos serán utilizadas de otra manera y las de la memoria interna se seleccionan para la demostración de una diapositiva.
• Menu Imagen Una vez que se ha seleccionado un medio de almacenamiento, serán disponibles las siguientes funciones. El primer símbolo de la próxima ventana podremos ver el icono de una foto. En la Carpeta para ver el medio de almacenamiento de imágines, con el botón circulo selecciona y confirma con el botón ENTER. En la próxima pre-presentación puede ver cuales son las fotos disponibles.
• Menu Música El próximo símbolo corresponde al icono de la Música, esta opción permite escuchar su música favorita. Para seleccionar el mismo se procede por medio del boton de círculo hacia arriba y abajo y confirmar con el botón ENTER.
• Menu VIDEO Para ir a este menú, seleccionar el ícono y confirmar con el botón ENTER. Similar al menú FOTO, Usted puede tener una pre-imagen de las películas o videos existentes (Fig.) Seleccionar el video deseado y comenzar oprimiendo ENTER. La música de fondo puede detenerla con el botón ENTER, el video se vedrá en toda la pantalla. El control del Volumen se realiza a través del movimiento a izquierda y derecha del botón círculo.
• Administrador de Archivos Es el penúltimo ícono, se encuentra antes del símbolo para la configuración. 3 1 4 2 1 Lista de todos los archivos existentes y de sus contenidos 2 El archivo seleccionado será realzado en azul 3 Pequeña representación de los ficheros seleccionados 4 Informaciones adicionales sobre el fichero o archivo seleccionado Primero veremos una pre-imagen de las carpetas existentes.
Apéndice • Solucion de Problemas Problemas Solucion La Pantalla se queda en negro. Por favor chequear el suministro de energía. No es posible seleccionar un dispositivo de tarjeta de memoria. Controle que la tarjeta ha sido correctamente incorporada. El marco se ha colgado hacia arriba y no hay función. Reajuste el marco de la foto digital, pinchando u oprimiendo el boton RESET.
Benvenuto Molti ringraziamenti per l’acquisto di questo prodotto. Abbiamo investito molto tempo e sforzo nel relativo sviluppo, speriamo che procuri molti anni senza problemi. Cautela 1. Non far cadere, non perfori o non smonti la struttura digitale della foto, altrimenti si annullerà la garanzia. 2. Eviti tutti i contatti con acqua ed asciugarsi le mani prima dell’uso. 3. Non esponga la struttura digitale della foto a temperatura elevata o non la lasciarla alla luce solare diretta.
Primi Passi Picasso è una struttura digitale della foto di facile impiego. Permette mostrare le foto, le pellicole d’alta risoluzione, ascoltare musica MP3 di sottofondo, combina le foto ad una proiezione di diapositive. Sopporta l’azionamento d’USB Flash, e le schede di memorie dei tipi CF, SD, MMC e la MS Pro.
• La struttura digitale della foto � � � � � Pannello anteriore � � � � �� �� �� �� Pannello posteriore 8 tasto d’ ESC 1 Schermo 2 Struttura 9 tasto d’ entrata ENTER 3 Ricevente di telecomando 10 altoparlante 4 struttura anteriore 11 tasto di navigazione 5 Piede base 12 Segnalatore d’ Alimentazione 6 tasto ripristinato 13 Interruttore d’ Alimentazione(ON-OFF) 7 tasto Anteriore- posteriore della struttura Panello inferiore �� �� �� �� 14 Cavo USB 15 DC 5 V (Fonte de
Funzioni della struttura digitale della foto Alle seguenti pagine le funzioni ed i menu differenti della struttura digitale della foto saranno presentati. Sia sicuro che il gruppo d’alimentazione necessario esistesse ed allora inserisse la struttura della foto. Ci sono 3 modi differenti dopo avere iniziato la struttura della foto. La selezione del modo reale compare alla regolazione “auto inizio attivata” e l’esistenza di una scheda di memoria. 1.
3. Indipendente dal dispositivo d’archiviazione che utilizzate, automaticamente inizia a volontà della proiezione di diapositive, se avete attivato “il modo d’auto inizio “. Se usate una scheda di memoria allora queste foto saranno usate al contrario quelli sulla memoria interna, sono selezionati per la proiezione di diapositive.
• Il Menu d’Immagine Non appena avete selezionato uno strumento per memorizzare ci, saranno ulteriori funzioni disponibili. Come il primo simbolo della finestra successiva vedrà l’articolo della foto. Per guardare le immagini sullo strumento di memoria, selezioni il simbolo con il tasto del cerchio e confermi la vostra scelta con il tasto d’ENTER. Dopo avrete una descrizione circa le foto disponibili.
• Il Menu di musica L’articolo che segue è l’icona di musica. Qui potete ascoltare la vostra musica favorita come in un lettore multimediale. Per questo prescelto l’articolo con il tasto del cerchio e conferma la vostra selezione con il tasto d’ENTER.
• Il Menu di film Per ottenere a questo menu dovete scegliere l’icona ed e confermare con il tasto d’ENTER. Similarmente al menu della foto ottenete una descrizione circa i film attuali (fig.). Selezioni il film preferito ed inizio con il tasto d’ENTER. La riproduzione o musica di sottofondo, che potete arrestare confortevolmente ed inizio con il tasto d’ENTER, comparirà sull’intero schermo. Il volume può essere controllato con il tasto del cerchio (di sinistra e di destra).
• L’amministratore dell’archivio L’icona prima dell’ultima è l’articolo dell’amministratore dell’archivio. In primo luogo ottenete una descrizione dei dispositivi attuali a destra dello schermo.
Appendice • Risoluzione dei problemi Problemi Risoluzione Lo schermo è ancora nero. Controlli per favore l’alimentazione d’energia. Non è possibile selezionare una scheda di memoria. Assicuratevi che la scheda è stata spinta correttamente nella scanalatura. La struttura se ha appeso in su in della foto e ci non è più Ripristini la struttura della foto spingendo un articolo aguzzo nella puntura di RISISTEMAZIONE (RESET). funzione.