
Instruction Manual

STEP TWO: SUSPENSION HARDWARE
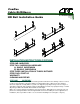
The aluminum rail supplied comes in 10 foot sections. The orientation ( 12 o, clock ) suspen-
sion should be 3” from the diffuser to where the vertical cable, (Speed Link), connects to the
rail support bracket. Rail must be aligned with the centerline of the air flow. Determine the
height of the rail. Rail must be supported level in order for the components to assemble prop-
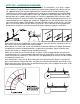
erly. Start from the air handler end of system and support rails with speed links from rail sup-
port up to bar joist, eyebolts, beam clamps, etc. Because applications differ, what the cable
can be anchored to is up to the installer. The supports slide into the top opening of the rail. It is
recommended to use 2 supports per 10 foot rail. Support the next rail and connect it to the pre-
vious with the rail couplers. Rail couplers slip into the center of each end of the rails. Slip Cou-
pler in first rail and secure with zip screw in side of rail. Then slide next rail over coupler and
bump end flush with first rail and secure with zip screw. Repeat this process until done.
When fabric fittings are incorporated in your installation, align rails with the centerline of the sys-
tem. All rails must be installed at the same elevation.
When elbows are used in the system rail should be installed as indicated as above. Rail bends
and precut rail sections will be provided for suspension of the elbows. (Note: rail bends may
come in two sections, a coupler may be needed to connect.)
When tee’s or take offs are used install rails as above. Install rail perpendicular to main rail to
suspend branch runs. To insure proper alignment the main of the fabric system can be installed
to the rail and the air handler first. Then the cross rails perpendicular to the main can be installed
to suspend the branch runs.
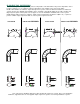
If the take off port is top even all glides will be the same distance of the diffuser. If the take off
port is centered on the side of the main, the glides are normally extended the same level as the
glides of the main duct. Fittings may have quick connect joints such as zippers to ease the instal-
lation and maintenance of the system.
CADDY
SPEED
LINK
ERICO
CADDY
SPEED
LINK
ERICO
CADDY
SPEED
LINK
ERICO