
User Guide

1 – Drain Line Adapter with Push-In Connection (ET109-002/ET112-002)...
ET112-002
Installation Procedures
For Multi Compartment Sinks or Single
Compartment Sink without Disposal
LIST OF PARTS ENCLOSED
1 – 3-Way Repair Tee
3 – Slip Joint (S.J.) Wing Nuts
3 – Slip Joint (S.J.) Beveled Washers
•The ET112-002 provides an IAPMO / UPC listed alternative to the use of the
drain saddle, which is a prohibited fitting in the United States.
• To install the ET112-002 reverse osmosis reject water drain line adapter,
follow these instructions.
Please read the instructions once through before starting.
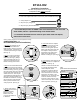
Recommended (Vertical Installation)
1. Measure the midpoint on the
vertical tailpiece between the
basket strainer and the horizontal
waste extension. A minimum of 4”
of uninterrupted tubing is required.
(See Fig. 1)
FIG. 1 FIG. 4
FIG. 5a
FIG. 5b
FIG. 5c
Push tube straight past O-ring
to bottom.
Tube is secured in position.
Push in collet to release tube
2. Cut out 1-1/2-inch of tubing
(3/4-inch on both sides of the
midpoint). (See Fig. 1) Always
ensure that tube ends are cut
squarely and inserted into the
bottom of all slip joint sockets.
3. Slip the nut and beveled washer
over both ends of the pipe. Always
face the beveled side of the washer
towards the fitting. (See Fig. 2) Then
insert the 3-way repair tee, ensuring
that the tube ends seat fully into
sockets of the tee. This may be
accomplished by loosening the nut
joining the horizontal waste ell to
the baffle tee until there is enough
play to bend the waste ell down,
then up into the bottom of the
3-way repair tee. (See Fig. 3)
4. Rotate side outlet of
repair tee to the desired
direction and firmly
tighten top, then
bottom nuts. Now
re-secure the waste ell
to baffle tee.
5. Insert new drain line adapter
with push-in connector into side
outlet of the tee, and rotate
towards incoming 3/8” rejected
water drain tube. Make sure that
the adapter is firmly seated in
the bottom of the socket, then
tightly secure with beveled
washer and wing nut. (See Fig. 4)
6. Insert 3/8-inch drain tube into the
push-in connector to complete the
installation. (See Fig. 5)
NOTE: To install the ET112-002
to a single compartment sink
without disposal, follow
instructions 1-6 above with the
following exception: Once you
have removed 1-1/2-inch of the
tubing from the center of the
tailpiece (Fig. 1), disconnect and
lower the J-bend of the trap.
Insert the 3-way repair tee, then
reconnect the trap. Use a bowl to
catch trap water. (See Fig. 6)
FIG. 2
FIG. 3
FIG. 5
Quick Connect / Push-In Connector
FIG. 6
Cut
1 ½"
Tailpiece
4"
Waste
ell
-OVER-
CONFIGURATION – A