
Installation Guide

www.airkinglimited.com
6728081 Rev. E 9-16 4 of 12
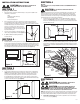
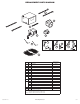
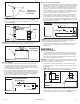
3c. AKLS6H MODELS: Connect the wire harness by plugging the 3 pin quick connect end
into the receptacle located on the side of the wire compartment cover. Confirm that the
5 pin quick connect end is plugged into the receptacle from the blower assembly. These
cords will only fit one way into the receptacles (Figure 13).
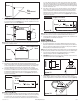
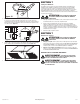
4. Install the grill by squeezing the two ends of the springs together and installing them up
into the slots on the fan’s housing. Push the grill up into position (Figure 14).
5. Restore power and test your installation.
Figure 14
SECTION 7
Setting the Humidistat
This fan may be equipped with a humidity sensor that automatically turns the fan on when
humidity is above set point and off when humidity is at or below set point. If the fan is operating
too long or not enough, first check to see the humidity sensor set point. In cases where the
ambient humidity level of the room rises higher than the preset level, the fan will turn on even if
the room is not occupied. This helps prevent conditions that lead to mold growth.
CAUTION: MAKE SURE POWER IS SWITCHED OFF AT
SERVICE PANEL BEFORE SERVICING THE UNIT.
1. To set the desired humidity level of the room, remove the grill and locate the
dehumidistat dial located on the wire compartment cover.
2. Set the dial to the relative humidity you want the fan to maintain usually between 50 &
80%. Moist climates will require higher settings than dry climates. When the humidity
level of the room is below this setting the fan will remain off. When the humidity level
rises about this setting the fan will turn on and run until the humidity level falls below
this setting.
3. Reinstall the grill and restore power.
SECTION 7
Use and Care
CAUTION: MAKE SURE POWER IS SWITCHED OFF AT
SERVICE PANEL BEFORE SERVICING THE UNIT.
1. Cleaning the Grill: Remove grill and use a mild detergent, such as dishwashing liquid,
and dry with a soft cloth. NEVER USE ANY ABRASIVE PADS OR SCOURING POWDERS.
Completely dry grill before reinstalling. Refer to instructions in Section 6 Finishing the
Installation, to reinstall grill.
2. Cleaning the Fan Assembly: Wipe all parts with a dry cloth or gently vacuum the fan.
NEVER IMMERSE ELECTRICAL PARTS IN WATER.
CALIFORNIA RESIDENTS ONLY:
WARNING: THIS PRODUCT CAN EXPOSE YOU TO A CHEMICAL [OR
CHEMICALS] KNOWN TO THE STATE OF CALIFORNIA TO CAUSE CANCER.
WARNING: THIS PRODUCT CAN EXPOSE YOU TO A CHEMICAL
[OR CHEMICALS] KNOWN TO THE STATE OF CALIFORNIA TO CAUSE
REPRODUCTIVE TOXICITY.
Figure 13