
Instruction Sheet

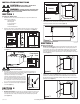
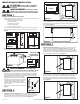


2. Remove grill from carton and open light lens area by pushing in on the two tabs of the
light lens and pulling outward from lens. The lens will swing open on the connector bars.
DO NOT remove the lens from the grill (Figure 12).
3. Install light reflector into grill by lining up the posts on grill with the holes in light reflector
(Figure 13). Raise light reflector and grill up to housing and insert plug from light into
receptacle marked “LIGHT” (located on the side of the wire compartment) and insert plug
from night light into receptacle marked “NIGHT LIGHT”(Figure 11).
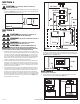
4. Attach light reflector in place with the two screws removed during Step 2 in SECTION 1
Preparing the Unit so grill fits snuggly against ceiling (Figure 14).
CAUTION: FAILURE TO SECURE THE REFLECTOR SCREWS MAY
RESULT IN A RATTLING OR HUMMING NOISE.
5. Install the appropriate bulbs (not included) specific to your model:
AK965L: Install a 100 watt maximum, type A19 medium base incandescent bulb (not
included) and a 7 watt maximum type C7 (candelabra base) night light (not included).
WARNING: TO REDUCE THE RISK OF FIRE, USE ONLY TYPE
GU24 BULB, 26 WATT MAXIMUM.
AKF965: Install an Air King model 26SBL or a compatible GU24 26 watt self ballasted
lamp (not included).
6. Close the light lens and secure in place by swinging back into position and snapping the
tabs in place (Figure 12).
7. Restore power and test your installation.
www.airkinglimited.com
965 Rev. F 6-16 4 of 12
SECTION 7
Operating Instructions
WARNING: HEATER MUST BE PROPERLY INSTALLED
BEFORE IT IS USED.
1. Each function of the heater is controlled via the wall switches described in SECTION 5 of
these instructions.
2. This unit utilizes a thermal fuse located in the heater wiring. DO NOT tamper with this device.
3. This unit utilizes an automatic resetting limit control located on the heating element
housing. DO NOT tamper with this device.
SECTION 8
Maintenance Instructions
CAUTION: MAKE SURE POWER IS SWITCHED OFF AT
SERVICE PANEL BEFORE SERVICING THE UNIT.
NOTE: Grill and fan should be cleaned when dust accumulation becomes visible on grill or
every 6 months.
1. Cleaning the Grill: Reverse the instructions in Section 6 Completing the Installation to
remove grill. Use a mild detergent, such as dishwashing liquid, and dry with a soft cloth.
NEVER USE ANY ABRASIVE PADS OR SCOURING POWDERS. Completely dry grill before
reinstalling. Refer to instructions in Section 6 Completing the Installation, to reinstall grill.
2. Cleaning the Fan Assembly: Wipe all parts with a dry cloth or gently vacuum the fan.
NEVER IMMERSE ELECTRICAL PARTS IN WATER.
NOTE: Motors in this unit are permanently lubricated. Do not add lubricant.
WARNING: ANY OTHER SERVICING TO THIS UNIT SHOULD BE
PERFORMED BY AN AUTHORIZED SERVICE REPRESENTATIVE.
CAUTION: ALLOW BULB TO COOL BEFORE REPLACING.
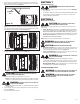
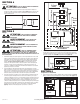
3. Changing the Light Bulb: Disconnect power to the unit. Open light lens by pushing in on
the two tabs of light lens and pulling outward from lens. The lens will swing open on the
connector bars. DO NOT remove the lens from the grill (Figure 12).
Incandescent Bulb (AK965L): Unscrew bulb from lamp holder and replace with a 100
watt maximum, type A19 medium base incandescent bulb.
WARNING: TO REDUCE THE RISK OF FIRE, USE ONLY TYPE
GU24 BULB, 26 WATT MAXIMUM.
Fluorescent Bulb (AKF965): Remove lamp by gently twisting the lamp base
counterclockwise while applying outward pressure. Installation is the reverse of removal.
Replace with Air King model 26SBL or a compatible GU24 26 watt self ballasted lamp.
Night Light (AK965L, AKF965): Unscrew night light bulb from socket and replace with a
7 watt maximum type C7 (candelabra base) night light bulb.
CALIFORNIA RESIDENTS ONLY:
WARNING: THIS PRODUCT CAN EXPOSE YOU TO A CHEMICAL [OR
CHEMICALS] KNOWN TO THE STATE OF CALIFORNIA TO CAUSE CANCER.
WARNING: THIS PRODUCT CAN EXPOSE YOU TO A CHEMICAL
[OR CHEMICALS] KNOWN TO THE STATE OF CALIFORNIA TO CAUSE
REPRODUCTIVE TOXICITY.
Figure 12
Connector
Bar
Tabs
Post
Hole
Post
Figure 13
Screws
Figure 14