
Instructions / Assembly


INSTALLATION INSTRUCTIONS
CAUTION:
MAKE SURE POWER IS SWITCHED OFF AT SERVICE PANEL BEFORE
STARTING INSTALLATION.
SECTION 1
Preparing the Range Hood
1. Unpack hood from the carton and confirm that all pieces are present. In addition to the
range hood you should have:
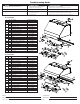
1 - Package containing:
3 - 2" wood screws
8 - 3/4" wood screws (36" models: 12)
4 - wall anchors (36" models: 6)
2 - Grease Filters
2 - Fluorescent Lamps
1 - Wood mounting strip
1 - Instructi on/Safety Sheet
NOTE: Some hoods may be shipped with a protective plastic adhered to the range hood. It is
recommended to leave this in place during installation to protect the hood from scratching.
Remove when the installation is complete.
2. Remove the wood mounting strip attached to the back of the hood and place in a secure
place. You will need this strip later (Figure 1).
CAUTION: MAKE SURE POWER IS SWITCHED OFF AT SERVICE PANEL BEFORE
STARTING INSTALLATION.
CAUTION: WHEN CUTTING OR DRILLING INTO WALL DO NOT DAMAGE
ELECTRICAL WIRING AND OTHER HIDDEN UTILITIES.
SECTION 2
Measuring the Hood Installation
NOTE: Before installing any parts or marking locations, make sure you have decided how your
ducting will be installed. You may need to modify the wall structure as described in
Section 5 Wall Mounted Canopy Installation or Section 6 Under Cabinet Canopy Installation.
1. The measurements for the installation will be custom to your specific location and will be
dependent upon exact ceiling height, distance mounted from cooking surface, cabinet or
soffit heights, along with other factors and will need to be adjusted accordingly. The
hood must be mounted a minimum of 24" and a maximum of 36" from the cooking
surface (Figure 2).
www.airkinglimited.com
A111597015 Rev. F 6-12 2 of 12
NOTE: When determining the height of the canopy from the cooking surface, be sure to take
into consideration items such as back splashes with shelves and other accessories that might
need more clearance under the canopy.
SECTION 3
Measuring the Installation
1. Determine where the top of the hood will be located within your installation (Figure 3).
2. Attach the wood strip that was removed in Section 1 Step 2 in place and confirm it is
level. Secure in place using the provided 2” mounting screws making sure the screws
are fastening into the wall studs (Figure 4).
CAUTION: DUE TO THE WEIGHT OF THE HOOD, ENSURE THE WOOD STRIP IS
FASTENED TO ALL AVAILABLE WALL STUDS (A MINIMUM OF 2 STUDS FOR 30" HOODS,
MORE AS THE WIDTH INCREASES) NOT INTO THE DRYWALL ALONE.
CAUTION: SUPPORT THE HOOD UNTIL IT IS FULLY INSTALLED ONTO THE WOOD
MOUNTING STRIP.
3. Rest the cavity in the back side of the hood on the wood strip and mark drilling locations
on the wall for wall anchors on the bottom rear of the hood then remove hood and install
wall anchors (Figure 5).
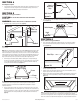
Wood
Mounting
Strip
Hood
Screw
Figure 1
Wood Mounting Strip
Optional Backsplash
Hood
Soffits or Cabinet
Ceiling
Figure 2
Cook Top
.75"
Figure 4
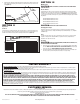
Wall Studs
Wood Mounting Strip
Screw
Hood
Figure 5
Wall Anchor
.75"
Wall Studs
Figure 3
Cook Top
Wood Mounting Strip
15.5"
or
7.5"
24" - 36"
Bottom of Hood
24" to 36"