
Instructions / Assembly


SECTION 4
Installing Backsplash
1. If an optional BS Series backsplash will be utilized, this must be installed before the hood
canopy because the hood canopy will cover the backsplash mounting screws. Refer to
the instructions included with the backsplash for installation.
SECTION 5
Wall Mounted Canopy Installation
CAUTION: ALL DUCTING MUST COMPLY WITH LOCAL AND NATIONAL
BUILDING CODES.
WARNING: TO REDUCE THE RISK OF FIRE, USE ONLY METAL DUCTWORK.
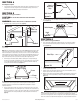
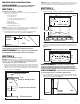
1. Determine the type of ducting you will require (Figure 6).
NOTE: A minimum of a 8” diameter outlet adapter & ducting is required to achieve the
proper air flow.
NOTE: When the duct termination is similar to that shown in Figure 6 (passing through the wall
to which the hood is mounted) the installation requires special consideration. Depending upon
where the wall studs are located, it may be necessary to cut one or more of the wall studs and
install a header and footer to transfer the load to the adjacent studs. Additional studs may need
to be framed into the opening to attach dry wall or secure the hood. If this is your situation Air
King recommends that you hire a professional and comply with all applicable codes.
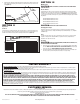
2. Install the proper sized outlet adapter (available separately) to the hood by matching up
the four holes on the flange of the adapter to the four corresponding holes on the hood and
secure in place with the provided screws. Ensure an airtight seal around the adapter by
securing all connections with ducting tape (Figure 7).
NOTE: If the recommended, optional BS Series backsplash is being installed it must be
installed before the hood canopy because the hood canopy will cover the backsplash
mounting screws. Refer to the instructions included with the backsplash for complete
installation instructions.
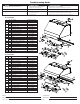
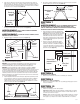
3. Rest the cavity in the back side of the hood on the wood strip and secure hood to wood
strip with the included 3/4" screws through the holes in the back of the hood that line up
with the wood strip (use 6 screws for 30" and 36" widths and 8 screws for larger widths)
Secure the bottom of the hood by installing the screws provided into the wall anchors
(Figure 8).
www.airkinglimited.com
A111597015 Rev. F 6-12 3 of 12
4. Connect the ducting to the outlet adapter and damper. Secure in place using tape to seal
all joints (Figure 9).
SECTION 6
Under Cabinet Canopy Installation
1. If the canopy will be installed under cabinets that have a recessed bottom, it will be
necessary to install wood mounting strips (not included) so the canopy will mount
properly (Figure 10).
2. The thickness of the strips should be the same as the recess of the cabinet and they
should be approximately 2” wide.
3. Install the strips using appropriate length wood screws (not included). Make sure the
strips line up to the holes in the top of the canopy.
4. Mark the location where the outlet adapter (available separately) will be located on the
cabinets and cut a hole approximately 1” larger on all sides than the outlet adapter
(Figure 11).
NOTE: If the recommended, optional BS Series backsplash is being installed, use the template
to locate and drill the appropriate holes for mounting. The back splash must be installed
before the hood canopy because the hood canopy will cover the backsplash mounting screws.
Refer to the instructions included with the backsplash for complete installation instructions.
Figure 6
Wall Cap
Outlet
Adapter
Roof Cap
Horizontal
Vertical
Figure 7
Hood
Screw
Flange
Outlet Adapter
Figure 8
Hood
Screw
Wood
Mounting
Strip
Wall Anchor
Hood
Outlet Adapter
Damper
Ducting
Figure 9
Figure 10
Wood Strip
Figure 11
Hole