
Use & Care Guide


Models AK80/90/110/130
Fire Rated Housing
If you discover any missing components or damage call 1-800-
465-7300 between 8:00 am and 3:30 pm eastern time Monday
to Friday
Read and save these instructions
IMPORTANT SAFEGUARDS
• WARNING: Disconnect the power before beginning this
installation
• WARNING: To reduce the risk of fire or electric shock or
injury to persons observe the following:
Do not use this fan with any solid-state speed
control device.
Use this unit only in the manner intended by the
manufacturer.
Before servicing or cleaning the unit, switch
power off at the service panel. To prevent power
from being switched on accidentally when the
service disconnecting means cannot be locked
securely, fasten a prominent warning device, such
as a tag to the service panel.
Installation work and electrical wiring must be done
by qualified person(s) in accordance with all
applicable codes and standards, including fire-rated
construction.
When cutting or drilling into wall or ceiling, do
not damage electrical wiring or other hidden
utilities.
Ducted fans must always be vented to the
outdoors.
Do not install this fan in a ceiling thermally
insulated to a value greater than R-40
• WARNING: Do not use in kitchens.
• WARNING: Sufficient air is needed for proper combustion and
exhausting of gases through the flue (chimney) of
fuel burning equipment to prevent back drafting.
Follow the heating equipment manufacturer’s
guidelines and safety standards such as those
published by National Fire Protection Association
(NFPA), and the American Society for Heating,
Refrigeration and Air Conditioning Engineers
(ASHRAE), and local code authorities.
• CAUTION: For general ventilating use only. Do not use to
exhaust hazardous or explosive materials and
vapors.
• Acceptable for use over a tub or shower when installed in a
GFCI protected branch circuit.
• Never place a switch where it can be reached from the tub or
shower.
Air King exhaust fans designed for installation in fire rated
ceilings are sold and shipped with the components broken
down. For Models AK80, AK90, AK110 and AK130 the
components are shipped in 4 pack housings, 4 pack fire
dampers, and 4 pack motor/blade/grills (MBG’s). It is best to
complete the installation of the housing during the rough-in
stage of construction.
Housing Installation, Electrical
Wiring, and Ducting
This housing will require at least 10” of clearance above the
ceiling. Check the area from above and plan the ducting and
wiring routes. A standard wall switch carrying the appropriate
electrical rating can be used to control the on/off operation of
the fan. The AK80, AK90, AK110 and AK130 housings are
designed to mount between 16” on centre joists using the
supplied mounting rails, or from above by using the key hole
slots on the sides of the housing (ceiling brackets not supplied).
Disconnect the power before beginning this installation.
All wiring and ducting must comply with local and national
codes.
Read these instructions fully before beginning this installation.
1. Install mounting rails on the housing and locate the housing
between the joist. Line up the housing on the joist so that the
fan/light housing will be flush with the finished ceiling. Nail or
screw the housing in place securely.
2. Remove one of the electrical knockouts and connect an
approved electrical connector to the housing.
3. Run wiring, one neutral (white), one hot (from switch), and
green or bare ground wire to the fan. Make the connections
to the fan’s receptacle and connect the ground wire to the
green ground screw in the fan housing.
4. Once the electrical connections are made, connect the
ducting. Models AK80, AK90, AK110 and AK130 come
complete from the factory with a 4” duct adapter. Ducted fans
must always be vented to the outdoors.
Motor, Blade, and Venturi Installation
Once the housing is mounted and wired and ducting is run,
you may install the motor, blade and venturi into the housing.
Leave the grills in the MBG carton until needed so they do
not get damaged.
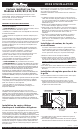
1. Remove the venturi mounting screw from the housing.
2. Insert the venturi (with motor and blower housing factory
mounted) into the housing at approximately a 45˚ angle, with
the notched side of the venturi down. As you are installing
the venturi, plug the motor into the receptacle. The notched
side of the venturi should be locked under the lances in the
housing (fig. 1).
3. Once in place secure the venturi with the screw removed
earlier.
4. Rotate the blade to make sure it spins freely.
Fire Damper and Grill Installation
After the venturi is mounted and the motor is plugged into the
receptacle, you can install the fire damper.
1. Push the damper up into the housing. There are rails for
mounting screws on two sides of the damper and rails with
slots to accept the grill springs on the other two sides.
2. With the damper in place secure it using the four screws
packaged with the damper.
3. To mount the grill, squeeze the grill springs together and
insert them into the slots provided on the damper rails.
AIR KING LIMITED, 110 GLIDDEN ROAD, BRAMPTON, ONTARIO, CANADA; TEL. 905-456-2033, 1-800-465-7300, FAX. 905-456-1015
INSTALLATION
INSTRUCTIONS
210572035 0010-15A2
Joist
Finished
Ceiling
Fan Housing
Housing Flush with
Finished Ceiling
Fan's Venturi, Motor
& Blower Assembly
Notched side of
Venturi lock
under Housing Lances
Fan Mounting
Bracket
Fig. 1