
Installation Guide

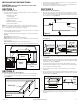


CAUTION: ALWAYS DUCT THE FAN TO THE OUTSIDE THROUGH A WALL
OR ROOF CAP.
SECTION 8
Finishing the Installation
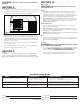
1. Reinstall the bottom cover removed in Section 1 using the 4 screws to secure it in place.
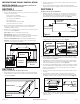
2. Reinstall the filters by fitting them into the channel on either side of the hood and
pushing upwards on them until they are secured in place (Figure 11).
3. Install the included 26 watt fluorescent lamp into the lamp holder by lining up the
pins on the lamp base to the socket of the lamp holder and gently turning clock-
wise until the lamp snaps into place and is firmly seated in the lamp holder. Install
a 4 watt maximum type C7 (candelabra base) night light (not included) into the side
lamp holder and reinstall the lamp cover by squeezing the cover’s sides and fitting
them into the slots on the hood.
4. Turn switches to the “OFF” position and restore power. Test that the light and the
fan are operating properly.
5. If there is any vibration noise, check for the source and try to tighten fasteners or
adjust the tape to make a tighter connection or seal.
SECTION 9
Controls
Your Range Hood is equipped with two rotary switches with one controlling the lighting and
the other controlling the exhaust fan. The light switch has three positions, Main Light ( ● ),
Night Light ( ◗ ), and OFF ( ■ ). The fan switch has four positions, High, Medium, Low, and OFF.
www.airkinglimited.com
5084457 Rev. G 1-11 4 of 12
SECTION 10
Maintenance
CAUTION: MAKE SURE POWER IS SWITCHED OFF AT SERVICE PANEL
BEFORE SERVICING THE UNIT.
Filters
1. Grease Filter - Included with your range hood are aluminum grease filters that
should be washed at least once a month. The filters are dishwasher safe and
should be washed in a mild soap or detergent. Reverse the instructions in the
“Finishing the Installation” section of the instructions to remove filters. If the grease
filters become damaged, replace with Air King Model GF-01 Grease Filters.
2. Charcoal Odor Filter - If you have installed the optional charcoal odor filters, they
cannot be washed and must be discarded and replaced when they become notice-
ably dirty, have stopped filtering the odors, or at least once per year. Replace with
Air King Model CF-01 Odor Filters.
Changing the Lamp
1. Remove the lamp cover by squeezing in the sides. The cover is held in place by
tension against the tabs on the hood.
Fluorescent Lamp: Remove lamp by gently twisting counterclockwise to release
the lamp from the base. Installation is the reverse of removal. Replace with Air King
model 26SBL or a compatible 26W GU24 lamp.
Night Light: Unscrew night light bulb from socket and replace with a 4 watt maximum
type C7 (candelabra base) night light bulb.
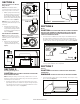
Fuse
1. To replace the fuse, turn the fuse cap located next to the wire connector counter
clockwise and pull out. Replace with only a 125-Volt fuse, 1-1/2 Amp Max. Reinstall
the fuse back into the hood (Figure 7).
Cleaning
CAUTION: DO NOT USE GASOLINE, BENZINE, THINNER, HARSH CLEANSERS,
ETC., AS THEY MAY DAMAGE THE RANGE HOOD.
1. Clean your range hood with a mild detergent, such as dishwashing liquid, and dry with
a soft cloth. NEVER USE ANY ABRASIVE PADS OR SCOURING POWDERS. Completely
dry before restoring power. NEVER IMMERSE ELECTRICAL PARTS IN WATER.
2. The fan assembly can be vacuumed when build up (dirt, lint, etc.) accumulates
over time. The fan is permanently lubricated and does not require oiling.
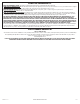
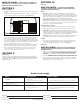
Troubleshooting Guide
Trouble Probable Cause Suggested Remedy
1. Hood does not operate when the switch is on. 1a. A fuse may be blown or a circuit tripped. 1a. Replace fuse or reset circuit breaker.
1b. Wiring is not connected properly. 1b. Turn off power to unit. Check that all wires are connected.
2. Hood is operating, but air moves slower than normal. 2. Obstruction in the exhaust ducting. 2. Check for any obstructions in the ducting including filter.
3. Hood is making a rattling noise. 3a. Filters are loose. 3a. Turn off power to unit. Check that all filter are securely in place.
3b. Duct connection is loose. 3b. Turn off power to unit. Check that duct connection is tight.
Installer: Installation Date:
Place of Purchase: Model Number:
Channel
Figure 11