
Use and Care Guide


SECTION 5
Attaching the Chimney
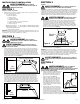
1. Mark the location for the vertical chimney bracket:
If using the upper chimney section: 9-3/4"
If not using upper chimney section: 15-3/4"
2. If installing onto drywall, drill holes into wall using a 3/16" drill bit. Install wall anchors into
the drilled holes (one for each hole). Secure bracket into place with (2) provided #6 x 1"
screws. If installing into other material (brick, cement, plaster, etc.) choose an appropriate
fastner capable of supporting the weight of the chimney (Figure 6).
3. Press in appropriate tabs on lower chimney section (section with vent holes). If using the
upper chimney, press in tabs in middle of the chimney (Position A), otherwise press in tabs
at top of the chimney (Position B). Press in tabs at the bottom of the chimney so there is
approximately 1/4" of clearance (Figure 7).
NOTE: If the top chimney section (included) will be installed, slide the top section inside of the
bottom section at this point.
3. Slide chimney in place so top tabs of the chimney are secured in place on the indents of the
vertical chimney bracket and the backside of the chimney fits between the hood and the wall
with the bottom tabs overlapping the back lip of the hood (Figure 8).
www.airkinglimited.com
6728027 Rev. T 3-17 3 of 12
4. To install the upper section, mark the location of the included horizontal mounting bracket
using the bracket as a template. Make sure the bracket is level and in line with the bottom
section. The height will be dependent on your installation requirements. Make sure the slots
in the side of the chimney will match the holes in the mounting bracket. If installing onto
drywall, drill holes into wall using a 3/16" drill bit. Install wall anchors into the drilled holes
(one for each hole). Secure bracket into place with (2) provided #6 x 1" screws. If installing
into other material (brick, cement, plaster, etc.) choose an appropriate fastner capable of
supporting the weight of the chimney (Figure 9).
5. Raise top chimney in place over horizontal mounting bracket and secure in place with
the two included #6 x 3/8" screws (Figure 9).
SECTION 6
Finishing the Installation
1. Install the appropriate filters.
Charcoal Filters: If the range hood will be run ductless, remove and discard the grease
filters that were included with the unit and install model BCCF-02 charcoal filters instead.
Grease Filters: If the range hood will be vented to the exterior of the home, install the
grease filters supplied with the hood by sliding tab at rear of filter into slot in hood.
While holding in handle of filter, lift filter into place and release handle. the filter should
snap securely into place (Figure 10).
Figure 7
A A
B B
Details of duct collar, ducting, and electrical have been
omitted from drawing for clarity purposes.
Figure 8
Figure 9
Mounting
Bracket
Side View
Vertical Chimney
Bracket
9-3/4"
or
15-3/4"
Details of duct collar, ducting, and electrical have been
omitted from drawing for clarity purposes.
Figure 6
Figure 5
Supply from house
Black
Neutral (White)
Ground (Green or Bare)
Hood
Black
Neutral (White)
Green
Filter
Figure 10