
User's Manual


17
Technical Support
1-800-248-0892
Ext. 2
Troubleshooting Guide
Minimum Air Pressure
Checking for Leaks
1.
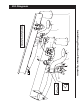
If there is a problem with the air fi tting:
a. Check the air line connection by defl ating the
spring and removing the line by pulling the
collar against the fi tting and pulling fi rmly on
the air line. Trim 1” off the end of the air line.
Be sure the cut is clean and square. Reinsert
the air line into the push-to-connect fi tting.
b. Check the threaded connection by tightening
the swivel fi tting another
1
/2 turn. If it still leaks,
defl ate the air spring, remove the fi tting, and re-
coat the threads with thread sealant. Reinstall
by hand tightening as much as possible, then
use a wrench for an additional two turns.
1. Spray all connections and the infl ation valves with
a solution of
1
/5 liquid dish soap and
4
/5 water to
check for leaks. You should be able to spot leaks
easily by looking for bubbles in the soapy water.
2. After the test, defl ate the springs to the minimum
pressure required to restore the Normal Ride
Height, but not less than 10 p.s.i.
Fixing Leaks
3. IMPORTANT: Check the air pressure again
after 24 hours. A 2 to 4 p.s.i. loss after initial
installation is normal. Retest for leaks if the
loss is more than 5 lbs.
2. If there is a problem with the infl ation valve:
a. Check the valve core by tightening it with a valve
core tool.
b. Check the air line connection by removing the
air line from the barbed fi tting. CAUTION: Do
not cut it off. This will usually nick the barb
and render the fi tting useless. Cut air line off
a few inches in front of the fi tting and use a pair
of pliers or vise-grips to pull/twist the air line off
the fi tting.
3. If the preceding steps have not resolved the problem,
call Air Lift Technical Service at 1-800-248-0892 for
assistance.